Everything she covered, taught rather than listed.
The full Lecture Focused guide, with every figure and diagram from
her slides. Hover any dotted term for its definition; search the glossary
from the box up top when an abbreviation stops you.
10 units18 figures— termsCh. 28 · 32
UNIT 1
Gas Exchange & the Oxyhemoglobin Dissociation Curve
Covers: Respiratory Failure and ARDS deck, slides 3–6 · Lecture 1 · Lewis's Ch. 32 for gap-fill
1.1 The Normal Gas Exchange Unit
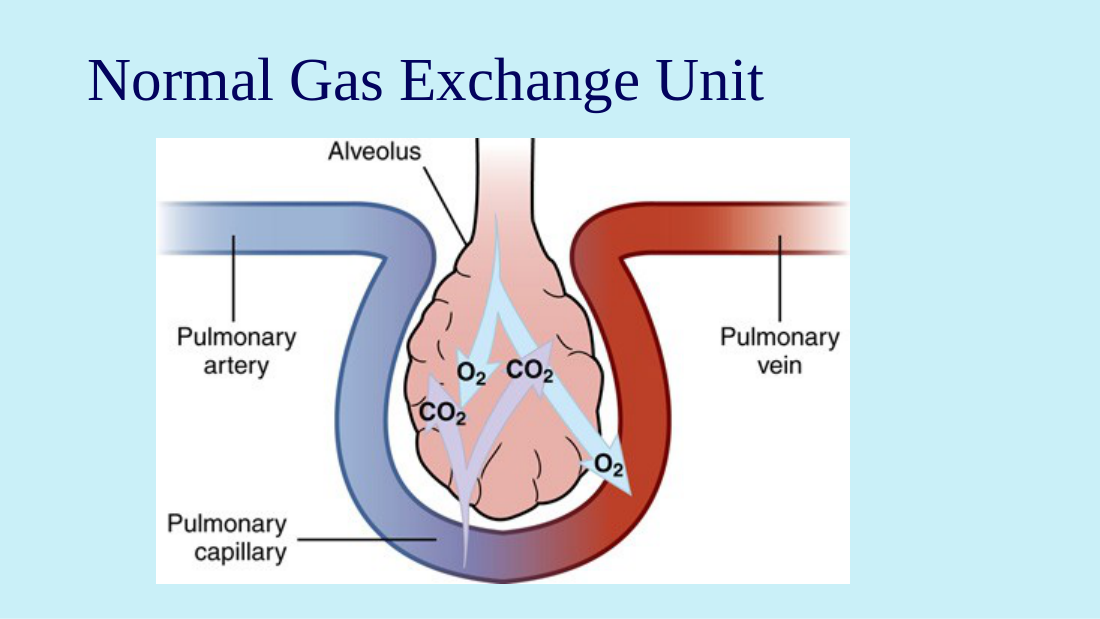
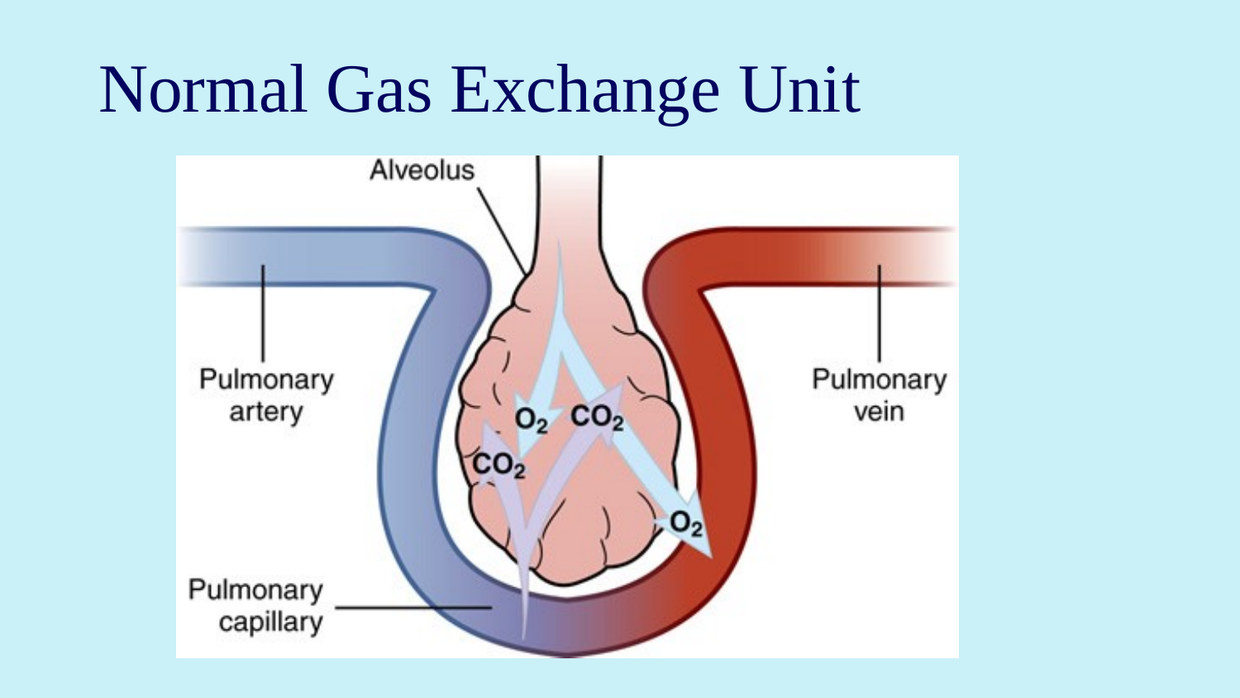
She opens the entire module here, and she opens it by walking the blood through. Deoxygenated blood arrives from the right heart through the pulmonary artery and enters the pulmonary capillary that wraps the alveolus. At the capillary, carbon dioxide leaves the blood and enters the alveolus to be exhaled, and oxygen leaves the alveolus and enters the blood. Newly oxygenated blood returns to the left heart through the pulmonary vein.
The thin white space between the alveolus and the capillary is the alveolar-capillary membrane. Every respiratory problem in this module is, at bottom, a problem with that membrane or with what is on either side of it: fluid in the alveolus, a clot in the capillary, a membrane that has grown too thick, or a set of alveoli that have collapsed.
Her normal gas exchange unit. Trace the direction of flow: pulmonary artery in (deoxygenated), gas exchange at the alveolar-capillary membrane, pulmonary vein out (oxygenated). Fix this picture — she returns to it for V/Q mismatch, shunt, diffusion impairment, and ARDS.
1.2 Oxygenation Is Blood Flow; Ventilation Is Airflow
This is her organizing frame for the whole module, and it is worth more than it looks. Oxygenation is the process of delivering oxygen to the body's tissues — think of it as blood flow. Ventilation is the process of moving air in and out of the lungs — think of it as airflow.
1.3 SaO2 and PaO2 — Two Different Measurements
The curve only makes sense once these two are separate in your head, and she takes real time to separate them.
Oxygen saturation (SaO2 / SpO2) — the amount of oxygen bound to hemoglobin and being carried to the tissues. This is what the pulse oximeter on the finger reads. It is a percentage.
Partial pressure of oxygen (PaO2) — the oxygen not bound to hemoglobin, dissolved and available in the plasma. It tells you how much oxygen is actually available for binding. Normal 80–100 mm Hg.
She adds a point the slide leaves out: PaO2 can only be measured with an arterial blood gas. A pulse oximeter cannot give it to you. That is why the diagnostic workup for respiratory failure always includes ABGs and not just continuous pulse oximetry — the oximeter tells you about the hemoglobin, the ABG tells you about the blood.
Each hemoglobin molecule has four binding sites for oxygen. Her arithmetic, spoken and not on the slide: if three of the four sites are occupied, that hemoglobin is 75% saturated. Saturation is simply the fraction of available sites that are filled, averaged across all the hemoglobin in the sample.
1.4 Cooperativity and Affinity
Cooperativity is the reason the curve is S-shaped rather than straight. When one oxygen molecule binds to a hemoglobin, the molecule changes shape slightly and the remaining sites become easier to fill. More oxygen is attracted and wants to bind. Her image for it: think of the additional oxygen molecules as followers — one binds and the others want to follow.
Affinity is the word for how tightly hemoglobin holds oxygen. High affinity means hemoglobin grabs oxygen readily and is reluctant to let go. Low affinity means it binds less eagerly and releases more easily. Every shift in the curve is a change in affinity, and every consequence follows from whether the change makes loading or unloading easier.
1.5 Left Shift and Right Shift
Hold one idea steady and the rest follows: the shift is named for which way the curve moves, and what matters clinically is what happens at the tissues.
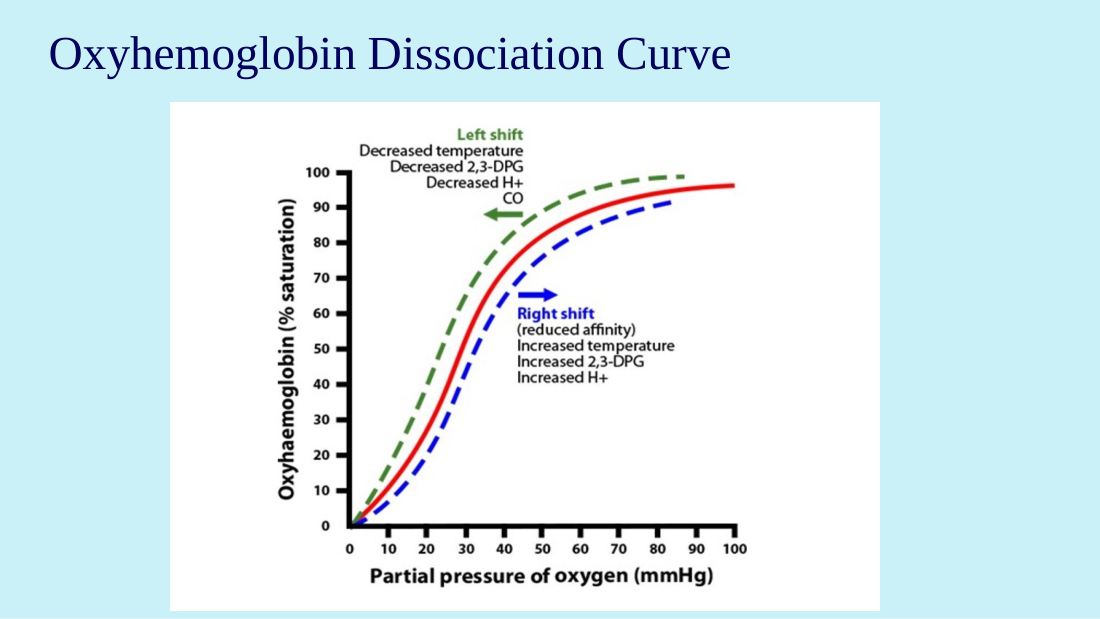
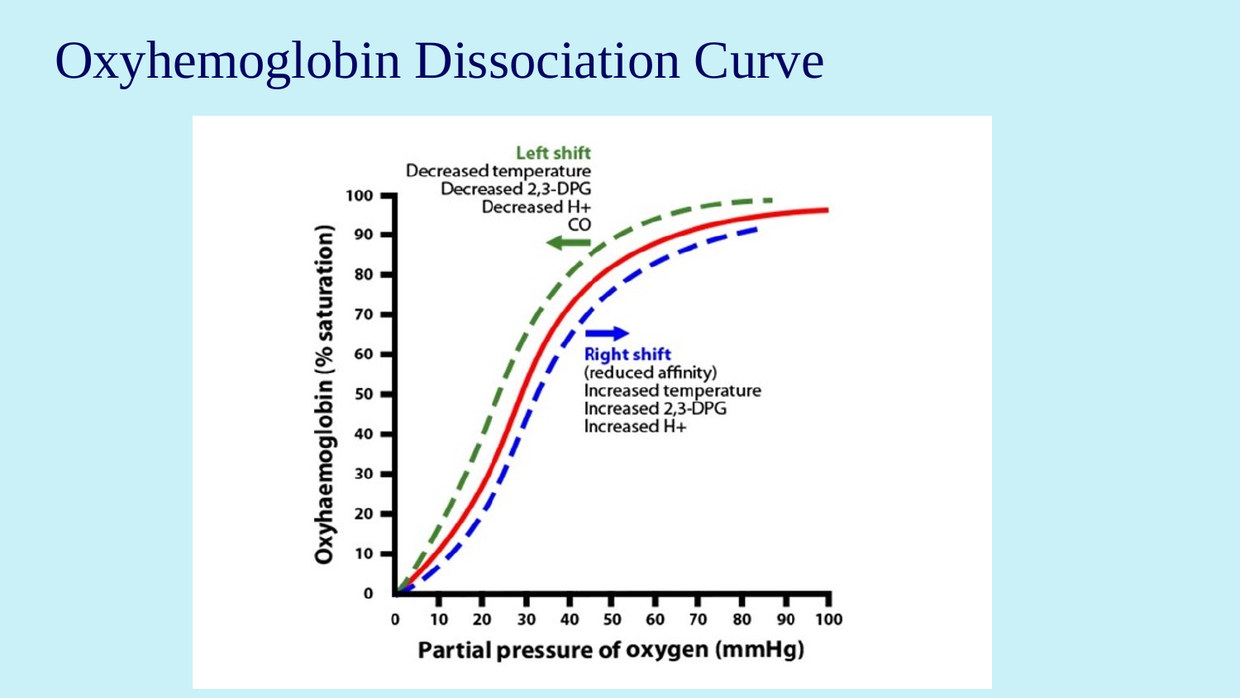
Left shift — hemoglobin has increased affinity for oxygen. It binds oxygen more avidly, so unloading at the tissue is harder. Less oxygen is released for use. Loading in the lung is easy; delivery is the problem.
Right shift — hemoglobin has decreased affinity for oxygen. It holds oxygen more loosely, so unloading is easier and more oxygen becomes available to the tissues.
Her oxyhemoglobin dissociation curve, with the normal line and both shifts plotted. Read the vertical axis as saturation and the horizontal axis as PaO2. At any given PaO2, the left-shifted curve sits higher — more oxygen still bound, less delivered.
She also points students to a video she uploaded to the Canvas module site for this curve, saying it can be confusing. If the shift logic does not settle from the slide alone, that video is her own recommended route.
1.6 What Causes a Shift
Her slide gives four factors for the right shift and then says the left shift is a decrease in all of the same four. That symmetry is the efficient way to learn it — memorize one column and invert.
Factor
Right shift (unloads easily)
Left shift (holds on)
CO2
↑ CO2
↓ CO2
pH
Acidosis (↓ pH)
Alkalosis (↑ pH)
2,3-DPG
↑ 2,3-DPG
↓ 2,3-DPG
Temperature
↑ temperature (fever)
↓ temperature
2,3-DPG is a molecule inside the red blood cell that regulates how readily hemoglobin releases oxygen to the tissues. Her definition is the one to use: it does not carry oxygen, it governs the handoff.
Covers: Respiratory Failure and ARDS deck, slides 7–17 · Lecture 1 · Lewis's Ch. 32 (pp. 672–681) for gap-fill
2.1 What Acute Respiratory Failure Is
Acute respiratory failure occurs when oxygenation, ventilation, or both are inadequate. Not enough oxygen is transferred into the blood, or not enough CO2 is removed from the lungs, or both at once.
Two definitions carry the rest of the unit:
Hypoxemia — a decrease in arterial oxygen: a fall in PaO2 and in SaO2. It results from conditions that interfere with the diffusion of oxygen.
Hypercapnia — an increase in arterial CO2 (PaCO2). It results from insufficient CO2 removal.
She stops on these two words and says outright that these are two definitions to know, because they are what the two classifications of respiratory failure are named after. Get the vocabulary exactly right before going further — hypoxemia and hypoxia are different words for different things (§2.9), and hypercapnia is a synonym for neither.
2.2 The Two Classifications
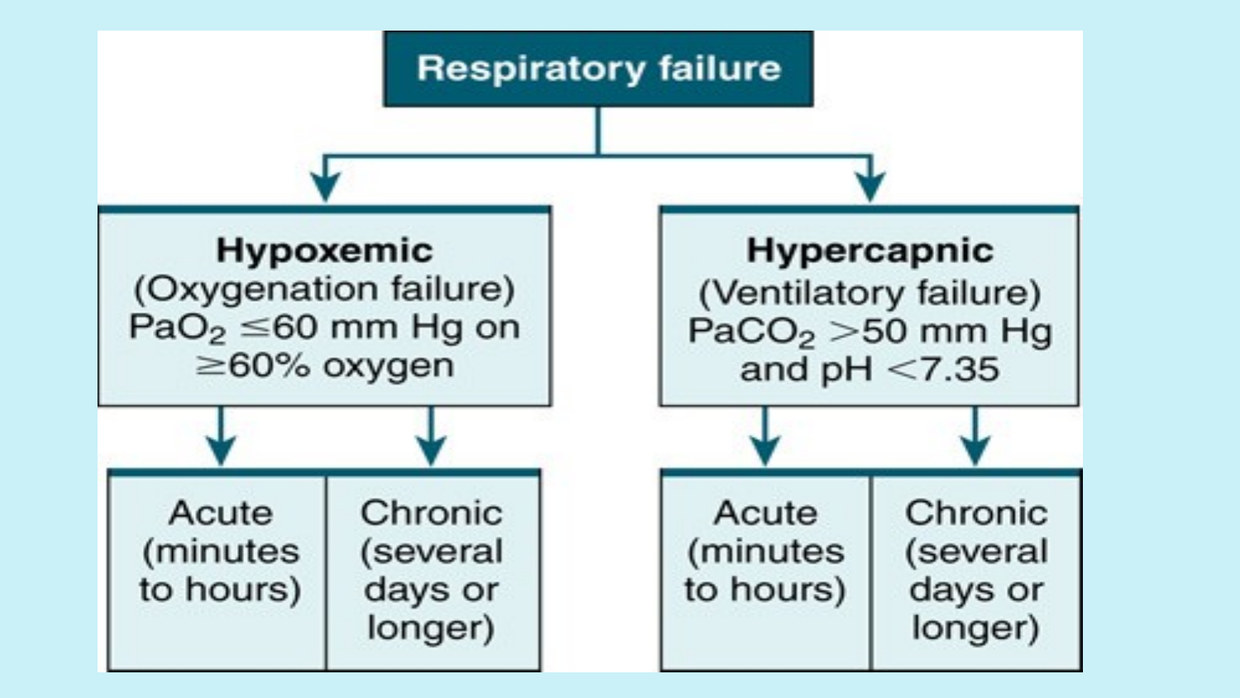
Her classification slide is the single most testable slide in deck one, because everything downstream sorts into these two columns. Learn the numbers first — the numbers are the definitions.
Hypoxemic respiratory failure
Hypercapnic respiratory failure
Also called
Oxygenation failure
Ventilatory failure
Defining numbers
PaO2 <60 mm Hg with a normal or slightly subnormal PaCO2
PaCO2 >50 mm Hg, with hypoxemia and/or acidemia (pH <7.35)
Core problem
Inadequate exchange of oxygen between the alveoli and the pulmonary capillaries
Insufficient CO2 removal, so PaCO2 climbs
What the number tells you
There is not enough oxygen in the arterial blood
The body will compensate for a while, then cannot, and acidemia worsens
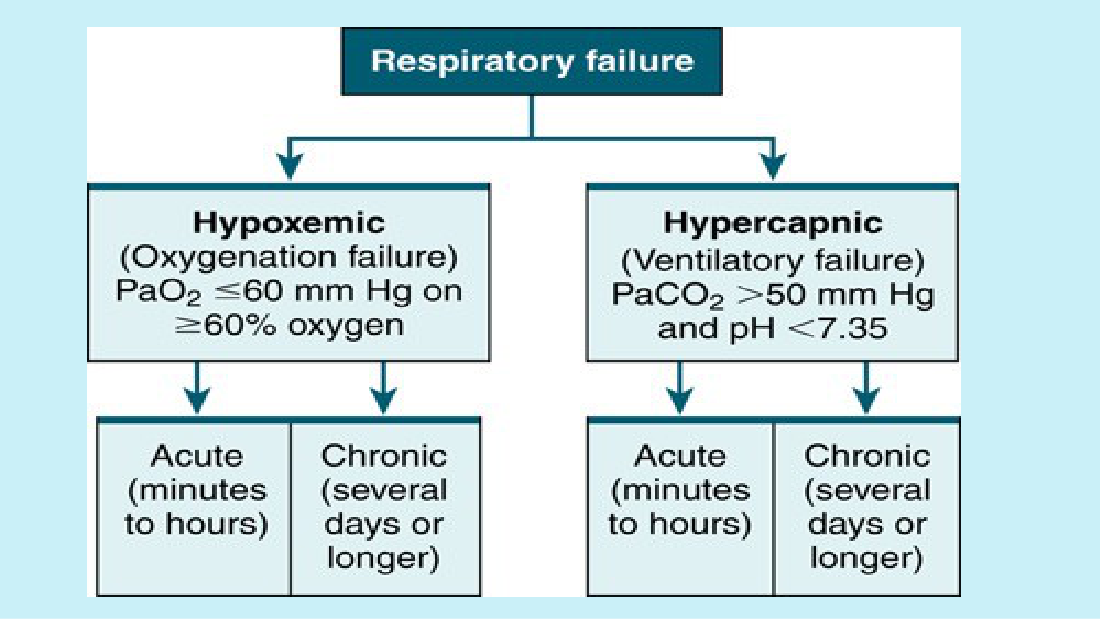
Each type further divides into acute and chronic. Her flowchart slide is that whole structure on one page, and it is worth reproducing from memory.
Her classification flowchart. Respiratory failure splits into hypoxemic (PaO2 ≤60) and hypercapnic (PaCO2 >50, pH <7.35), and each of those splits again into acute and chronic. If you can redraw this tree with the numbers on it, §2.2 is done.
2.3 Acute, Chronic, and Acute-on-Chronic
Chronic respiratory failure develops over days to weeks. The patient is usually more stable, because time has let the body compensate for small, subtle changes. It is usually not immediately life-threatening. The classic example is COPD — a patient who has lived with chronic respiratory failure for years, managed with medications.
Acute failure, by contrast, develops over minutes to hours or a day or two, and the compensation has not had time to build. The chapter adds the clinical texture her slides do not: in acute failure expect hemodynamic instability (tachycardia, hypotension), increased respiratory effort, and a decreased level of consciousness, and expect that urgent intervention is needed.
2.4 Hypoxemic Mechanism 1 — V/Q Mismatch
Four mechanisms can cause hypoxemic respiratory failure. She teaches them in order and the order is worth keeping: V/Q mismatch, shunt, diffusion impairment, alveolar hypoventilation.
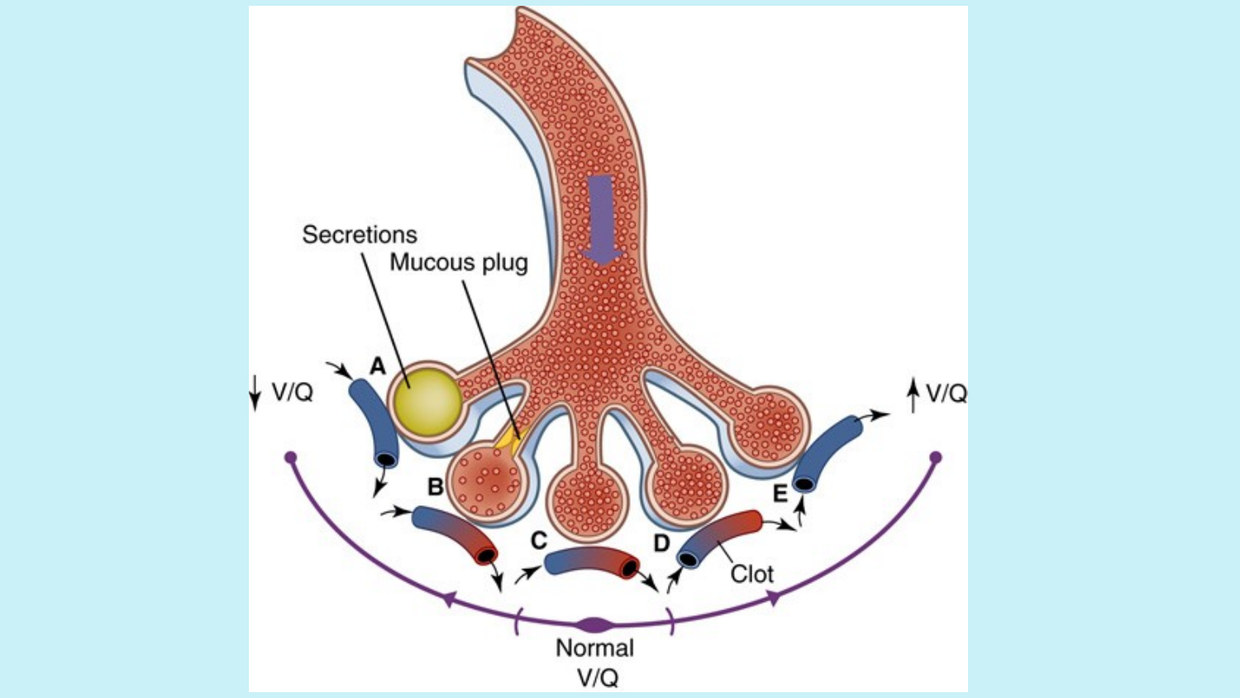
In normal lungs the amount of blood perfusing the lungs and the amount of gas reaching the alveoli are almost identical. Her regional detail, which is on the slide and is examable: the base of the lungs has less ventilation than perfusion, and the apex has more ventilation than perfusion. Those two regional imbalances offset each other, so the net effect across the whole lung is close to a match.
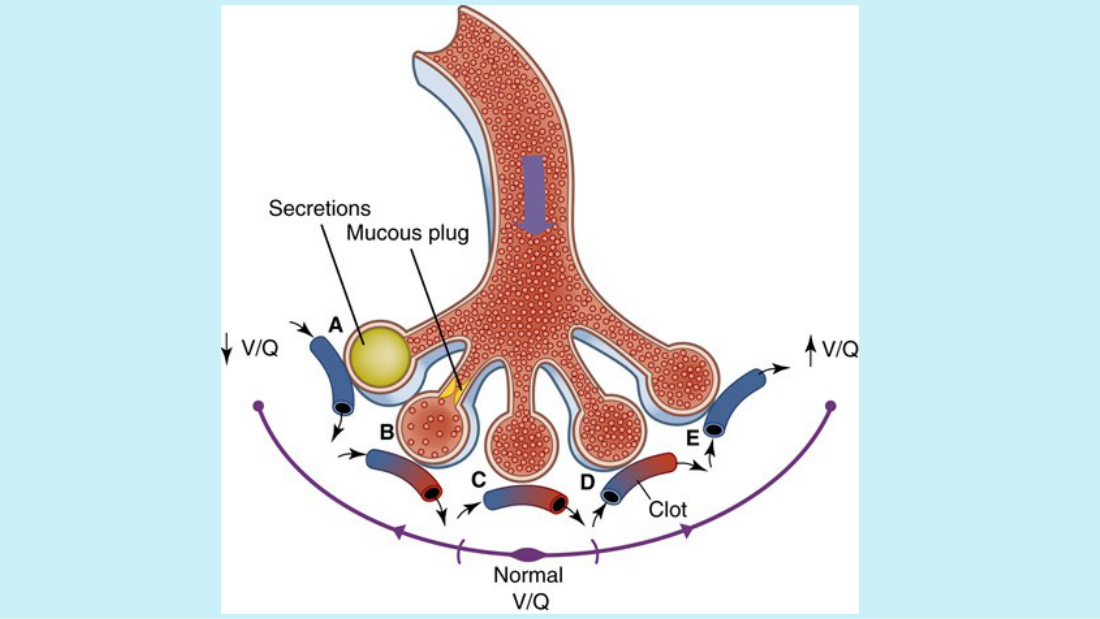
A mismatch happens when one side of that pairing is disturbed. Her causes: increased secretions in the alveoli or the airways, or bronchospasm — so COPD, pneumonia, and asthma. She then splits the concept into its two directions using the picture:
A ventilation problem. Something fills or blocks the alveolus — pus, blood, fluid, or a mucus plug. Perfusion through the capillary underneath is still fine, but the gas exchange cannot happen because the air side is blocked.
A perfusion problem. The alveolus is normal and ventilating well, but a clot in the capillary — a pulmonary embolism — prevents blood from reaching it. Gas exchange happens for whatever blood arrives, but not enough blood arrives.
Her V/Q mismatch slide, four panels. Left: alveolus filled with secretions — a ventilation problem with intact perfusion. Next: a smaller mucus plug, the same problem less severely. Then a normal V/Q unit for comparison. Right: a clot in the capillary — a perfusion problem with intact ventilation.
Treatment of V/Q mismatch: treat the cause. If it is a pulmonary embolism, treat the embolism; if it is secretions from pneumonia, treat the pneumonia. Add oxygen therapy, frequent ABGs, and continuous assessment of the patient's status including pulse oximetry.
2.5 Hypoxemic Mechanism 2 — Shunt
A shunt occurs when blood exits the heart without participating in gas exchange. The blood bypasses the exchange process entirely. There are two types.
Type
What is happening
Her example
Anatomic shunt
Blood passes through an anatomic channel inside the heart and bypasses the lungs altogether
Ventricular septal defect — a hole letting blood cross from one ventricle to the other
Capillary shunt
Blood flows through the pulmonary capillaries without taking part in gas exchange, because the alveoli are filled with fluid
Pneumonia
Treatment: oxygen therapy alone is not effective at increasing PaO2 when the hypoxemia is due to shunt. These patients often need mechanical ventilation with a high FiO2.
2.6 Hypoxemic Mechanism 3 — Diffusion Impairment
Gas exchange is impaired by any process that damages the alveolar membrane or affects blood flow through the capillaries. Two routes to it:
The membrane thickens. Pulmonary fibrosis, ARDS, and interstitial lung disease make the alveolar-capillary membrane thicker and fibrotic, which slows gas transport.
The alveolus fills. Pulmonary edema — accumulation of fluid, white blood cells, or protein in the alveoli — decreases gas exchange.
The classic sign is hypoxemia that worsens with activity and is better with rest. Her explanation of why is the part the slide leaves out, and it is the part that makes the sign answerable in any wording.
Alveolar hypoventilation is a decrease in ventilation that increases the PaCO2. Her causes: CNS problems, chest wall dysfunction, acute asthma, and restrictive lung disease.
This is mainly a mechanism of hypercapnic failure — it is the one item that appears on both lists — but it contributes to hypoxemia as well, which is why it sits fourth on the hypoxemic list.
2.8 The Mechanisms Rarely Act Alone
Her slide ends the four mechanisms with one line: it is rare that respiratory failure is caused by a single mechanism. She then works a full example that the slide does not contain.
2.9 From Hypoxemia to Hypoxia
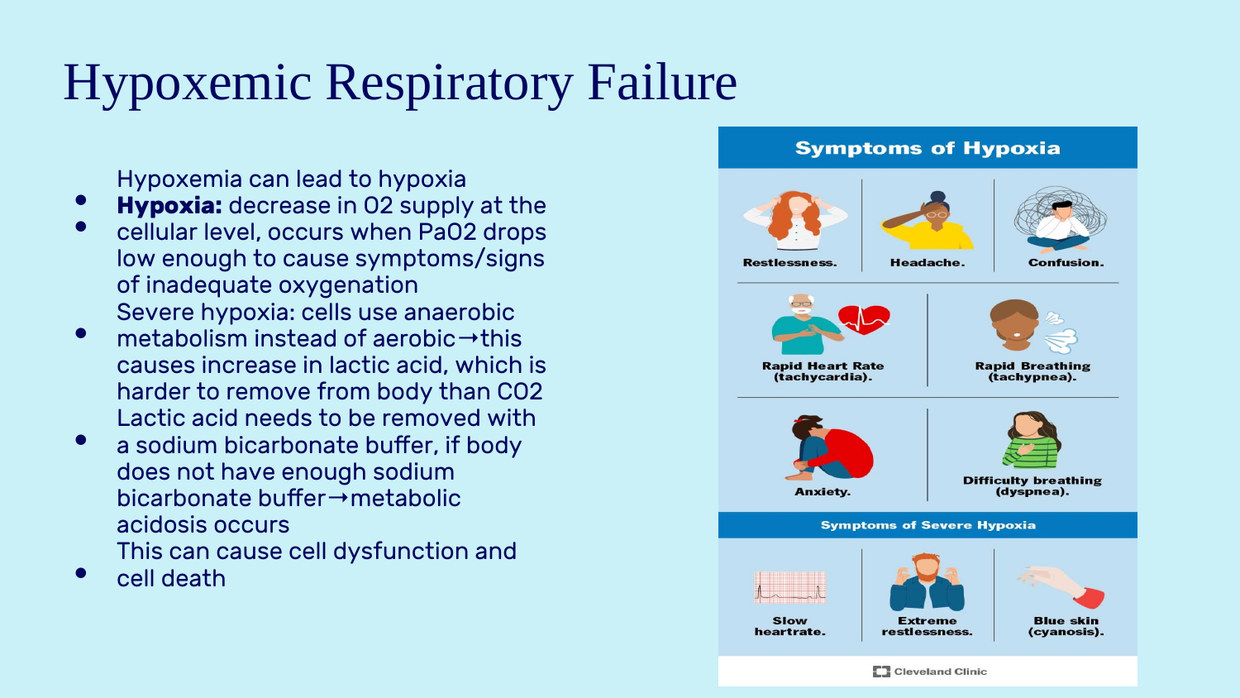
Hypoxemia can lead to hypoxia, and the two words are not interchangeable.
Term
What it means
How it is measured
Hypoxemia
A decrease in the oxygen available in the arterial blood — a low PaO2
Arterial blood gas
Hypoxia
A decrease in oxygen supply at the cellular level, occurring when the PaO2 drops low enough to produce signs and symptoms of inadequate oxygenation
Assessed clinically; oxygen saturation and the patient's presentation
When hypoxia becomes severe, cells shift from aerobic to anaerobic metabolism. That shift produces lactic acid, which is harder to remove from the body than CO2 because it must be buffered with sodium bicarbonate. If the body runs out of bicarbonate buffer, metabolic acidosis develops, and left uncorrected it causes cell dysfunction and cell death.
Her infographic of the symptoms of hypoxia mapped onto the body. Note the split she teaches: restlessness, confusion, rapid breathing, dyspnea and anxiety early; slower heart rate, extreme restlessness and cyanosis as it becomes severe.
2.10 The Four Causes of Hypercapnic Failure
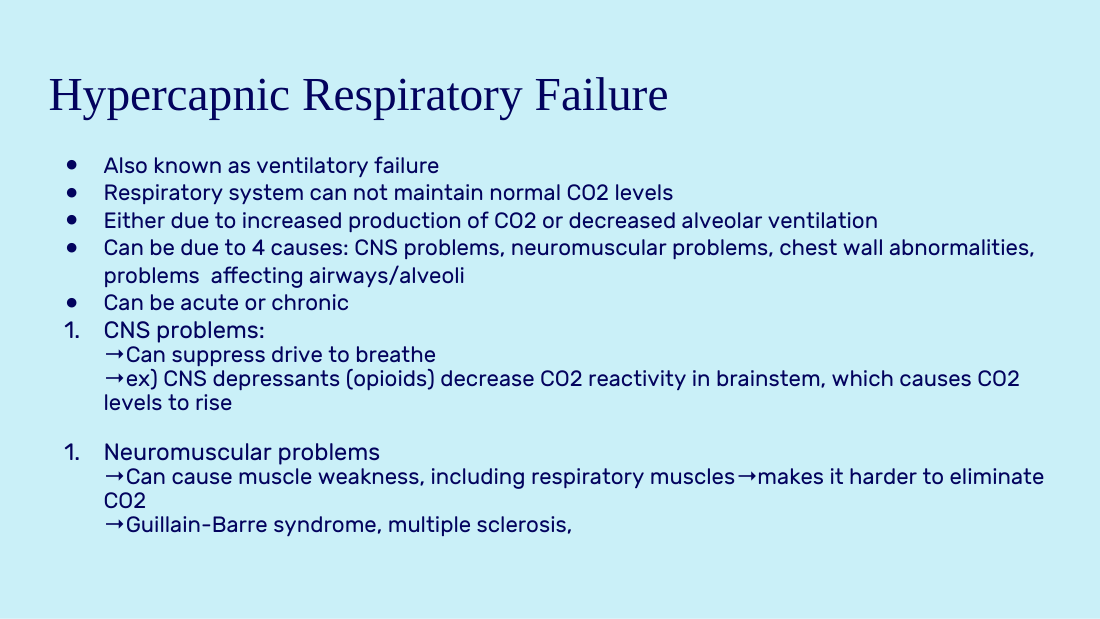
Hypercapnic failure — ventilatory failure — means the respiratory system cannot maintain a normal CO2 level, either from increased CO2 production or from decreased alveolar ventilation. Her slide gives four categories of cause. This is the mirror of the four hypoxemic mechanisms and should be learned as a matched pair with them.
Category
Mechanism
Examples
1. CNS problems
The drive to breathe is suppressed. CNS depressants decrease CO2 reactivity in the brainstem, so CO2 levels rise
Opioids and other CNS depressants; brainstem injury
2. Neuromuscular problems
Muscle weakness includes the respiratory muscles, making it harder to eliminate CO2
Guillain-Barré syndrome, multiple sclerosis
3. Chest wall abnormalities
The rib cage cannot expand normally, so lung expansion is limited
Obesity; flail chest from multiple rib fractures
4. Airway and alveolar problems
Increased airway resistance and air trapping raise the work of breathing until the respiratory muscles fatigue
COPD, asthma, cystic fibrosis
Work of breathing (WOB) is the effort the respiratory muscles must make to inhale air into the lungs. In category 4 it is the whole story: the patient has to push air against increased resistance and against air already trapped in the alveoli, the muscles fatigue, and ventilatory failure follows.
She explains air trapping in a way the slide does not. Normally exhalation empties the lungs; in air trapping some air is left behind after each breath. That makes the next breath harder to take deeply, and over time the lungs become overinflated, which further limits ventilation.
2.11 Why the Body Tolerates CO2 Better Than Low Oxygen
Her slide ends the hypercapnia section with a comparison that explains a great deal of COPD management: the body will tolerate increased CO2 better than decreased oxygen.
Covers: Respiratory Failure and ARDS deck, slides 18–25 · Lecture 1 · Lewis's Ch. 32 (pp. 681–686) for gap-fill
3.1 What Determines the Clinical Picture
Her slide gives three variables, and they explain why two patients with identical ABGs can look completely different. The signs of respiratory failure are related to:
the extent of the change in PaO2 and PaCO2,
the speed of that change, and
the patient's ability to compensate for it.
When compensatory mechanisms fail, respiratory failure occurs. Everything you assess is really an assessment of where the patient is on that compensation curve.
3.2 Mental Status Changes Come First
One of the first signs of hypoxemic acute respiratory failure is a change in mental status.Restlessness, confusion, and agitation suggest inadequate oxygen delivery to the brain.
3.3 Hypoxemia and Hypercapnia — Manifestations Side by Side
Her slide separates the two lists, and side by side is the way to hold them. Notice that the mental-status column is shared but arrives by different routes.
Hypoxemia
Hypercapnia
Respiratory
Accessory and intercostal muscle use, nasal flaring, dyspnea, tachypnea
Confusion, restlessness, agitation — the earliest signs
Morning headache, decreased level of consciousness, progressive somnolence
Respiratory rate
Increased
Often decreased
Her one-line rule for the hypercapnic column: a morning headache and a low respiratory rate with a decreased level of consciousness may indicate problems with CO2 removal. That triad is the signature of a patient retaining CO2 overnight.
She explains pursed-lip breathing beyond the slide, which lists only the words. Patients with COPD do it because it slows the respiratory rate, increases the time available for expiration, and prevents the smaller bronchioles from collapsing. It is a self-taught form of positive expiratory pressure, and the reason it raises saturation is that a longer expiration empties trapped air.
3.4 Reading the Patient — Position and Speech
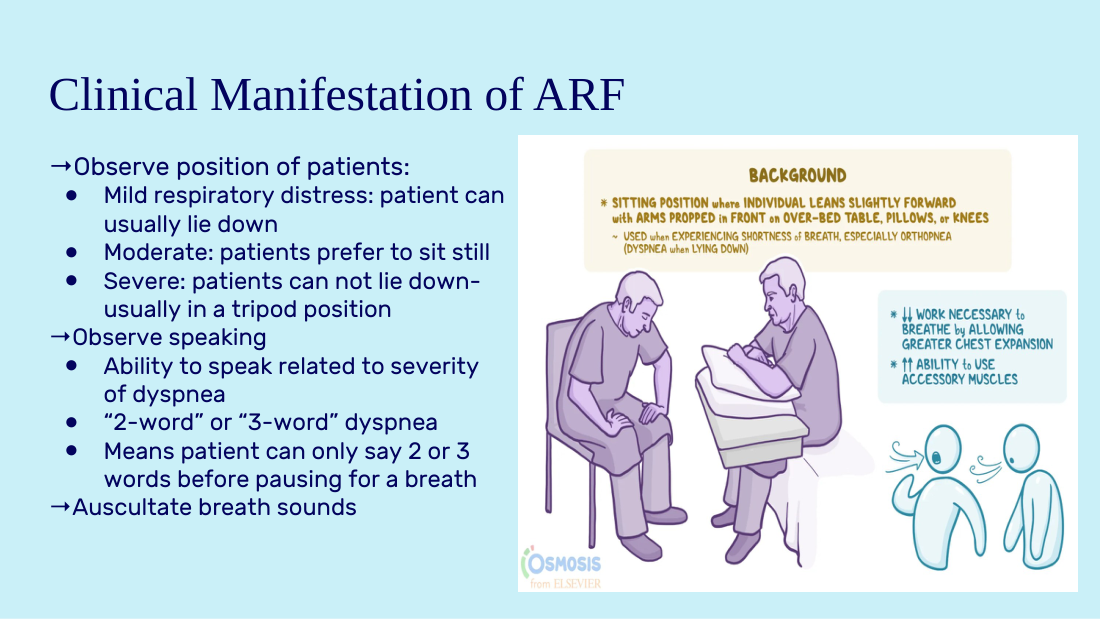
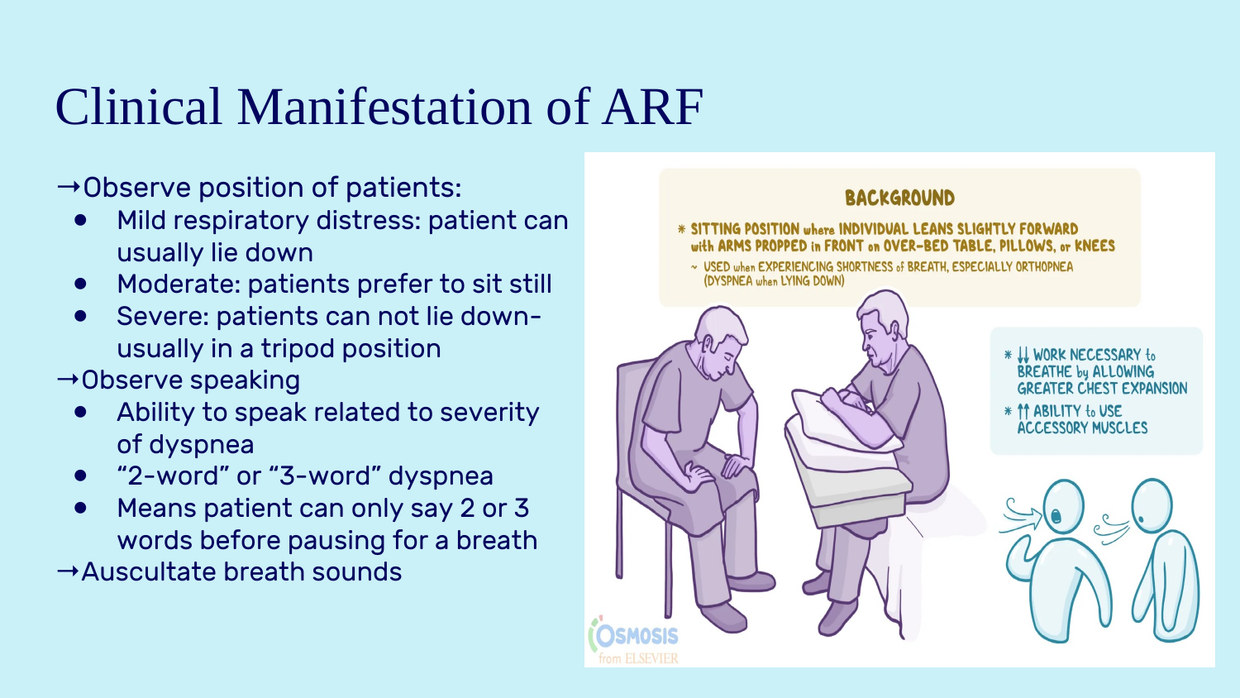
Her slide turns assessment into three quick observations that cost nothing and grade severity before any equipment is involved.
Observation
What it tells you
Position — can lie down
Mild respiratory distress
Position — prefers to sit still
Moderate distress. She adds that this is especially true in diffusion impairment, where activity worsens hypoxemia
Position — cannot lie down, tripod
Severe distress
Speech — "2-word" or "3-word" dyspnea
The patient can say only 2 or 3 words before pausing for a breath. The fewer the words, the more severe the dyspnea
Breath sounds
Auscultate for diminished areas, wheezing, or anything suggesting a blockage that is causing the failure
Her positioning slide, including the tripod position. Tripod is not a comfort preference — it is a severity marker, and she explains the mechanism below.
3.5 Diagnostic Studies
Her list, with what each one is actually for:
Study
What it gives you
Chest x-ray
Shows the cause of the failure — pneumonia, fluid in the lungs, atelectasis
ABG
Ventilation (PaCO2), oxygenation (PaO2), and acid-base balance (pH, bicarbonate). The only way to get a PaO2
Pulse oximetry
Oxygenation status, indirectly and continuously
CBC, electrolytes, urinalysis
Supporting data; anemia limits oxygen carriage regardless of lung function
EKG
Dysrhythmias from hypoxemia and acidosis
Blood / sputum culture
Identifies the organism when infection is the cause; can identify tuberculosis
CT scan of chest or V/Q scan
Assesses for pulmonary embolism
End-tidal CO2 (EtCO2)
Trends in ventilation for the patient on mechanical ventilation
3.6 Nursing Management by Severity
Severity
Management
Mild to moderate ARF
Oxygen administration through a high-flow device; noninvasive ventilation such as BiPAP
Severe ARF
ICU care; mechanical ventilation will likely be needed; continuous pulse oximetry and BP monitoring; frequent ABGs; central or mixed venous O2 saturation; central venous pressure (CVP) monitoring
She adds a practical layer: respiratory therapy manages the ventilators at most sites, so nursing's job is to notice change and communicate it. Her instruction is to remain alert to subtle changes and communicate effectively with the care team — the provider and the respiratory therapist both.
3.7 Patient Goals and Prevention
Her five patient goals, which double as the evaluation criteria:
Independently maintain a patent airway.
Absence of dyspnea, or recovery to the baseline breathing pattern.
Effective cough, able to clear secretions.
Normal ABG values, or values within the patient's own baseline.
Breath sounds within the patient's baseline.
Notice that three of the five are written as within the patient's baseline rather than as normal values. For a COPD patient a "normal" ABG is neither achievable nor the target.
Prevention is where nursing has the most leverage. Her targets are atelectasis, pneumonia, and the complications of immobility, and her interventions are deep breathing, incentive spirometry, and early ambulation, plus optimizing hydration and nutrition. Her at-risk examples: the elderly patient sitting in bed most of the day, and the postoperative patient who is neither breathing deeply nor walking.
3.8 Oxygen Therapy — Goal and the Lowest Effective Dose
The goal of oxygen therapy is to correct hypoxemia. The rule that governs how you do it: administer oxygen at the lowest possible FiO2 that achieves an acceptable saturation.
FiO2 is the fraction of inspired oxygen — the percentage of the air the patient is breathing that is oxygen. Her reference point: a normally breathing person on room air is at about 21% FiO2.
Monitor the response through mental status, ABGs, and respiratory rate. The chapter adds the interpretive rule: a trend toward a normal PaO2 tells you the patient is responding to oxygen.
3.9 Complications of Prolonged High-Concentration Oxygen
Oxygen is a drug, and her slide treats it as one. Three mechanisms to be able to explain, not just name:
Oxygen toxicity
High oxygen levels generate oxygen free radicals, which cause inflammation and cell death by disrupting the alveolar-capillary membrane. She adds the downstream consequence: this produces pulmonary edema and hypoxemia — the treatment starts causing the disease.
Absorption atelectasis
Alveoli normally contain oxygen, CO2, and nitrogen. Nitrogen is inert — it does not get absorbed, and its bulk is what holds the alveolus open. When a patient breathes very high concentrations of oxygen, oxygen replaces the nitrogen in the alveolus. The oxygen is then absorbed into the blood, and with no nitrogen left to hold the shape, the alveolus collapses. That collapse worsens the hypoxemia you were treating.
The other effects of prolonged exposure
Increased pulmonary capillary permeability.
Decreased surfactant production, and surfactant inactivation.
Fibrotic changes in the alveoli.
She defines surfactant here rather than waiting for ARDS: it is a lubricating substance in the alveoli that lets them open and close smoothly. Losing it stiffens the lung. That definition carries straight into Unit 4.
3.10 COPD and the Oxygen Target
This is her most fully developed clinical teaching point in the ARF section, and the numbers are examable in both directions.
Patient
Saturation target
Most patients
SaO2 >92%, or PaO2 >60 mm Hg
Longstanding COPD
Providers are often satisfied with SpO2 >88%
The reason is CO2 narcosis. Chronic hypercapnia blunts the response of the chemoreceptors to high CO2 as a respiratory stimulant. Give a chronic retainer a lot of supplemental oxygen and the drive to breathe falls further, so CO2 accumulates beyond even their usual baseline, and respiratory failure follows.
3.11 Mobilizing Secretions
Retained secretions can worsen or cause acute respiratory failure, because they limit the movement of oxygen into the alveoli and the removal of CO2. Her methods:
Proper positioning — position the patient with ARF upright, with the head of the bed elevated at least 30 degrees.
Effective coughing.
Chest physiotherapy. She describes what she has seen: the respiratory therapist percusses areas of the chest, or applies a vest that vibrates to break secretions loose.
Suctioning — covered in detail with the ventilated patient.
Humidification, which makes secretions less thick and easier to remove.
Hydration.
Early ambulation when possible, which opens the lungs and helps the patient cough secretions up.
3.12 Drug Therapy
Her four goals of drug therapy: reduce airway inflammation and bronchospasm, relieve pulmonary congestion, treat infection, and reduce anxiety, pain, and restlessness.
Purpose
Drug
Key points
Relieve acute bronchospasm
Short-acting bronchodilator — albuterol
Works quickly. She adds the side effects: patients report feeling shaky and anxious and the heart rate goes up
Reduce inflammation and bronchospasm
Corticosteroid — IV methylprednisolone
Takes several hours to take effect, so it will not relieve dyspnea or increased work of breathing quickly
Treat infection
IV antibiotics
For pneumonia and acute bronchitis, which can cause or worsen ARF
Reduce anxiety, pain, restlessness
IV benzodiazepine — lorazepam; opioid — morphine
Anxiety, pain and restlessness increase oxygen consumption and CO2 production and raise the work of breathing
Her last item is nutrition therapy. Nutrition depletion causes loss of muscle mass — and that includes the respiratory muscles, which delays recovery. This same reasoning reappears in §10.4 as a reason ventilated patients are fed early.
UNIT 4
Acute Respiratory Distress Syndrome (ARDS)
Covers: Respiratory Failure and ARDS deck, slides 26–34 · Lecture 1 · Lewis's Ch. 32 (pp. 686–692) for gap-fill
4.1 What ARDS Is
ARDS is a sudden and progressive form of acute respiratory failure in which the alveolar-capillary membrane becomes damaged and more permeable to intravascular fluid. Go back to the gas exchange unit in §1.1: the membrane between alveolus and capillary starts leaking, so fluid crosses into the alveolar space, and gas exchange fails.
The most common cause is sepsis. Another cause is multisystem organ dysfunction syndrome (MODS).
Injury type
Mechanism
Her examples
Direct
A pathogen or substance comes into direct contact with lung tissue
Aspiration of gastric contents into the lung; bacterial pneumonia; chest trauma
Indirect
A problem somewhere else in the body causes widespread inflammation that eventually reaches the lungs
Sepsis — an inflammatory response spreading through the bloodstream from an infection
4.2 Phase 1 — The Injury or Exudative Phase
Three phases, and she says outright that the three phases are something to know. Learn each one by its timing and its defining process.
What happens, in her order:
Engorgement of the peribronchial and perivascular interstitial space produces interstitial edema.
Fluid crosses into the alveolar space. As the alveoli fill, V/Q mismatch and shunt both develop — the same two mechanisms from §2.4 and §2.5, now occurring together.
The membrane damage is thought to come from stimulation of the inflammatory and immune systems, which draws neutrophils into the pulmonary interstitium.
The neutrophils release biochemical, humoral, and cellular mediators, which increase pulmonary capillary permeability, destroy collagen, form pulmonary microemboli, and cause pulmonary artery vasoconstriction.
Respiratory rate rises and tidal volume falls.
Cardiac output increases in response to the hypoxemia, as the body tries to raise pulmonary blood flow.
Eventually compensation fails, and hypoventilation, decreased cardiac output, and decreased tissue oxygen perfusion occur.
4.3 Surfactant, Atelectasis, and the Hyaline Membrane
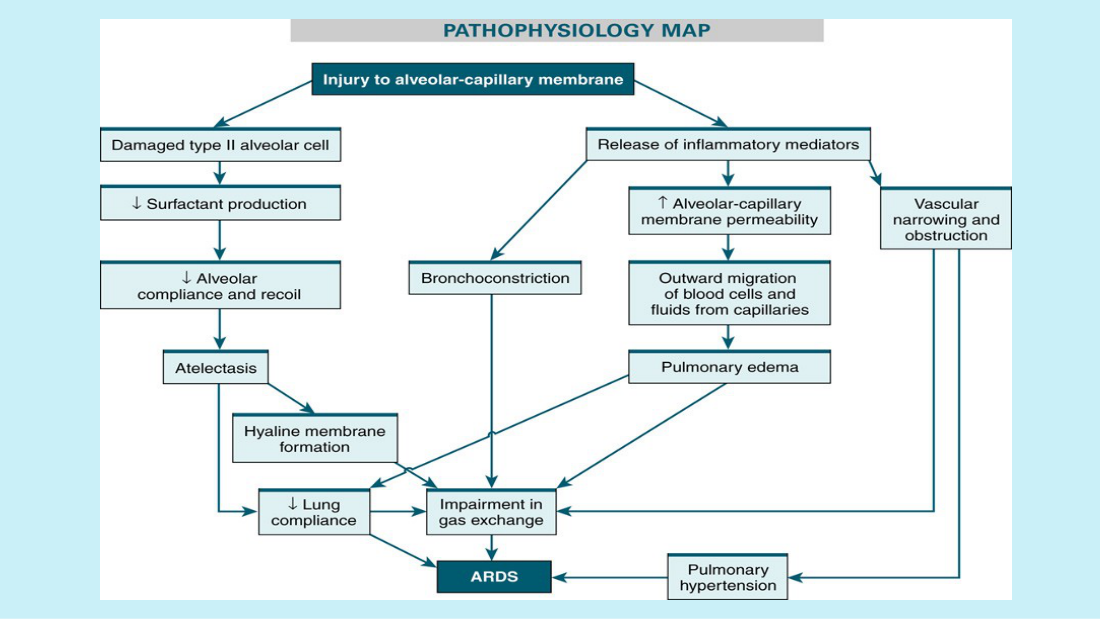
This is the chain that turns a leaky membrane into a stiff lung, and it is the highest-value mechanism in the unit because so many later facts hang off it.
Alveolar type I and type II cells make surfactant. Surfactant maintains alveolar stability and prevents alveolar collapse.
In ARDS these cells are damaged, so surfactant production falls and existing surfactant is inactivated — surfactant dysfunction.
Without surfactant the alveoli become unstable and collapse — atelectasis.
Widespread atelectasis decreases lung compliance, compromises gas exchange, and contributes to hypoxemia.
A hyaline membrane — made of necrotic cells, protein, and fibrin — forms and thickens on the inside of the alveolus, further impairing gas exchange and lung compliance.
The patient must generate higher airway pressures to inflate the stiff lungs, so the work of breathing rises — and at that point mechanical ventilation is needed.
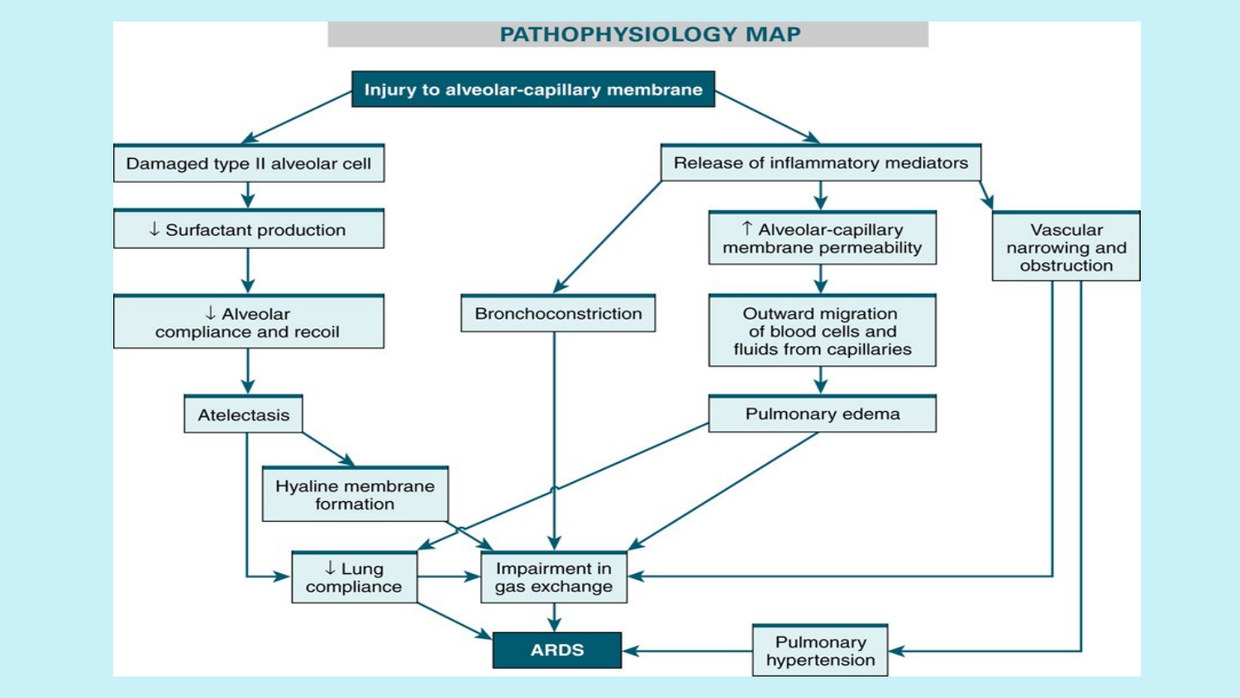
Her ARDS pathophysiology map. Follow the left branch: injury to the alveolar-capillary membrane → damaged alveolar cells → less surfactant → decreased compliance and recoil → atelectasis → hyaline membrane → impaired gas exchange → ARDS. The right branch is the inflammatory mediators: bronchoconstriction, vascular narrowing, pulmonary hypertension, and increased permeability leading to pulmonary edema.
4.4 Refractory Hypoxemia — the Hallmark
Refractory hypoxemia is the classic sign and the hallmark of ARDS: despite higher and higher oxygen concentrations, the patient's condition may still get worse.
4.5 Phase 2 — The Proliferative Phase
The inflammatory response is still going.
There is damage to the pulmonary vasculature, and lung compliance continues to fall because of interstitial fibrosis.
Hypoxemia continues because of the thickened alveolar membrane — producing V/Q mismatch, diffusion limitation, and shunting all at once.
The phase ends when dense, fibrous tissue replaces the diseased lung.
If this phase stops, the lesions often resolve. That is the good outcome.
The surface area available for gas exchange is reduced, so hypoxemia continues.
4.7 The Three Phases Side by Side
Phase
Timing
Defining process
1. Injury / exudative
Starts 24–72 hr after the insult; lasts 7–10 days
Interstitial then alveolar edema; V/Q mismatch and shunt; surfactant loss, atelectasis, hyaline membrane
2. Proliferative
Begins 1–2 weeks after injury
Continued inflammation; interstitial fibrosis; compliance keeps falling; ends when dense fibrous tissue replaces diseased lung. If it stops here, lesions often resolve
3. Fibrotic
May start as early as 24 hr after injury
Lung remodeling — diffuse scarring, interstitial and alveolar duct fibrosis; reduced surface area. Not everyone enters it; poorer prognosis if they do
4.8 Clinical Progression and the Chest X-Ray
ARDS is dangerous partly because it starts quietly.
Stage
Findings
Early
Possibly no respiratory symptoms, or mild dyspnea, tachypnea, cough, restlessness. Lung sounds: fine, scattered crackles. ABG: mild hypoxemia and respiratory alkalosis. CXR: normal, or diffusely scattered minimal infiltrates
Worsening
Respiratory distress becomes evident as work of breathing rises: tachypnea, intercostal and suprasternal retractions, tachycardia, mental status changes, cyanosis, pallor. Lungs: scattered to diffuse crackles, and coarse crackles on expiration
Established
Refractory hypoxemia — the hallmark. After 72 hours the CXR shows extensive bilateral interstitial and alveolar infiltrates
That 72-hour film is the one she calls the "whiteout." Her explanation of the term is the useful part: on a normal chest x-ray the air-filled spaces read black. In ARDS those spaces fill with fluid and consolidated infiltrate, so they turn white — widespread, throughout the lung, where there should be black.
She also flags the long view: patients with ARDS may need several weeks of mechanical ventilation, which is why she raises advance directives here and tells you to talk with patients and families about their wishes before a crisis.
4.9 The P/F Ratio
The PaO2/FiO2 ratio — the P/F ratio — evaluates the severity of hypoxemia. It is the patient's PaO2 divided by the FiO2 they are receiving, with FiO2 expressed as a decimal.
P/F ratio
Interpretation
>400
Normal
<300
Mild ARDS
<200
Moderate ARDS
<100
Severe ARDS
The P/F ratio returns in §10.9 as a weaning criterion. She makes that link herself in the ventilator lecture, telling students to remember the ARDS ratios when they see PaO2/FiO2 >300 on the readiness-to-wean list.
4.10 Complications of ARDS
Complication
Mechanism and management
Abnormal lung function
Can persist for years or for life. Severity of scarring and lung change are the key factors. Post-ARDS: fatigue, chest pain, shortness of breath after minimal activity, persistent dyspnea
Fragile alveoli are overdistended by excess pressure during mechanical ventilation and rupture, so alveolar air escapes. Minimized by small tidal volumes and varying amounts of PEEP
GI ulcers
Blood is diverted from the GI tract to the respiratory system to meet the body's oxygen demand. Prophylaxis with antiulcer and mucosal-protecting drugs; early enteral nutrition helps prevent mucosal damage
Venous thromboembolism
From immobility and venous stasis. She names SCDs, and early ambulation or passive range of motion if the patient cannot walk
Acute kidney injury
Decreased renal perfusion means decreased oxygen delivery to the kidneys. Monitor intake and output, daily weights, daily creatinine and urea. May need CRRT
Psychological issues
After a frightening and prolonged critical illness
She explains CRRT in the ARDS lecture rather than waiting: continuous renal replacement therapy is a slower form of dialysis run over 24 hours, pulling toxins out of the blood and returning it. The chapter adds why the slow version is used: ARDS patients are often hemodynamically unstable, may be on vasopressors, and cannot tolerate the large fluid shifts of conventional hemodialysis.
4.11 Nursing Management — the Seven Best Practices
The overall goal is a PaO2 of 60 mm Hg or higher and adequate lung ventilation to help with acid-base balance. Her slide then lists seven best practices, numbered, and the list is worth memorizing as a list.
Low tidal volume ventilation
4 to 8 mL/kg. Her reasoning: delivering a large volume into stiff lungs causes volutrauma or barotrauma, damaging the alveoli. A stiff lung cannot accept a normal breath without being injured by it.
Permissive hypercapnia
Permissive hypercapnia is the PaCO2 slowly rising above normal limits as a result of delivering a lower than normal tidal volume. It is a consequence of the low-volume strategy, not a goal in itself — you accept the rising CO2 as the price of not injuring the lung.
PEEP
Positive end-expiratory pressure increases the volume of air left in the lungs at the end of a normal expiration, which helps open collapsed alveoli and may let you lower the FiO2. Patients with ARDS may need higher levels of PEEP — and her reason is the surfactant chain from §4.3: if the surfactant that normally holds alveoli open is gone, external pressure has to do that job instead. Full treatment of PEEP is in §9.14.
Prone positioning
Turning the patient onto the stomach, which may help with lung expansion. The chapter gives the mechanism she does not: proning better matches perfusion to ventilation — anterior alveoli become dependent and stop being overdistended, while posterior alveoli are recruited and re-expand. It is used for refractory hypoxemia not responding to other strategies, needs at least 3 nurses plus an intensivist and respiratory therapist, and patients may stay prone up to 16 hours a day.
ECMO
She keeps this brief and says she posted a video. Her description: blood leaves the body, is oxygenated in the machine, and is returned — the machine does the job of the lungs. The chapter adds that it requires large-bore vascular access and systemic anticoagulation, so bleeding risk is weighed before starting.
Analgesia, sedation, perfusion and fluids
Her closing items. Analgesia and sedation matter because the tube is uncomfortable, because sedation reduces the work of breathing, and because it prevents the patient from breathing against the ventilator — ventilator dyssynchrony. Then promote tissue perfusion, and maintain fluid balance and nutrition.
UNIT 5
Noninvasive Ventilation
Covers: Respiratory Failure and ARDS deck, slides 35–37 · Lecture 1 · Lewis's Ch. 28 (pp. 556–558) for gap-fill
5.1 What NIV Is and Who Gets It
Noninvasive ventilation uses a mask instead of an invasive endotracheal tube. It is ideal for the patient who needs a high level of ventilatory support but whose condition is not bad enough to require mechanical ventilation. Her framing is that NIV is what you try first, before intubating.
Her list
Useful for
COPD exacerbations and heart failure
Not a candidate
Patient with an acute MI or a GI bleed
Requirements to use it
Patient must be awake, alert, and able to breathe spontaneously
5.2 Mode 1 — CPAP
Continuous positive airway pressure provides one level of pressure continuously, during both inspiration and expiration.
Delivered through a tight-fitting mask.
It increases the work of breathing, because the patient must forcibly exhale against the CPAP.
Use with caution in patients with heart problems.
5.3 Mode 2 — BiPAP
Bilevel positive airway pressure provides two levels of positive pressure support — one for inhaling, a different one for exhaling.
IPAP — inspiratory positive airway pressure. It is the higher of the two, and it helps with CO2 removal.
EPAP — expiratory positive airway pressure. The lower level; it helps keep the alveoli open at end expiration.
The patient must be awake, alert, and able to breathe spontaneously to use it.
5.4 CPAP versus BiPAP
CPAP
BiPAP
Pressure levels
One, continuous through inspiration and expiration
Two — IPAP on inspiration, EPAP on expiration
Helps oxygenation
Yes
Yes — via EPAP holding alveoli open
Helps ventilation / CO2 removal
No
Yes — via the higher IPAP
Best for
A patient who needs alveoli held open
A patient who is retaining CO2, e.g. a COPD exacerbation
Watch out for
Increases work of breathing; caution with cardiac problems
Patient must be able to protect their airway
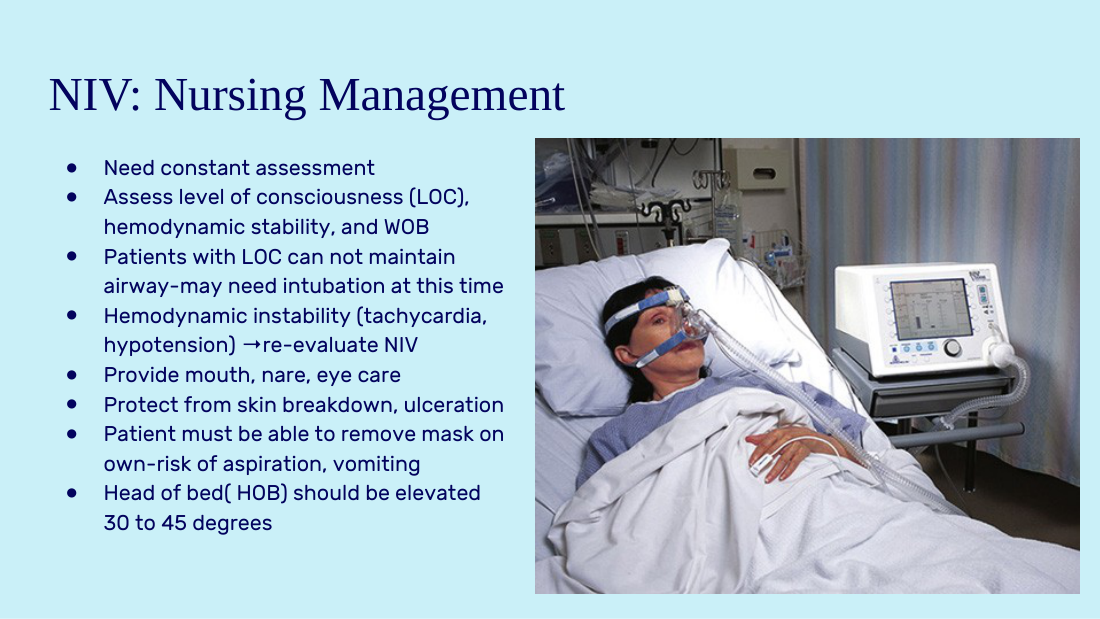
5.5 Nursing Management of the Patient on NIV
Her slide is a list of assessments; the reasons are hers, spoken.
Assessment / action
Why
Assess level of consciousness
A patient with a decreased LOC cannot maintain their airway and may need intubation at that point
Assess hemodynamic stability
Tachycardia or hypotension means re-evaluate whether NIV is still appropriate
Assess work of breathing
Rising WOB means NIV is failing and invasive ventilation is coming
Mouth, nare, and eye care
She explains that air escaping around the mask seeps toward the eyes and dries the nose and mouth
Protect from skin breakdown and ulceration
The tight mask presses on the nasal bridge. She notes that respiratory therapists now often place a silicone dressing on the nasal bridge before applying the mask
Patient must be able to remove the mask on their own
Risk of vomiting and aspiration
Head of bed elevated 30 to 45 degrees
Helps prevent aspiration and improves air movement
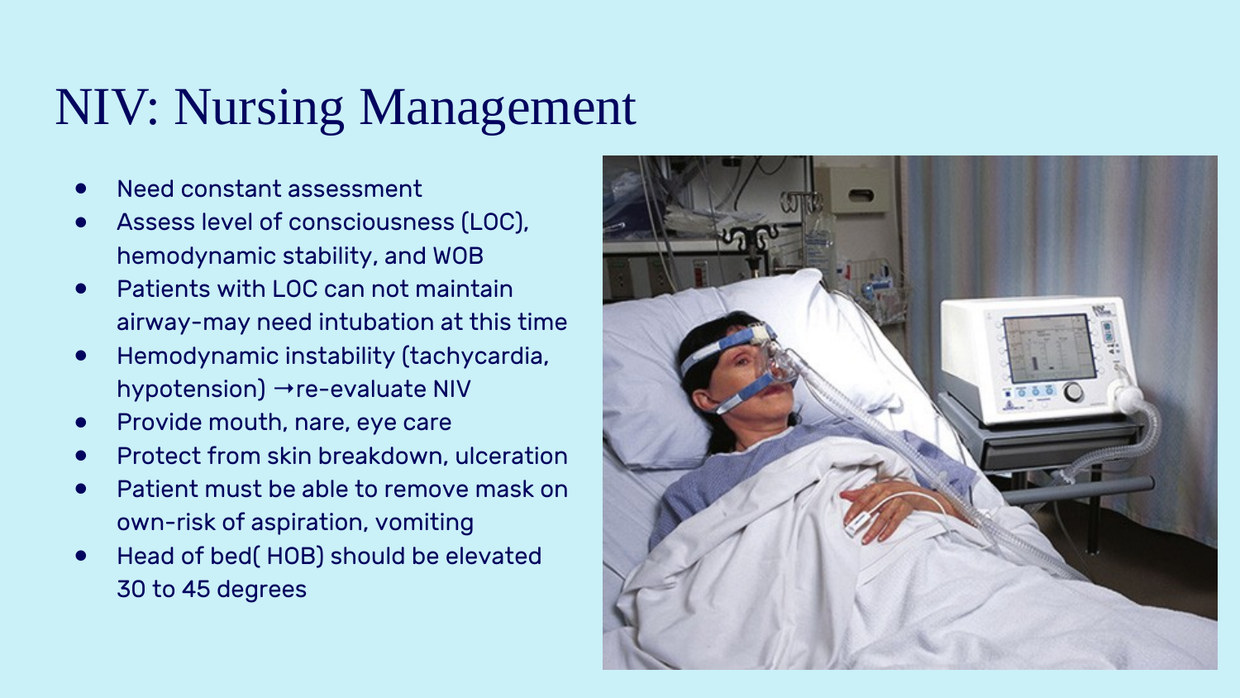
Her photograph of a patient wearing a noninvasive ventilation mask. Look at where it seals — the nasal bridge and cheeks are the pressure points, and the mask must be removable by the patient.
5.6 When NIV Is Not Enough
If the patient cannot tolerate noninvasive ventilation, or their respiratory status declines on it, they move to mechanical ventilation. Her indications for mechanical ventilation, which close deck one and open deck two:
Acute respiratory failure
Apnea
Inability to breathe or to protect the airway
Acute respiratory distress
Severe hypoxemia and/or hypercapnia
Respiratory muscle fatigue
A ventilator delivers oxygen to the lungs and supports the patient until they can breathe spontaneously again. Her recurring point, made in both lectures: encourage patients and families to discuss mechanical ventilation before a crisis occurs, because some people do not want to be ventilated and some want noninvasive treatment only. Advance directives belong in this conversation.
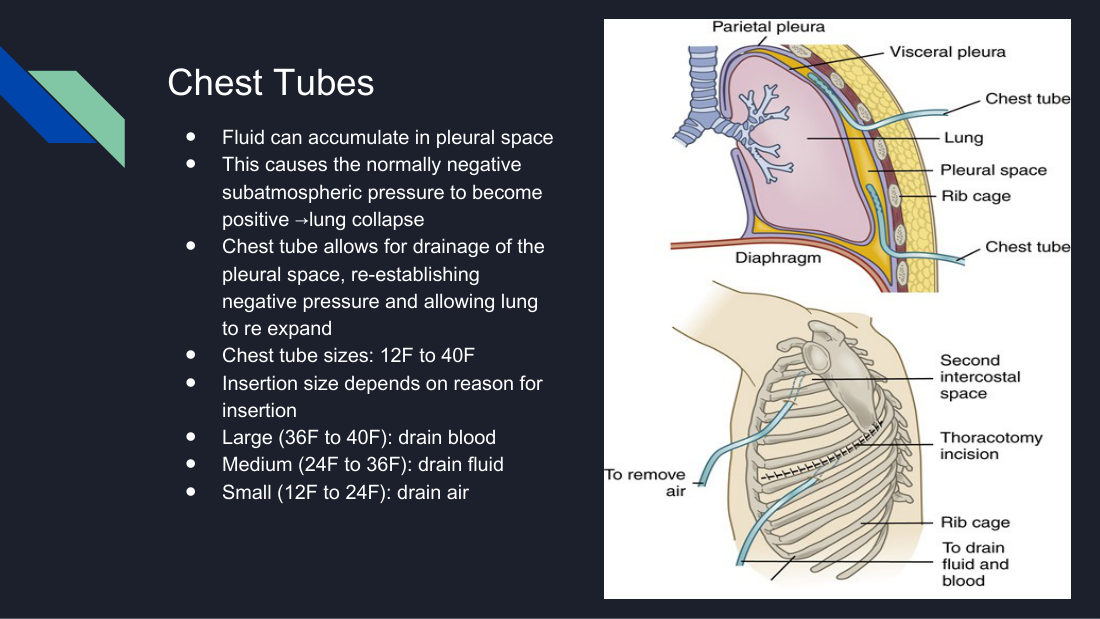
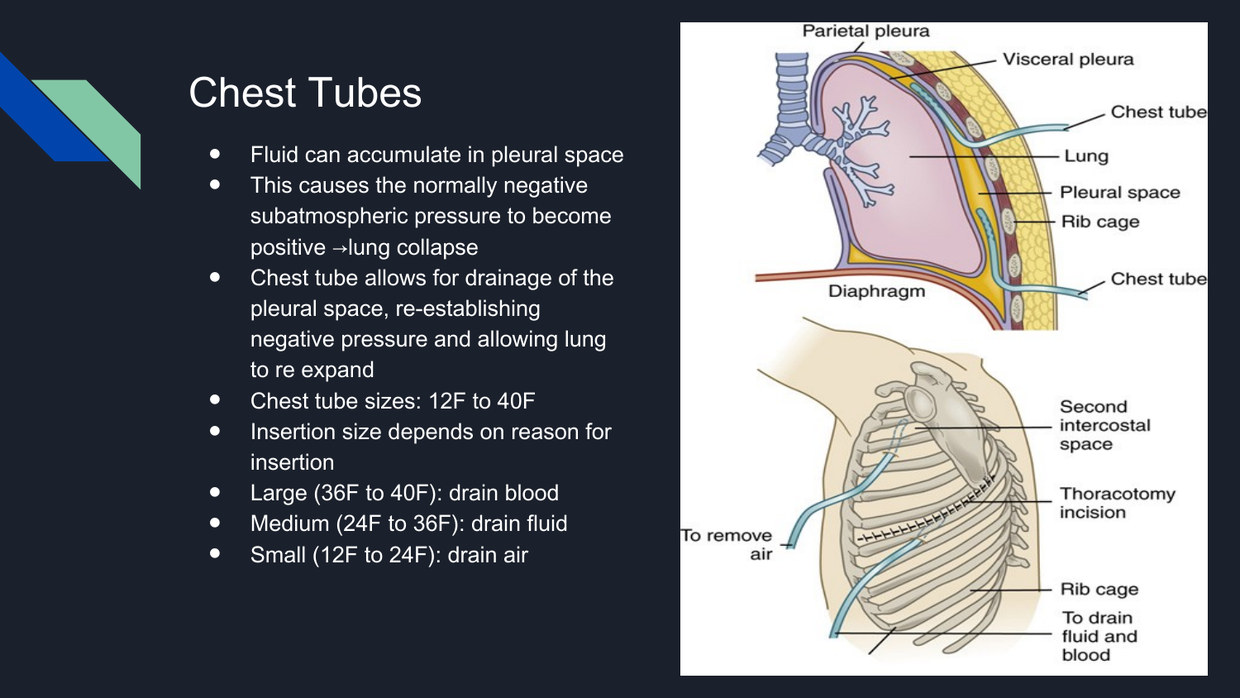
Her slide gives one line of physiology. She gives the whole system, and the whole system is what makes every later chest tube rule reasonable.
Now the pathology follows. If enough fluid or air accumulates in the pleural space, the normally negative pressure becomes positive, and the lung collapses. A chest tube drains the pleural space, re-establishes negative pressure, and lets the lung re-expand.
Her chest tube slide. Locate the pleural space, the insertion over the top of the rib, and the drainage tubing running to the collection unit. Everything in this unit is about protecting the negative pressure in that space.
6.2 Indications and Sizes
Chest tube sizes run 12F to 40F, and the size chosen depends on what is being drained.
Size
Drains
Why
Large, 36F–40F
Blood
Her rule of thumb: blood is the thickest, so it needs the largest tube
Medium, 24F–36F
Fluid
Thinner than blood
Small, 12F–24F
Air
Air is the thinnest thing you can drain, so it needs the smallest tube
The chapter adds one size class her slide omits: pigtail catheters, 10F–14F — very small tubes with a curled end that holds them in place, sometimes a safe and effective alternative to a larger-bore tube for a pneumothorax.
6.3 Insertion
Step
Detail
Position
Arm raised above the head on the affected side, which exposes the midaxillary area — the standard insertion site
Head of bed
Elevated 45 degrees, which lowers the diaphragm and reduces the risk of injury
Technique
The tube is inserted up and over the top of the rib
Securing
Tube sutured in place, incision closed, tube connected to the pleural drainage system
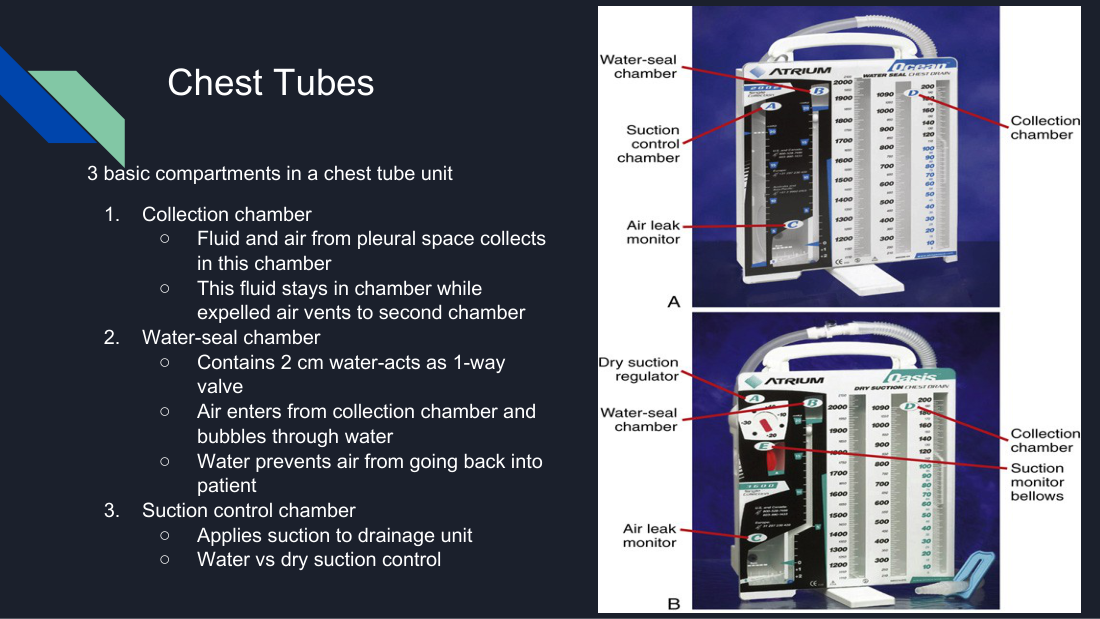
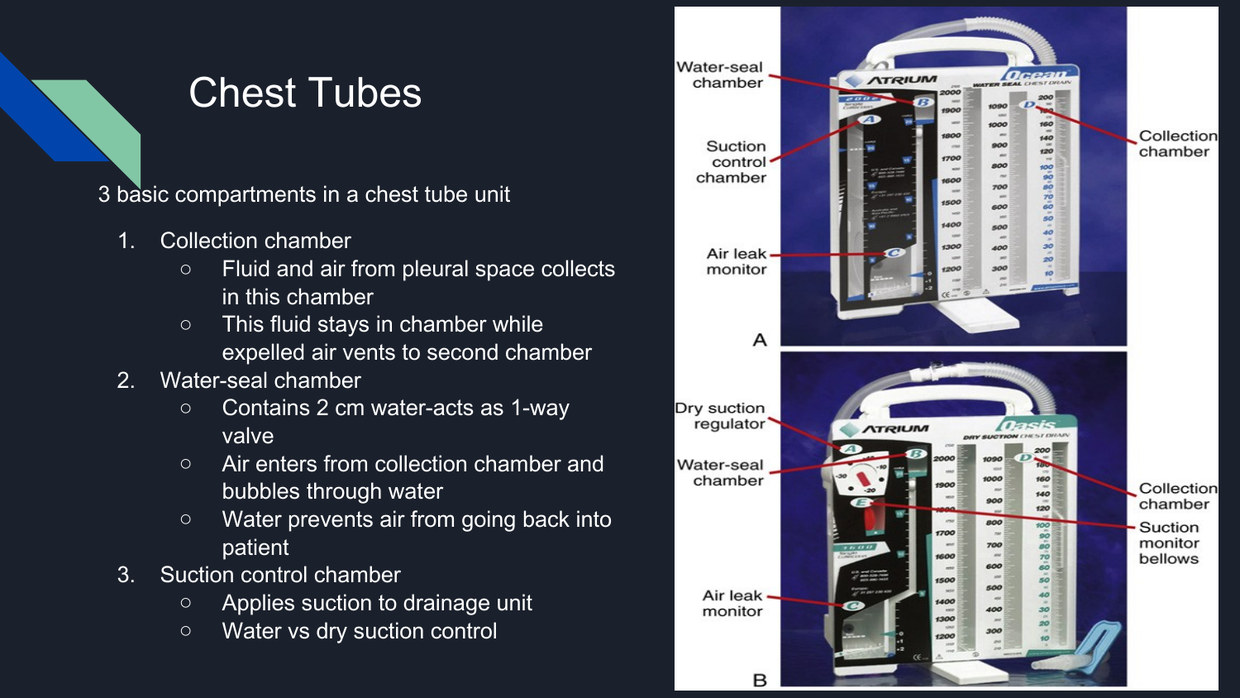
The fluid stays in this chamber; the expelled air vents onward to the second chamber
2. Water-seal chamber
Acts as a one-way valve. Air enters from the collection chamber and bubbles up through the water
Contains 2 cm of water. The water prevents air from going back into the patient
3. Suction control chamber
Applies suction to the drainage unit
Two kinds: water (wet) suction control and dry suction control
Her photograph of a real three-chamber drainage unit. Identify each chamber left to right and say what it does before reading the labels — that is the exercise she is pointing at when she says to know how they work.
6.5 Suction Control — Wet and Dry
6.6 Bubbling and Tidaling
This is the assessment section, and it is the one she repeats most often in the lecture. Four findings, and each has an action attached.
Finding
Normal?
What it means / what to do
Intermittent bubbling in the water-seal chamber during exhalation, coughing, or sneezing
Normal
Expected as long as there is still air in the pleural space. It stops as the air leak resolves and the lung fully expands
Continuous bubbling
Not normal
Indicates an air leak. She says to check the tube and make sure it is not disconnected and nothing is leaking anywhere
Tidaling — up and down movement of the water with the patient's breathing
Normal
Reflects intrapleural pressure changes during inspiration and expiration. It slows and eventually stops as the lung re-expands
Tidaling suddenly stops
Concerning
Assess the chest tube immediately for an occlusion
One practical point on her slide that is easy to miss: tidaling is not seen when the chest tube is connected to suction. You have to disconnect the tube from suction momentarily to evaluate tidaling. If a question describes "no tidaling" in a patient on wall suction, that may simply be the suction, not an occlusion.
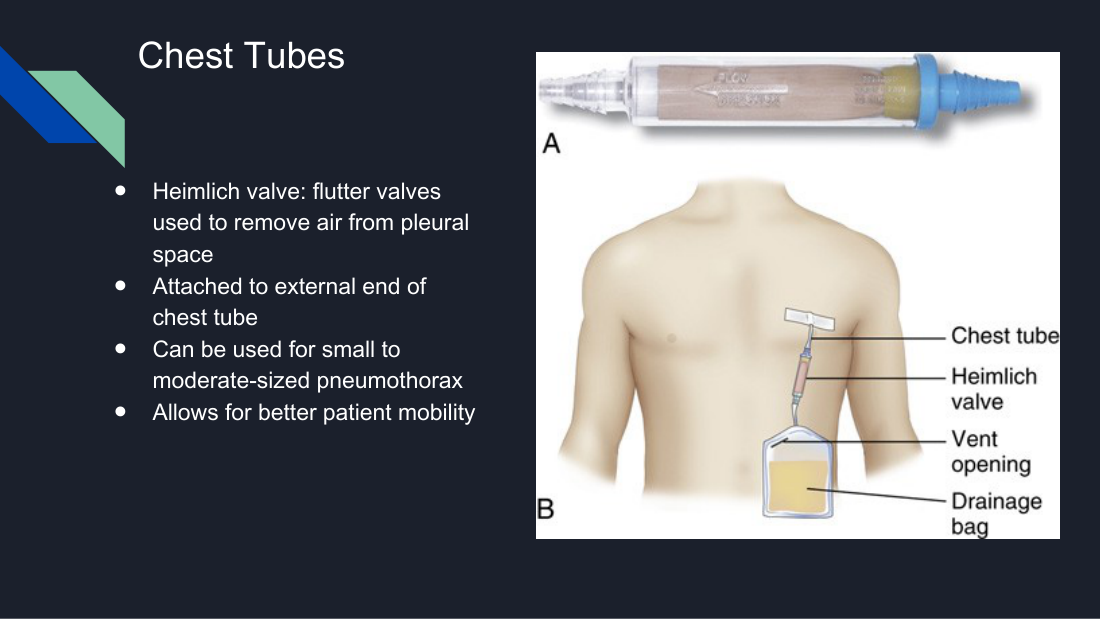
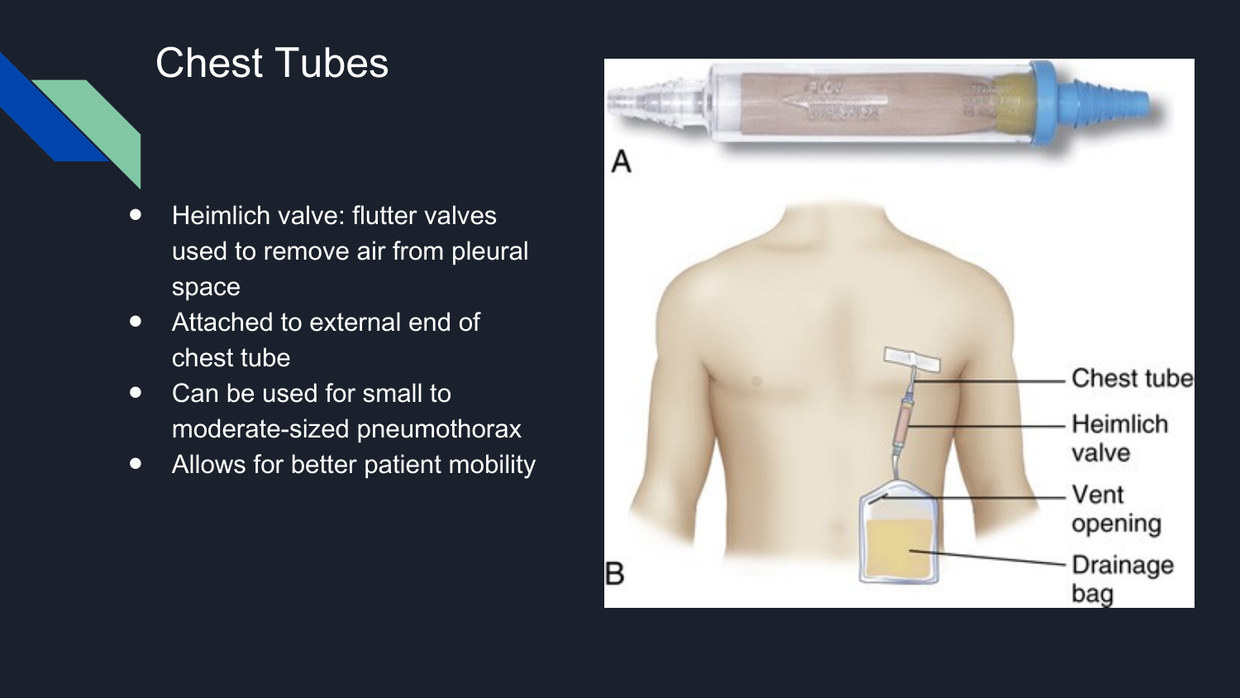
6.7 The Heimlich (Flutter) Valve
A flutter valve used to remove air from the pleural space.
Attached to the external end of the chest tube.
Used for a small to moderate-sized pneumothorax.
Allows better patient mobility.
Her Heimlich flutter valve, attached at the external end of the chest tube. It replaces the whole three-chamber unit for the right patient, which is why mobility improves.
She adds the quality-of-life reason: it is far more comfortable than carrying the big tube and the large suction chamber unit, and patients can sometimes go home with it. She also says fluid can be removed with it as well as air — that goes beyond the slide, which says air only, so if a question is written from the slide, air is the keyed answer.
6.8 Nursing Management
Action
Detail
Monitor vital signs after placement
Especially respiratory rate and rhythm
Watch the volume drained
If 1 to 1.5 L of fluid and/or blood is removed rapidly, re-expansion pulmonary edema or severe hypotension may occur
Know what drainage to expect
Ask the provider. Report drainage >200 mL in the first hour
Assess for subcutaneous emphysema
Air leaking into the tissue around the insertion site
Sterile technique for dressing changes
Prevents infection
Pulmonary hygiene
Encourage coughing, deep breathing, incentive spirometry, and range of motion exercises
Do not "milk" the chest tube
See §6.9
She develops subcutaneous emphysema well beyond the slide's single word:
It feels like a crackling sensation when you palpate the skin — her comparison is popcorn.
There will probably be pain on palpation of that area, and you may see swelling around it.
Palpating for it is part of the routine chest tube assessment, not something you do only when suspicious.
If it is small it may resolve on its own.
If it starts to move up toward the neck or head, the swelling can put pressure on the trachea and cause airway compromise.
6.9 The Four Chest Tube Emergencies
These are the items most likely to be written as a "what do you do first" question, and two of them look alike on purpose.
Event
Priority action
Rationale
Chest tube becomes disconnected from the drainage unit
Re-establish the water-seal system — immerse the exposed end of the tube in sterile water as a temporary water seal
Without a seal, atmospheric air travels straight into the pleural space
Chest tube comes out of the patient
Cover the incision site as quickly as possible with an occlusive dressing, then notify the provider right away
Prevents more air from getting in through the open chest wall
Should you clamp?
Do not clamp. A tube may be clamped only briefly to check for air leaks or change the unit — and only per hospital policy
The danger is rapid accumulation of air in the pleural space, causing a tension pneumothorax
Milking or stripping the tube
Do not do it.
She defines it as pulling on the tube to move drainage along. It may cause more problems and may cause an easy disconnection
6.10 Chest Tube Removal
Step
Her detail
When it can come out
When the lungs are re-expanded, or when the fluid drainage is minimal or has stopped completely
Before removal
Give pain medicine — removal can be painful
Who removes it
The health care provider
Patient action during removal
The patient holds their breath or performs a Valsalva maneuver
Immediately after
Cover the incision site with an airtight occlusive dressing
Follow-up imaging
Chest x-ray about 30 to 60 minutes after removal, to check whether the pneumothorax or fluid accumulation has improved and the lung has re-expanded
Ongoing monitoring
Monitor for respiratory distress — it could mean the original problem has recurred
Oxygen is the most common therapy for hypoxemia and hypoxia.
It requires a provider order.
The dose of oxygen administered is the fraction of inspired oxygen (FiO2).
Goal for most patients: SaO2 >92% or PaO2 >60 mm Hg.
Patients with COPD may be acceptable at SpO2 >88%.
These are the same targets she taught with the mechanism in §3.10. Seeing them a second time in a different lecture is itself the signal — the numbers appear in both decks.
7.2 Low-Flow versus High-Flow Systems
Low-flow
High-flow
Patient
Alert, awake, spontaneously breathing
Also awake, alert and spontaneously breathing, but with higher oxygen requirements
Concentration delivered
Does not meet all of the patient's inspiratory demands
Delivers fixed oxygen concentrations, independent of the patient's respiratory rate or pattern; meets or exceeds inspiratory demand
Her examples
Nasal cannula, simple mask, non-rebreather mask
High-flow nasal cannula, Venturi mask
7.3 Complications of Oxygen Therapy
Complication
Detail
Combustion
Smoking is prohibited in any area where oxygen is in use. A patient smoking on oxygen risks burns and airway injury
Oxygen toxicity
Can occur in mechanically ventilated patients at FiO2 >60% for >24 hours. Signs: blurred vision, coughing, chest pain, dyspnea, seizures. Provide the lowest FiO2 that maintains acceptable SpO2 and PaO2, monitor ABGs, and taper when possible
Infection
Related to the device and how often it is cleaned or changed
CO2 narcosis
The danger of giving a COPD patient too much oxygen — see below
She gives the mechanism of oxygen toxicity beyond the slide: it is due to oxygen free radicals that damage the alveolar-capillary membrane, which causes pulmonary edema and hypoxemia.
7.4 ABG Normal Values
Value
Normal range
What it tells you
pH
7.35–7.45
Acidotic or alkalotic. Always the first thing you look at
PaCO2
35–45 mm Hg
The respiratory value. Her memory hook: CO2 is what we breathe out through the lungs, so CO2 is lungs
HCO3
22–26 mEq/L
The metabolic value. Bicarbonate is a base, retained or excreted by the kidneys
PaO2
80–100 mm Hg
Oxygenation. Not part of the acid-base determination, but read it
7.5 The Method — Four Steps
Her interpretation procedure, in her order. Work every gas the same way and the hard ones stop being hard.
Steps 2 and 3 are really one question: which value matches the direction of the pH? Whichever one agrees with the pH is the cause; the other one, if it has moved, is the compensation.
7.6 ROME
How pH and the value relate
Example
Respiratory is Opposite
pH and PaCO2 move in opposite directions
pH low + PaCO2 high = respiratory acidosis
Metabolic is Equal
pH and HCO3 move in the same direction
pH low + HCO3 low = metabolic acidosis
Her second memory aid, for remembering which value is which: CO2 is what we breathe out in our lungs, so CO2 is respiratory. CO2 is lungs. Bicarbonate, by elimination, is the metabolic one.
7.7 Compensation
Her decision rule, stated as a procedure and present on no slide:
State
How you recognize it
Uncompensated
The other value — the one that is not causing the problem — is normal. The body has not started compensating
Partially compensated
Nothing is normal. The pH is still abnormal, but the other value has moved in the opposite direction to try to correct it
Fully compensated
The pH is back within its normal range, while both the PaCO2 and HCO3 are abnormal
A fully compensated gas still has a direction. If the pH lands at 7.36, it is on the acidotic side of the midpoint, so the underlying disorder was an acidosis. Read which half of the normal range the pH sits in.
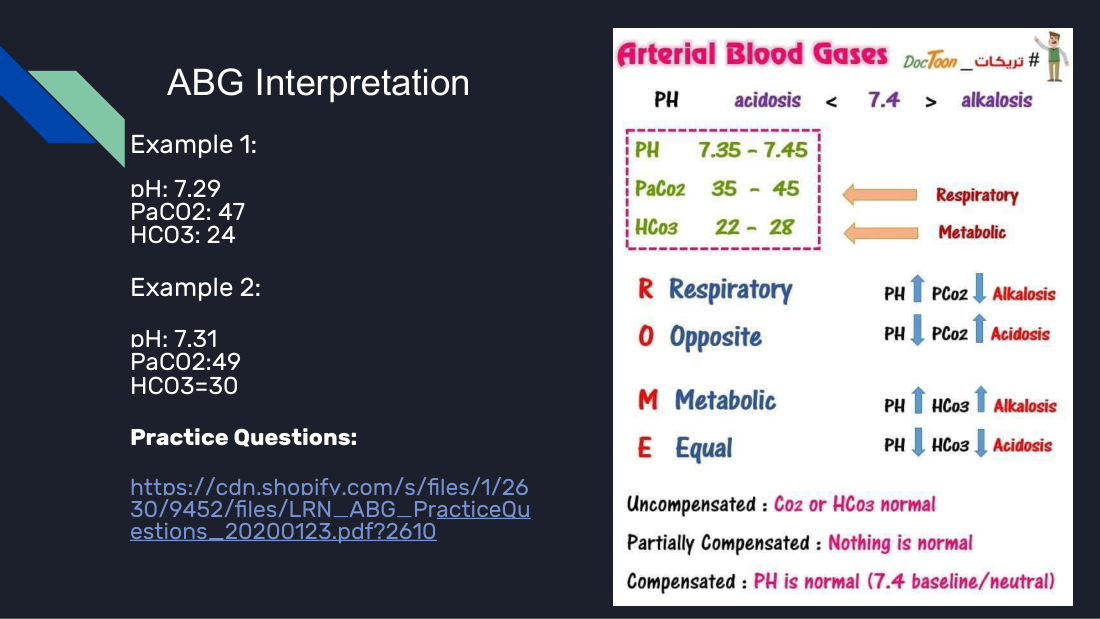
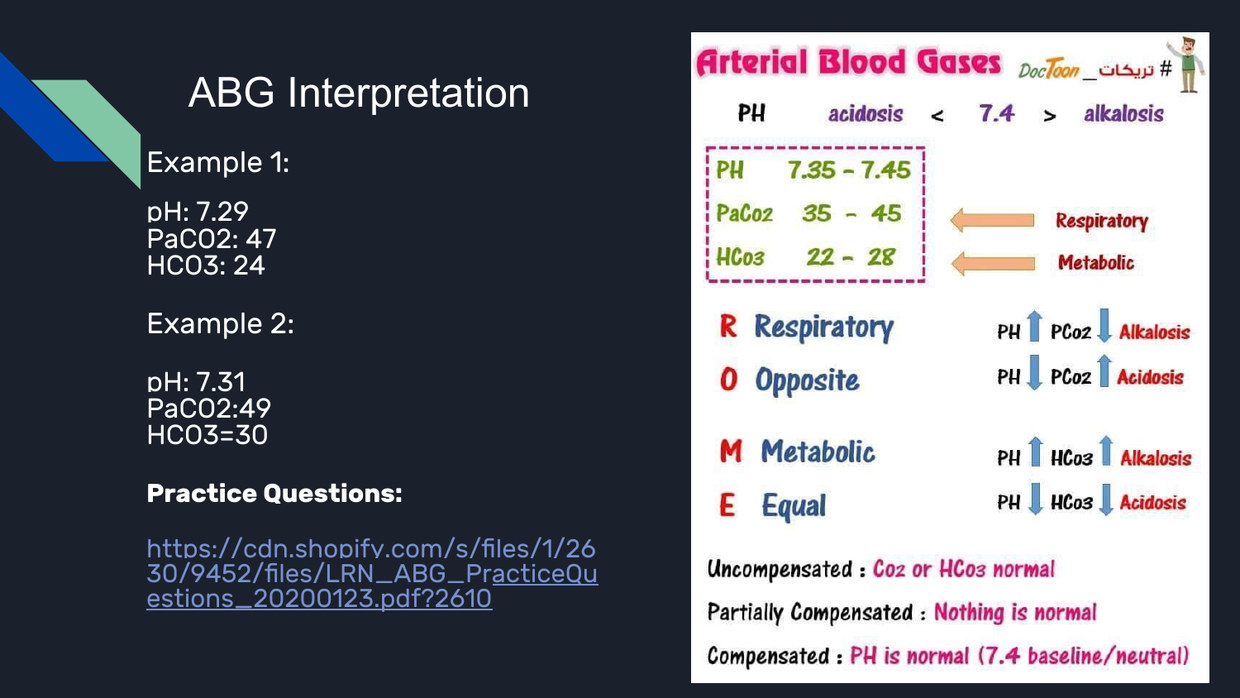
7.8 Worked Example 1
Her first example, solved aloud in full. The slide shows the three numbers and no answer — the whole solution is hers.
Step 1 — pH. 7.29 is below 7.35, so the patient is acidotic.
Step 2 — PaCO2. 47 is above 45, and a high CO2 is acidotic. So the CO2 is also acidotic. Her observation: the pH is low and the PaCO2 is high — these are opposite, which by ROME means respiratory. Respiratory acidosis.
Step 3 — HCO3. 24 is within the normal range of 22–26. The bicarbonate has not moved.
Step 4 — Compensation. Because the bicarbonate is normal, the body has not begun compensating. Not compensated.
Her ABG reference slide, with the ROME device and both worked examples. She calls this chart a good cheat sheet and tells students to use it. Cover the numbers and re-derive both answers before the exam.
7.9 Worked Example 2
Step 1 — pH. 7.31 is below 7.35, so acidotic.
Step 2 — PaCO2. 49 is above 45, so also acidotic. pH and CO2 are opposite. Respiratory acidosis.
Step 3 — HCO3. 30 is above 26, so it is higher than normal — more alkaline. Her interpretation: this tells you the body is trying to compensate, because the base is rising to offset the acid.
Step 4 — Compensation. The pH is still abnormal, and the bicarbonate has moved abnormal in the opposite direction. Nothing here is normal. Partially compensated.
7.10 The Four Patterns, Assembled
Everything above collapses into one table. Build it once from her method and it covers any uncompensated gas.
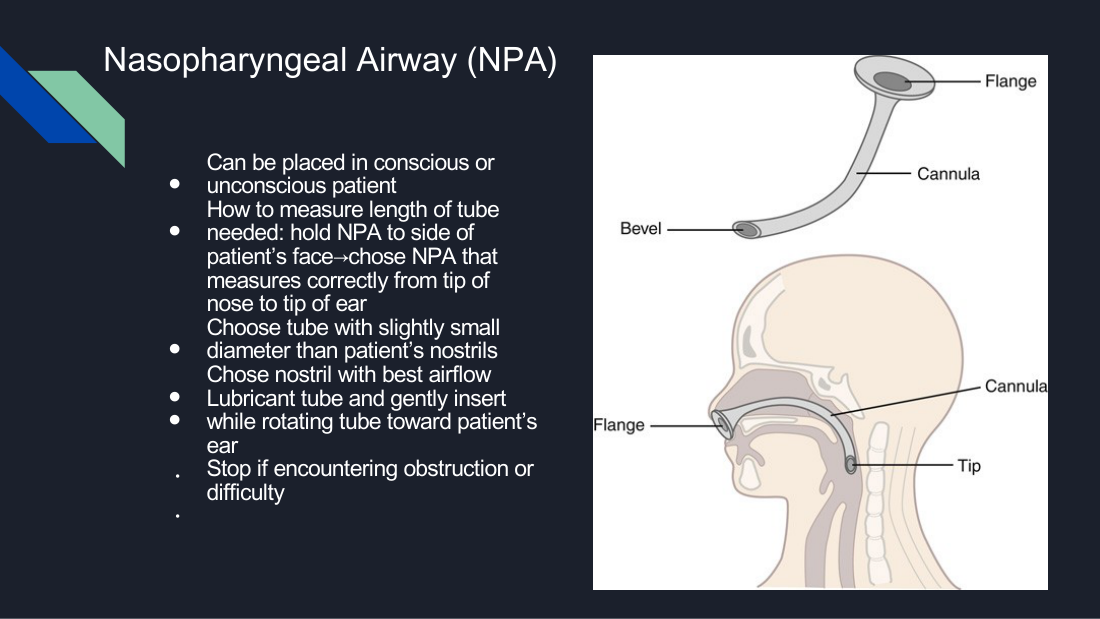
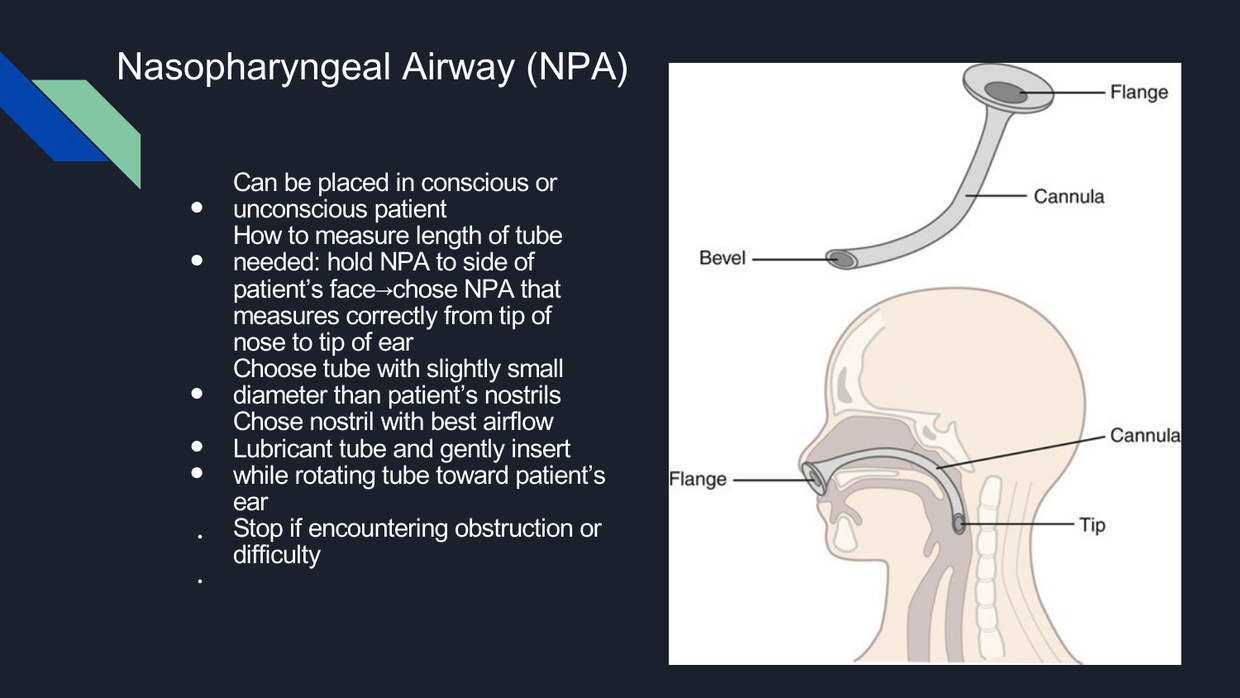
Can be placed in a conscious OR unconscious patient.
Measuring length: hold the NPA to the side of the patient's face and choose the one that measures correctly from the tip of the nose to the tip of the ear.
Diameter: choose a tube slightly smaller than the patient's nostrils.
Choose the nostril with the best airflow.
Lubricate and insert gently while rotating the tube toward the patient's ear.
Stop if you encounter obstruction or difficulty.
Her nasopharyngeal airway slide, showing the nose-to-ear measurement against the face. Note the material — soft and flexible, which is why a conscious patient tolerates it.
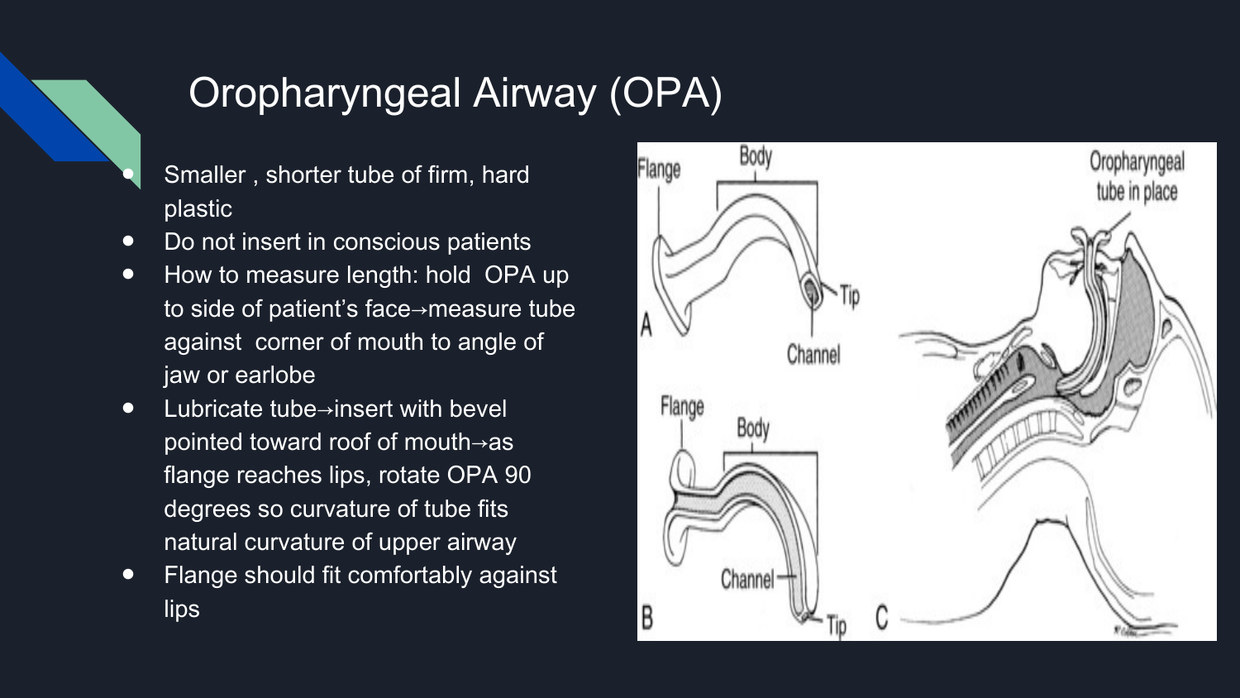
8.2 Oropharyngeal Airway (OPA)
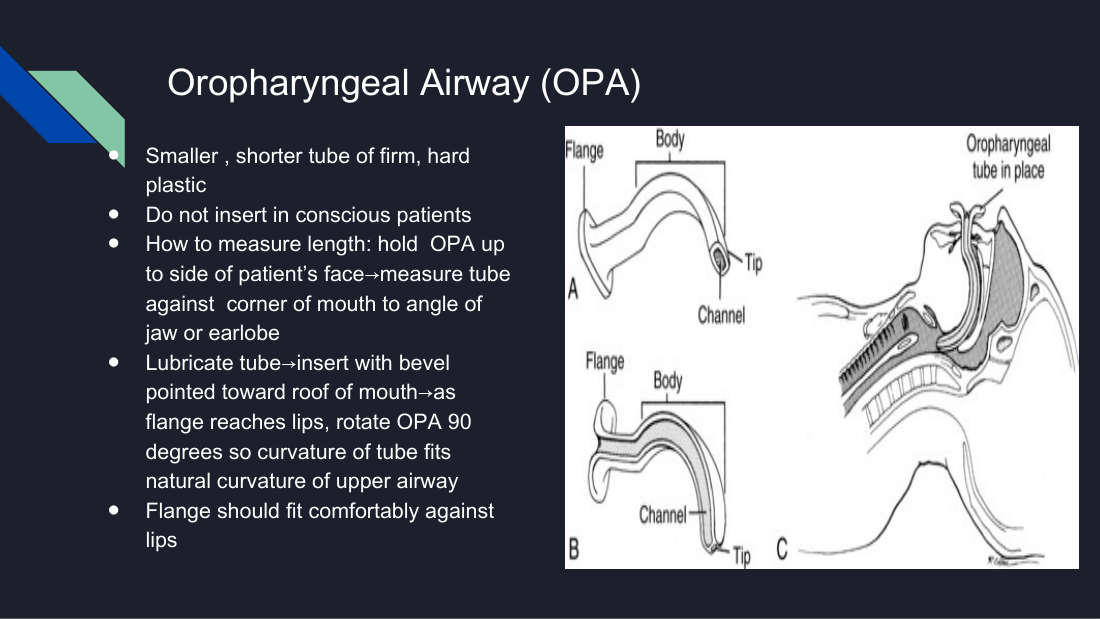
A smaller, shorter tube of firm, hard plastic.
Do not insert in a conscious patient.
Measuring length: hold it against the side of the face and measure from the corner of the mouth to the angle of the jaw or the earlobe.
Insertion: lubricate, insert with the bevel pointed toward the roof of the mouth, and as the flange reaches the lips, rotate the OPA 90 degrees so its curve fits the natural curve of the upper airway.
The flange should sit comfortably against the lips.
Her oropharyngeal airway slide, with the measurement and the 90-degree rotation on insertion. The rotation is the step most often asked about.
8.3 NPA versus OPA
NPA
OPA
Material
Soft, flexible, rubbery
Firm, hard plastic; smaller and shorter
Level of consciousness
Conscious or unconscious
Unconscious only — it induces vomiting in a conscious patient
How it is measured
Tip of the nose to tip of the ear
Corner of the mouth to the angle of the jaw or earlobe
Insertion
Lubricate, insert rotating toward the ear; stop at any resistance
Lubricate, bevel toward the roof of the mouth, then rotate 90 degrees at the lips
Extra use
Route for frequent suctioning
Keeps the tongue from occluding the airway
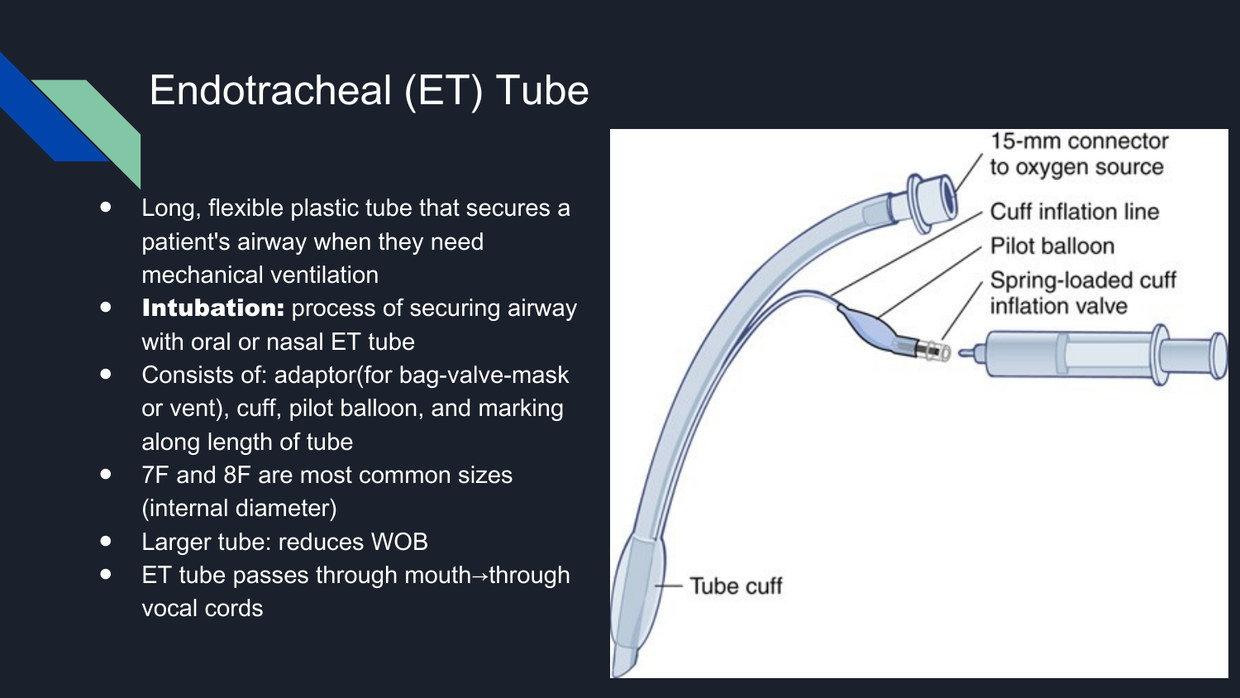
8.4 The Endotracheal (ET) Tube
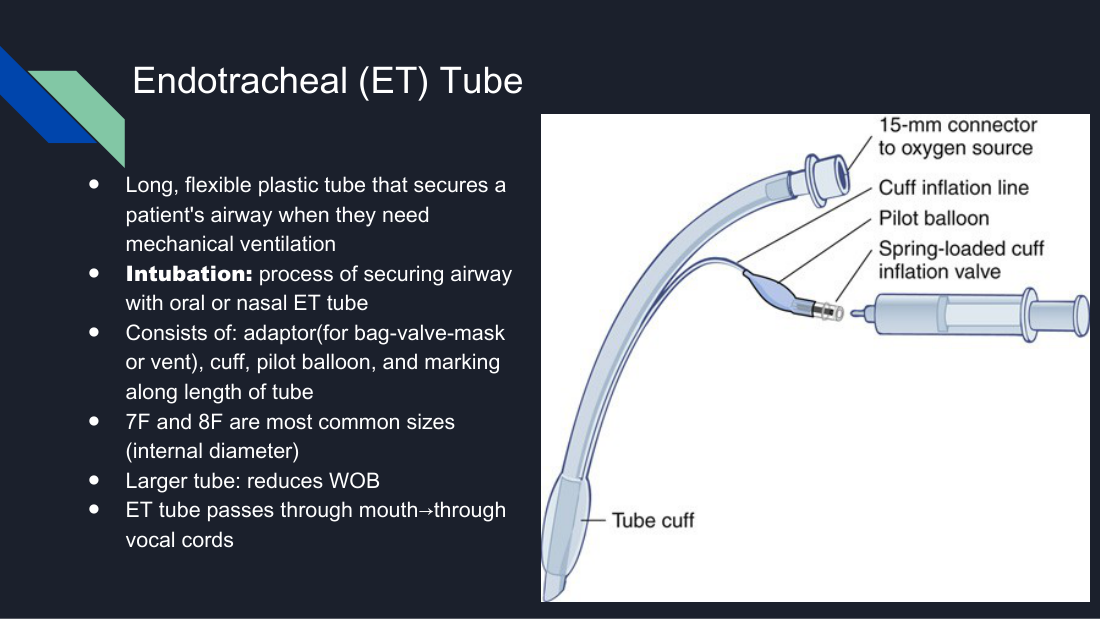
A long, flexible plastic tube that secures the airway when a patient needs mechanical ventilation. Intubation is the process of securing the airway with an oral or nasal ET tube. The tube passes through the mouth and through the vocal cords.
Part
Function
Adaptor / connector
Attaches the tube to a bag-valve mask or a ventilator. The chapter specifies it is a 15-mm connector
Cuff
Inflated after placement. It holds the tube in place and prevents secretions from dripping down past it
Pilot balloon
Tells you whether the cuff is inflated; the inflation valve is here
Markings along the tube
Used to gauge and record how far the tube is inserted
The most common sizes are 7F and 8F, referring to the internal diameter. The chapter adds the typical assignment: 7F for females, 8F for males.
Her labelled endotracheal tube: 15-mm connector, cuff, pilot balloon, inflation valve, and the depth markings along the shaft. The markings are what you record at the lip or teeth every shift.
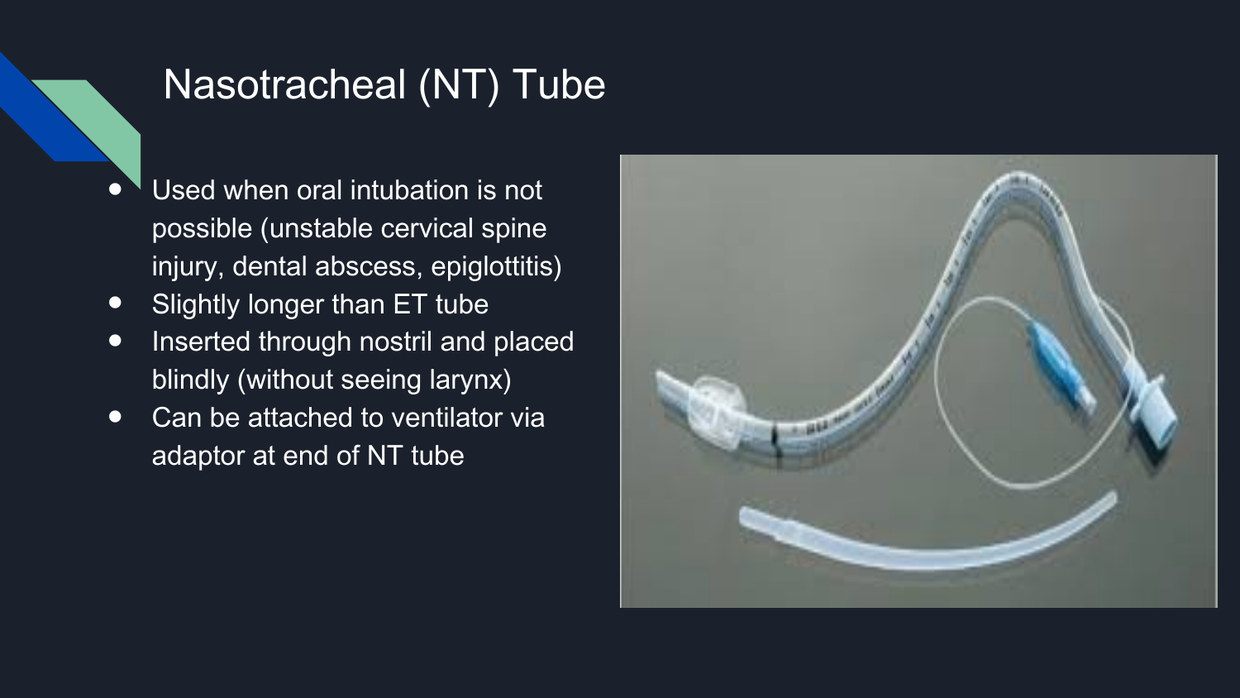
8.5 The Nasotracheal (NT) Tube and the GlideScope
Used when oral intubation is not possible — her slide's examples are unstable cervical spine injury, dental abscess, and epiglottitis.
Slightly longer than an ET tube.
Inserted through the nostril and placed blindly, without seeing the larynx.
Attaches to the ventilator via an adaptor at the end.
She adds two intubation risks that are on no slide, and one decision that follows from them. Limited neck mobility or a spinal cord injury makes an oral tube very difficult to place, and in that situation you may need a nasotracheal tube instead. And teeth can be chipped or removed during the procedure. She also names who performs intubation: the health care provider or a respiratory therapist.
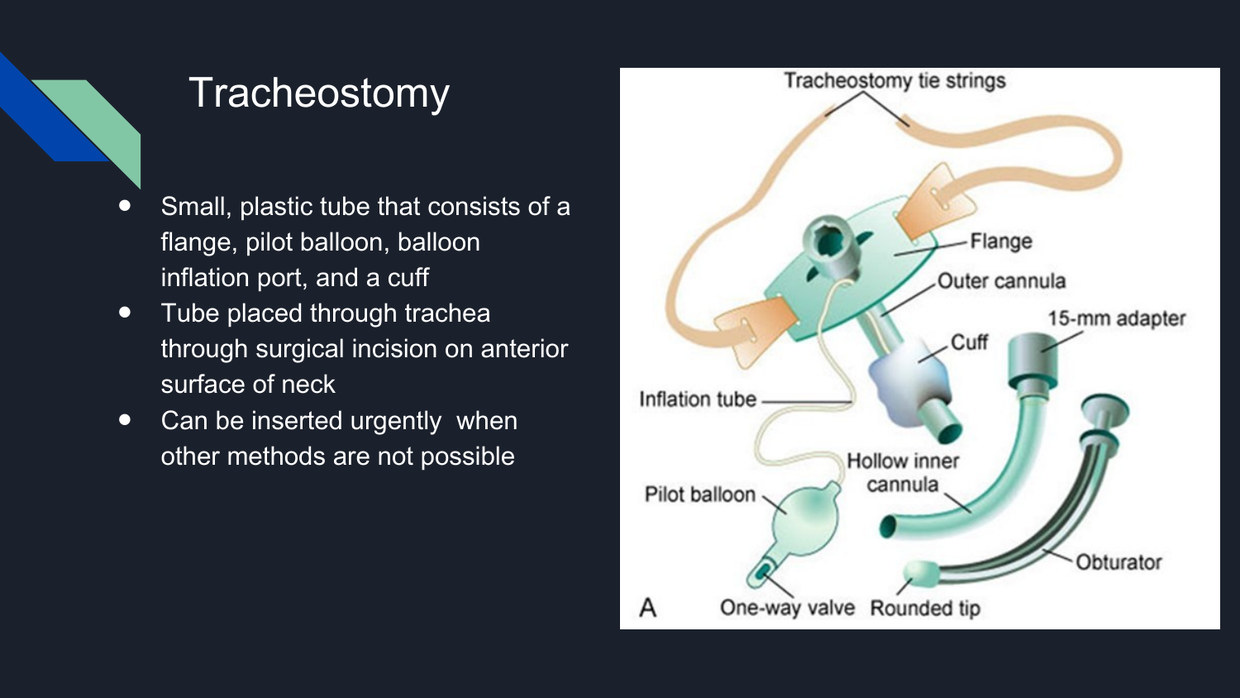
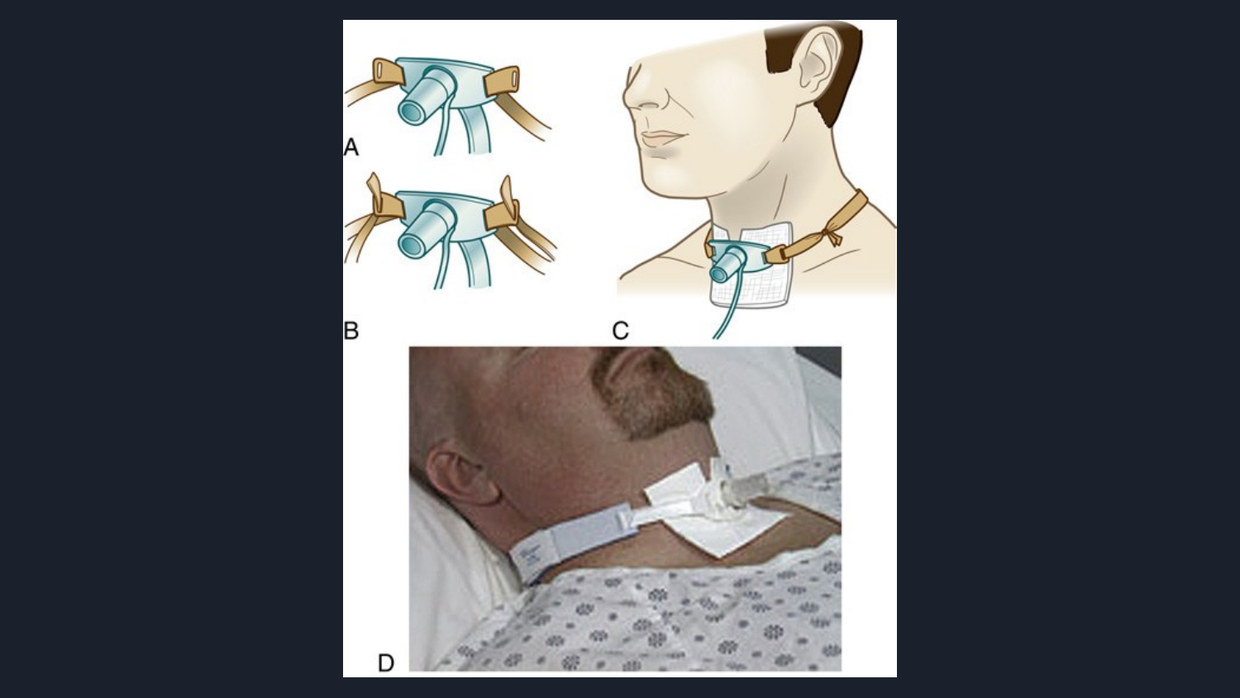
8.6 Tracheostomy — Introduction
She introduces the tracheostomy briefly here and defers the detail to the end of the lecture (Unit 10). At this point:
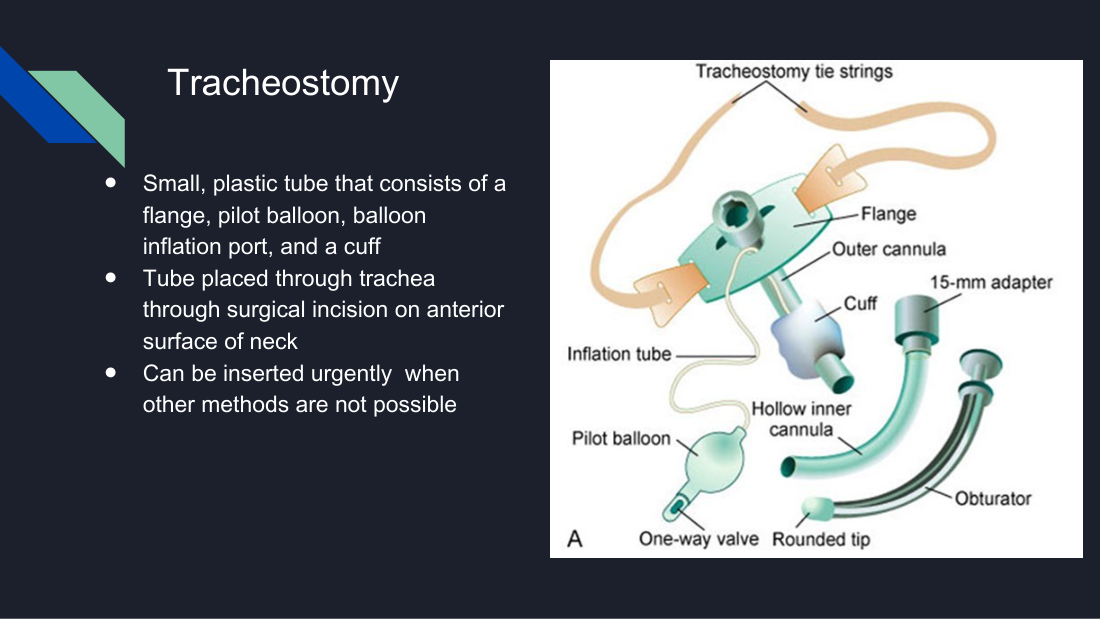
A small plastic tube consisting of a flange, pilot balloon, balloon inflation port, and a cuff.
Placed into the trachea through a surgical incision on the anterior surface of the neck.
Can be inserted urgently when other methods are not possible.
Her labelled tracheostomy tube: flange, outer and inner cannula, obturator, cuff, pilot balloon. The inner cannula is the part you remove and clean; the obturator is the guide used to insert the tube.
She explains the two cannulas, which the slide assumes you know: there is one cannula sitting in the tracheostomy site and another cannula on the inside that you can remove, clean, and put back. That inner cannula is the object of most trach care (§10.14). The tube is placed through the anterior surface of the neck.
8.7 Rapid Sequence Intubation
RSI is the rapid, concurrent administration of both a sedative and a paralytic during emergency airway management, to induce unconsciousness for intubation. Its purpose is to decrease injury and aspiration risk.
Drug class
Her examples
Purpose
Sedative
propofol, etomidate
Induces unconsciousness
Rapid-onset opioid
fentanyl
Blunts the pain of the procedure
Paralytic
rocuronium
Produces skeletal muscle paralysis so the cords can be passed
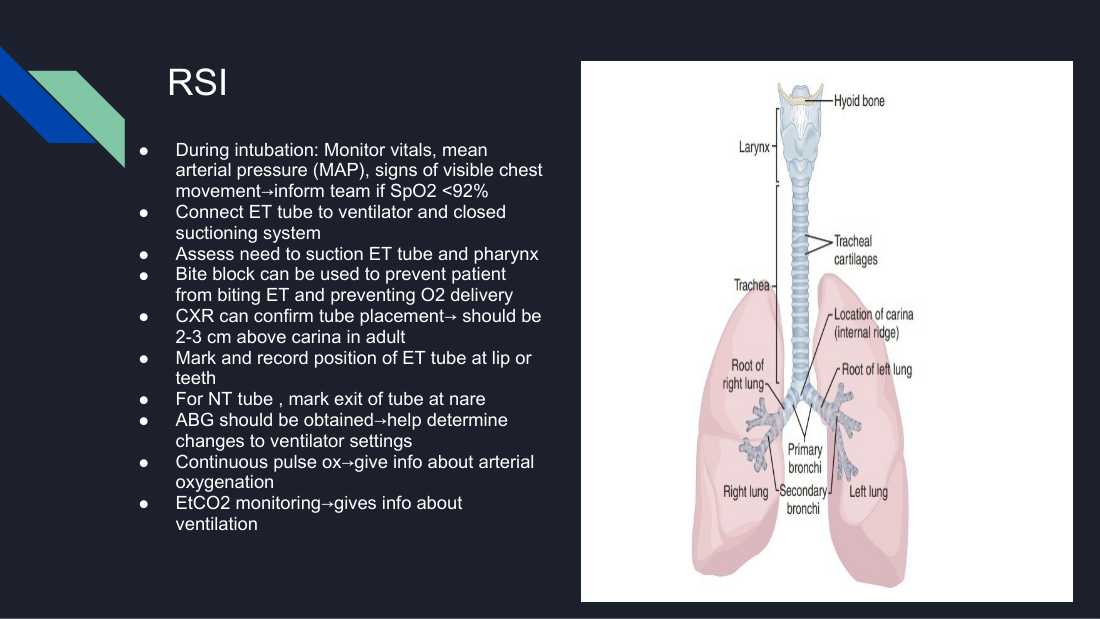
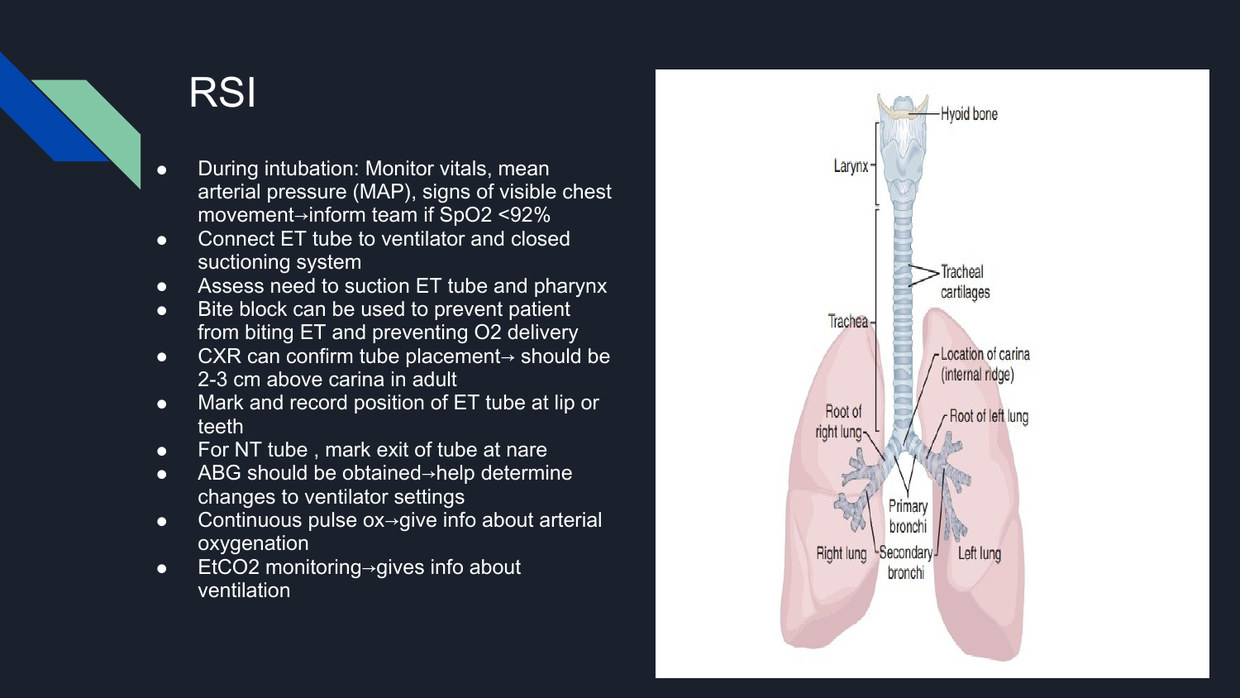
Her airway anatomy during rapid sequence intubation. Trace the path the tube takes past the vocal cords and note the carina below — the tube tip must sit 2 to 3 cm above it.
Immediately after the tube is placed: inflate the cuff, and continue to manually ventilate the patient with a bag-valve mask and 100% oxygen while placement is being confirmed.
8.8 Confirming Placement
Her confirmation sequence, in her order. The list is short enough to memorize whole, and the exam version of this question usually asks which finding confirms versus which merely suggests.
The chapter adds the rationale for the 2-to-3-cm position: it allows the patient to move their neck without moving the tube or letting it drop into the right mainstem bronchus.
8.9 Immediately After Intubation
Action
Detail
Monitor during the procedure
Vital signs, mean arterial pressure (MAP), and visible chest movement. Inform the team if the SpO2 falls below 92%
Connect
ET tube to the ventilator and to a closed suctioning system
Assess
The need to suction the ET tube and the pharynx
Bite block
Can be used to prevent the patient from biting the ET tube and blocking oxygen delivery
Mark and record
The position of the ET tube at the lip or teeth. For an NT tube, mark where the tube exits the nare
ABG
Obtain one — it guides changes to the ventilator settings
Her two settings slides, combined. Learn the definition and the typical value together — a question can give you either one and ask for the other.
Setting
What it is
Typical value
Respiratory rate
Number of breaths the ventilator delivers per minute
12–20 breaths/min
Tidal volume (VT)
Volume of gas delivered to the patient during each ventilator breath
4–8 mL/kg
FiO2
Fraction of inspired oxygen delivered to the patient. Adjusted to maintain PaO2 >60 mm Hg or SpO2 >92%
30%–100%
PEEP
Positive pressure applied at the end of expiration of ventilator breaths
5 cm H2O
Pressure support
Positive pressure used to augment the patient's inspiratory pressure during a spontaneous breath
5–10 cm H2O
Sensitivity
The amount of effort the patient must generate to trigger a breath from the ventilator
Set by the provider or RT
Peak inspiratory pressure (PIP)
The maximum pressure the ventilator can generate to deliver the tidal volume
30 cm H2O
Inspiratory flow rate and time
The speed with which the tidal volume is delivered
40–80 L/min; 0.8–1.2 sec
I:E ratio
Duration of inspiration to duration of expiration
1:2 — exhalation is twice as long as inspiration
A notation point she makes: tidal volume is usually abbreviated with a capital V and a lowercase subscript t, and she notes she could not format it that way on the slide. Expect to see it as VT.
9.2 Peak Inspiratory Pressure and the Overflow Mechanism
PIP is a ceiling, not a target. The ventilator will build pressure to deliver the breath, but it is not permitted to exceed the PIP you set.
Her reason for setting a PIP at all: so the ventilator cannot over-pressurize the patient, which would cause volutrauma — damage to the alveoli.
9.3 Ventilator Alarms
9.4 The Mode Framework
A ventilator mode is the way the ventilator delivers effective ventilation, and it is chosen based on how much work of breathing the patient can perform. Her definition of WOB in this context: the inspiratory effort needed to overcome the elasticity and viscosity of the lungs, plus airway resistance.
She translates that into plain language: if the lungs are stiffer, the work of breathing is harder, because the patient has to push against a harder pressure.
Level of support
Who does the work
Settings
Full support
The ventilator does most of the work of breathing
Usually a set respiratory rate, set VT, and a PIP limit
Partial support
Shared — the patient assumes more responsibility for breathing
A set rate or VT, but the patient adds their own breaths
Spontaneous
The intubated or tracheostomy patient assumes responsibility for almost all breathing
Usually used before extubation
9.5 Which Modes Matter
One footnote on the slide itself: it announces five most common modes and then lists six — assist control, pressure control, PRVC, SIMV, pressure support, and CPAP. If a question asks you to name them, name the six that are actually printed.
9.6 Assist-Control (AC)
Also called volume control.
A full support mode.
A preset tidal volume is delivered at a preset respiratory rate — the patient will always get that preset rate no matter what.
When the patient takes a spontaneous breath, the ventilator senses the change in airflow in the circuit and delivers the full preset tidal volume for that breath too.
Used in postoperative patients, patients with neuromuscular disorders, and acute respiratory failure.
Hyperventilation can occur.
She also names two clinical triggers for that hyperventilation, neither on the slide. A patient waking up from anesthesia starts taking more spontaneous breaths and gets each one at full tidal volume. And a patient in pain or anxious may start breathing fast spontaneously. Both are stems waiting to happen: the post-op patient whose ABG shows a rising pH and a falling CO2.
She adds one indication the slide does not list: AC is used for a patient who has just had CPR and needs help breathing, or someone in bad respiratory failure who cannot do any of the breathing on their own.
Both the patient and the ventilator do the work of breathing — a partial support mode.
Delivers a preset tidal volume at a preset respiratory rate, in synchrony with the patient's own spontaneous breathing.
In between the ventilator-delivered breaths, the patient breathes spontaneously and achieves whatever tidal volume they can achieve.
Used when the patient's condition is too good for a full support mode, but they are not ready for a spontaneous mode.
Benefits: improved patient-ventilator synchrony, lower mean airway pressures, and prevention of respiratory muscle atrophy as the patient takes on more of the work of breathing.
9.8 AC versus SIMV — the Discriminator
Assist-Control (AC)
SIMV
Level of support
Full support
Partial support
Set rate delivered?
Yes — always, no matter what
Yes — synchronized with the patient's own efforts
Patient's own extra breaths
Receive the full preset tidal volume
Receive whatever volume the patient can generate
Main risk
Hyperventilation → respiratory alkalosis
Muscle fatigue from increased work of breathing
Typical patient
Just intubated, post-CPR, post-op, severe ARF — cannot do the work
Improving, doing some of the work; a weaning mode
9.9 Pressure-Control (PC) Ventilation
A full support mode that provides a pressure-limited breath.
There is a set respiratory rate and a set peak inspiratory pressure.
When the patient breathes, the ventilator delivers a volume of gas up to the PIP limit.
The PIP limit is never exceeded, and there is NO set tidal volume.
Useful for patients with decreased lung compliance and increased resistance — "stiff lungs".
Gives control over the amount of pressure going into the lungs, which decreases the risk of volutrauma and barotrauma.
Usually used for a trial before extubation.
Her stiff-lung indication connects straight back to ARDS. The chapter names the same example — pressure control for the ARDS patient with decreased compliance and increased resistance, because limiting pressure prevents alveolar overdistention and rupture.
9.10 Pressure-Regulated Volume Control (PRVC)
A full support mode that combines features of both volume and pressure delivery.
The ventilator attempts to deliver the targeted tidal volume with the least amount of pressure.
It constantly analyzes each breath — resistance and compliance of the lungs, the exhaled tidal volume, and the PIP — and adjusts the delivery of each breath based on that feedback.
9.11 Pressure Support Ventilation (PSV)
A spontaneous mode.
Positive pressure is applied to the airway on inspiration only.
The patient must be able to initiate their own breath.
The preset positive airway pressure is set so the inspiratory flow rate of gas is greater than the patient's own inspiratory flow rate.
When the patient starts a breath, the ventilator supplies a rapid flow of gas at initiation and then tapers the flow toward the end of inhalation.
The patient determines their own inspiratory length, tidal volume, and respiratory rate.
Purpose: to help facilitate weaning.
Benefits: patient comfort, decreased work of breathing, and decreased oxygen consumption.
The chapter notes PSV is the most common spontaneous mode in North America, may be combined with SIMV during weaning when the respiratory drive is not yet stable, and that the nursing priority is to monitor for apnea and for rising work of breathing.
9.12 CPAP as a Ventilator Mode
A spontaneous mode in which the ventilated patient controls almost all aspects of the breath.
Not the same as the noninvasive CPAP used for sleep apnea — this is a mode on a ventilator, delivered through an artificial airway.
Only FiO2 and PEEP are set. One level of pressure during both inspiration and expiration.
The patient determines their own respiratory rate and tidal volume.
Used to assess the patient's rate and rhythm, work of breathing, and hemodynamic status after a period of intubation.
Usually used for only about 30 to 120 minutes — the patient may be extubated after this.
9.13 All Six Modes at Once
Mode
Support level
What is set
What varies
AC (volume control)
Full
Rate, VT, PEEP
Pressure. Every breath — set or patient-initiated — gets the full VT
PC
Full
Rate, PIP, PEEP
Volume. PIP is never exceeded; no set VT
PRVC
Full
Rate, VT target, PIP limit, PEEP
Adjusts breath by breath to hit the VT at the lowest pressure
SIMV
Partial
Rate, VT, PEEP
Mandatory breaths get the set VT; the patient's own breaths get whatever they can generate
PSV
Spontaneous
Inspiratory pressure, PEEP, sensitivity
Patient sets rate, VT, and inspiratory time. No backup rate
CPAP
Spontaneous
FiO2 and PEEP only
Everything else. No set rate, VT, or PIP
9.14 Positive End-Expiratory Pressure (PEEP)
Positive pressure applied to the airway during exhalation.
PEEP increases oxygenation by splinting open previously collapsed alveoli and preventing alveolar collapse throughout the respiratory cycle, which increases the opportunity for O2 and CO2 to diffuse across the alveolar-capillary membrane.
Used in all patients who are mechanically ventilated.
Optimal PEEP is PEEP titrated so oxygenation improves without compromising hemodynamics.
FiO2 can usually be reduced when PEEP is used.
Classic indication for PEEP: ARDS.
Use with caution in traumatic brain injury, increased ICP, and low cardiac output. Her slide also lists hypovolemia.
She ties PEEP to ARDS with a callback to the previous week's images: patients with ARDS have those secretions in their alveoli, so they are going to need PEEP for sure. It is the same reasoning as §4.11 — if the surfactant that normally holds alveoli open has been lost, applied pressure has to do the job.
UNIT 10
The Ventilated Patient — Nursing Management, Weaning & Tracheostomy
Her four nursing responsibilities for the artificial airway: maintain correct tube placement, maintain proper cuff inflation, maintain tube patency, and maintain alarm systems. The first one is where the emergencies live.
How you confirm placement is still correct: observe for symmetric chest wall movement, auscultate and confirm bilateral breath sounds, and record and mark the position of the ET tube at the lip or teeth so the next shift can compare.
10.2 Maintaining Proper Cuff Inflation
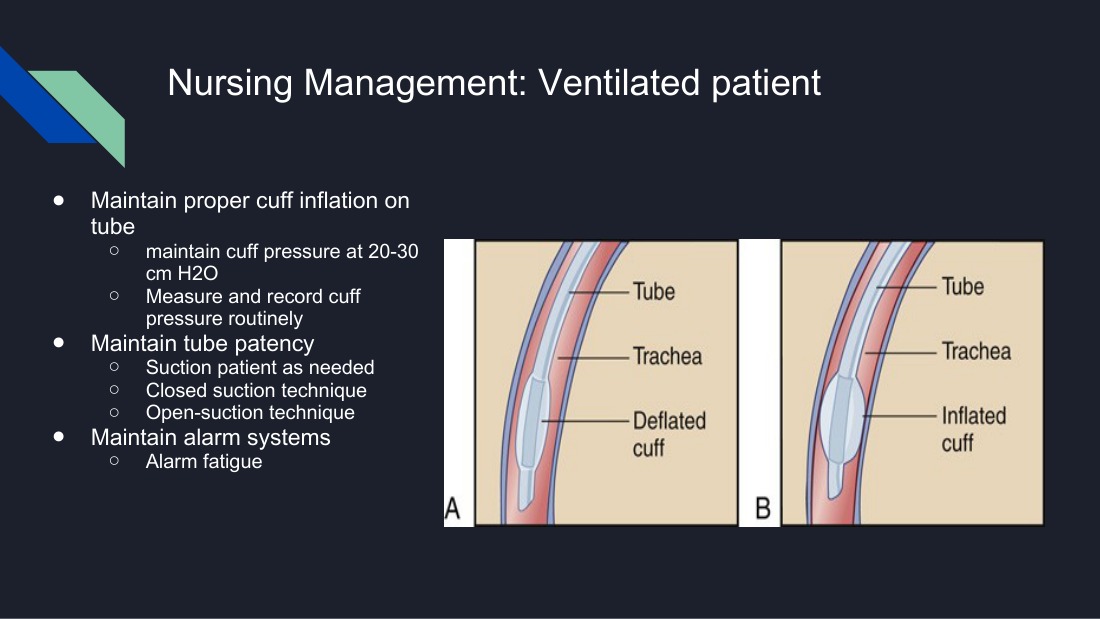
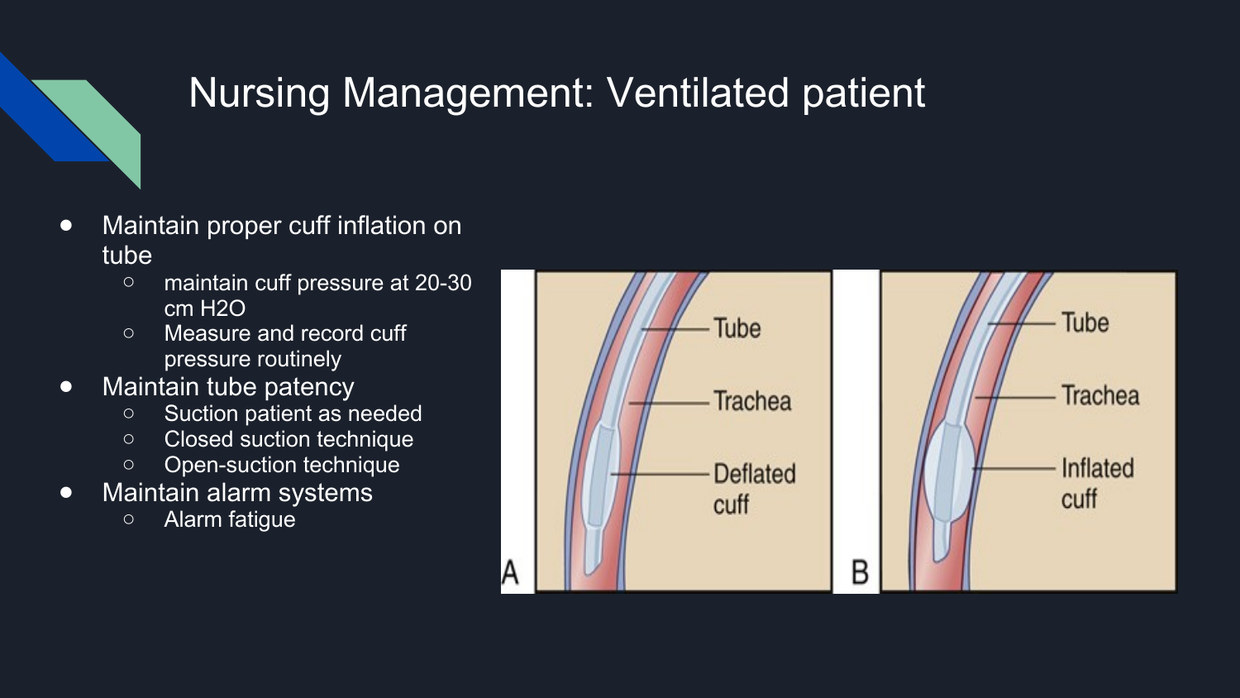
Maintain cuff pressure at 20 to 30 cm H2O.
Measure and record cuff pressure routinely — she says usually every shift, or according to hospital policy.
Her deflated versus inflated cuff, shown against the tracheal wall. Deflated, secretions pass freely down past the tube. Over-inflated, the cuff presses on the tracheal wall and shuts off capillary blood flow. The 20–30 cm H2O window is the space between those two failures.
10.3 Maintaining Tube Patency — Suctioning
Her procedure, in order:
Step
Detail and rationale
Hand hygiene and gloves
She adds this before the slide's first step — wash your hands well and put on sterile gloves
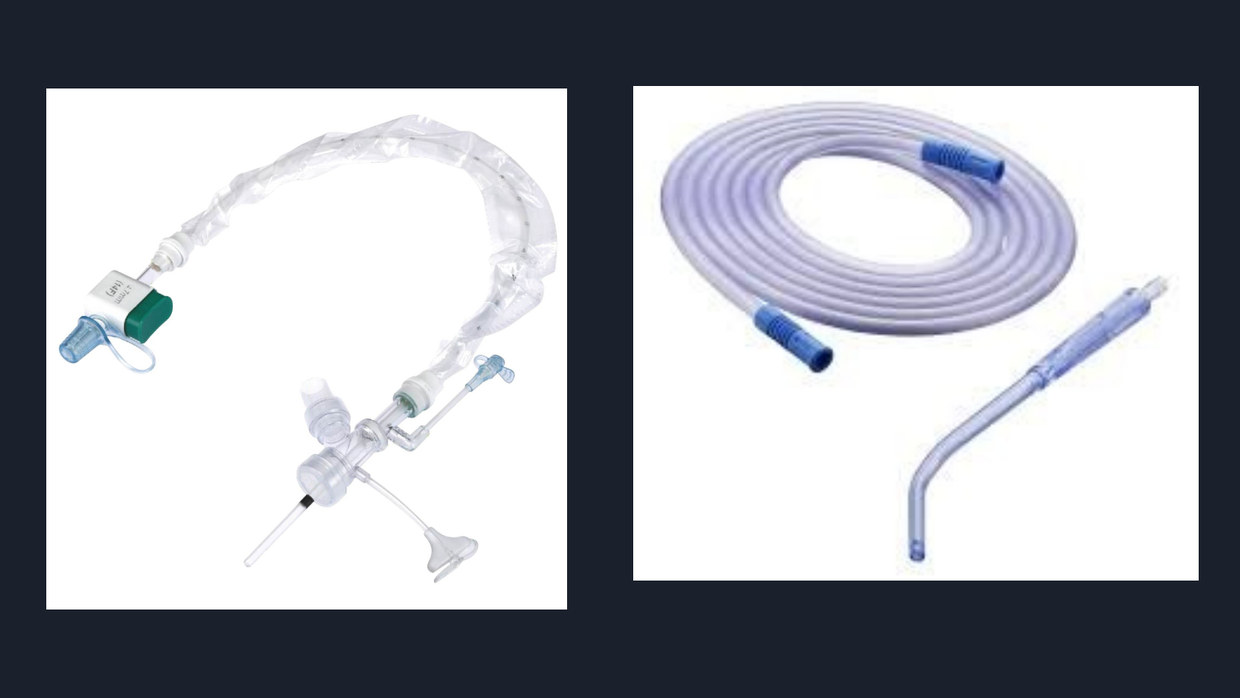
Connect suction tubing
To the end of the in-line suction catheter
Hyperoxygenate
100% FiO2 before starting, by pressing the 100% FiO2 button on the ventilator. If you raise the FiO2 manually, remember to return it to baseline when you are done
Insert the catheter
Gently but quickly, pausing to pull back on the plastic sleeve containing the catheter
Stop inserting if the patient coughs more forcefully
A cough means the catheter is deep enough
Do NOT insert until you meet resistance
Resistance means you are hitting the carina — fragile, vascular tissue
Apply suction
Continuous suction on withdrawal, over 10 seconds. Never on the way in
Observe tolerance
She defines it: make sure they are not turning blue and not coughing excessively
Oral cavity last
Disconnect the suction tubing, connect the Yankauer, and gently suction the mouth
10.4 Oral Care, Skin Integrity, and Nutrition
Area
Her content
Oral care
Moisten lips, tongue, and gums with saline or water swabs to prevent mucosal drying. At least 3 times per day. Helps prevent ventilator-associated pneumonia
Skin integrity
Her concrete version: ventilated patients have straps on the cheeks holding the tube in place — check for breakdown around those, and anywhere the tube sits on the lip
Nutrition
Nutrition problems cause poor oxygen transport from anemia, delay weaning, decrease resistance to infection, and slow extubation and recovery
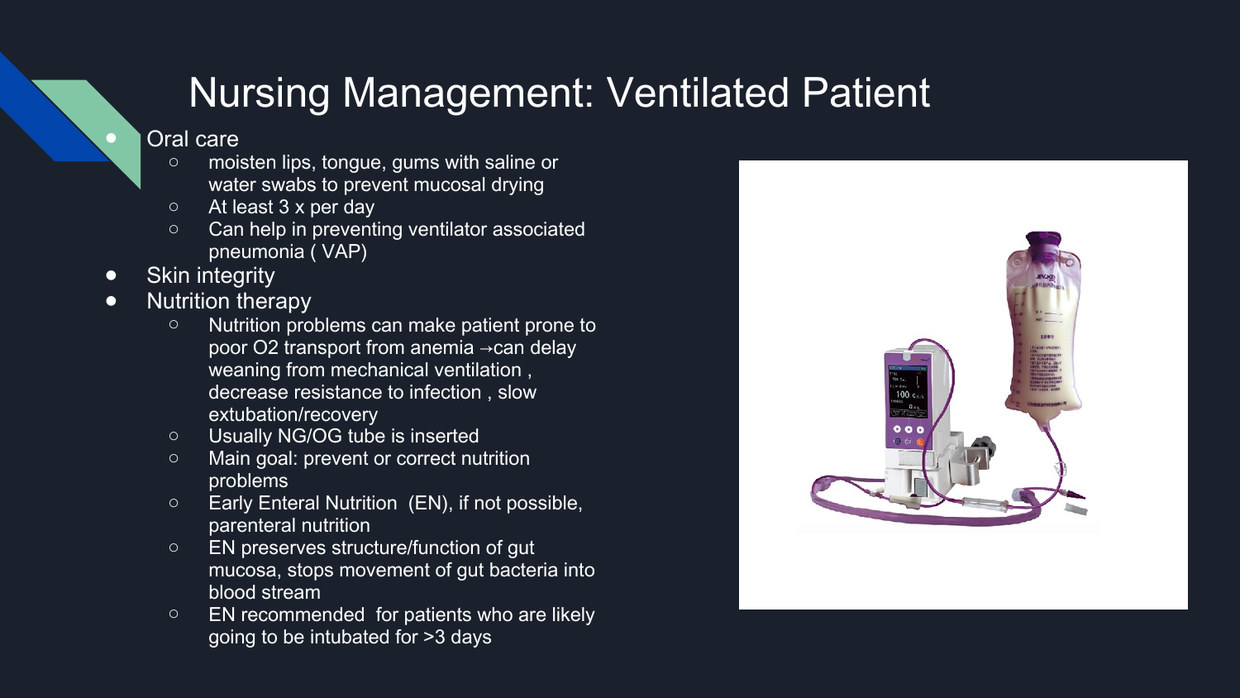
For feeding, an NG or OG tube is usually inserted. Her definitions, which the slide assumes: an NG tube goes in through the nose and down the back of the throat; an OG tube is the same concept but goes in through the mouth.
She also defines the two feeding routes, which the slide uses without explaining: enteral nutrition is feeding into the stomach — through a tube such as a PEG — and parenteral is intravenous, going directly to the bloodstream. Know which one your patient is on.
10.5 Prophylaxis and Early Mobility
Venous thromboembolism prophylaxis. She names it concretely: SCDs, and if there are no contraindications, subcutaneous anticoagulants such as heparin.
Stress ulcer prophylaxis with a PPI.
Early mobility. Encourage most patients receiving invasive ventilation to exercise and mobilize as soon as possible unless contraindicated; collaborate with physical and occupational therapy.
Proper positioning to prevent pressure injuries.
She describes the turning routine concretely: go in and turn the patient, position pillows, turn them onto the right side and onto the left, and elevate the heels so they do not develop pressure sores on the heels. She notes that hospitals watch pressure injuries closely because they are preventable.
10.6 Complications of Mechanical Ventilation
Her list, with the mechanism attached to each. Several have already appeared in other units, which is the point — this slide is a synthesis.
Complication
Mechanism
Aspiration
The tube holds the epiglottis open, and secretions collect above the cuff. HOB elevation and cuff pressure are the defenses
Sodium and water imbalance
The chapter adds the mechanism: decreased cardiac output → decreased renal perfusion → renin, angiotensin and aldosterone → sodium and water retention, appearing 48 to 72 hours after starting positive pressure ventilation
Adverse hemodynamic effects
Increased intrathoracic pressure compresses the thoracic vessels, decreasing venous return, preload, and cardiac output — the same mechanism as the PEEP cautions in §9.14
Alveolar hypoventilation / hyperventilation
Hypoventilation → respiratory acidosis. Hyperventilation → respiratory alkalosis. Settings, leaks, secretions, or over-sedation on one side; over-set rate or volume, pain, or anxiety on the other
Barotrauma
Increased airway pressure distends and ruptures fragile alveoli. Greatest risk in stiff, noncompliant lungs — ARDS
Volutrauma
Too large a volume delivered into noncompliant lungs; causes alveolar rupture and movement of fluid and protein into the alveoli
Ventilator disconnection or malfunction
Most disconnections are caught by the low-pressure alarm
Constipation
Her reason, which the slide omits: they are not going to be very mobile
Unplanned extubation
See §10.8
Ventilator-associated pneumonia
See §10.7
10.7 Ventilator-Associated Pneumonia
Her prevention guidelines, which double as the ventilator bundle:
The chapter adds the definition and the epidemiology her slides omit: VAP is pneumonia occurring 48 hours or more after intubation, it develops in as many as 40% of intubated patients, most cases appear within 96 hours, and the usual organisms are gram-negative bacteria. Signs suggesting VAP: fever, high WBC count, a change in the color or amount of sputum, crackles or wheezes, and new infiltrates on chest x-ray.
10.8 Unplanned Extubation
The chapter adds the recognition half. Unplanned extubation is not always obvious; sometimes the tip sits in the hypopharynx or esophagus. Its signs: the low-pressure ventilator alarm, decreased or absent breath sounds, respiratory distress, an audible cuff leak — and the clearest of all, the patient may be talking to you.
10.9 Weaning Readiness
Weaning is the process of gradually reducing ventilator support so the patient assumes greater responsibility for breathing. A formal readiness assessment is done first.
10.10 The Spontaneous Breathing Trial
Element
Her detail
How often
Daily, for patients on ventilators, if they can tolerate it
What you stop
All sedatives and opioids — but only in patients who are not in pain. If they are in pain, do not stop it
How long
At least 30 minutes, but no more than 120 minutes
Signs of failing
Increasing respiratory rate, falling oxygen saturation, decreased tidal volume; also monitor for tachypnea, sustained low saturation, and dysrhythmias
If they fail
Restart the sedation at about 50% of the prior dose
If they pass
Get them ready for weaning, and do not restart the sedatives if they are doing well without them
10.11 Tracheostomy — Indications and Advantages
Advantages over an ET tube: more comfortable for the patient, easier to keep the tube clean, and less long-term risk to the vocal cords.
Tube type
When it is used
Cuffed
Especially for patients who are on mechanical ventilation — the cuff seals the airway so the delivered volume reaches the lungs and secretions do not descend
Uncuffed
For patients who need a better airway but are not going to be mechanically ventilated
Post-procedure care: inflate the cuff immediately, confirm correct placement, and monitor vital signs. Her complications list: airway obstruction, bleeding, infection, and potential tube dislodgement.
10.12 Nursing Management of the Tracheostomy
Action
Frequency / detail
Assess and confirm patency
Every shift, or more often as needed
Observe the site
For redness, inflammation, edema, ulceration — she adds that these may indicate infection
Sterile dressing changes
Every 12 to 24 hours
Measure cuff inflation pressure
With a cuff manometer at least every 8 hours. Pressure should not exceed 20 to 30 cm H2O
Suction
As needed.Avoid suctioning a newly created tracheostomy for the first few hours
She explains why mucus plugs matter, which the slide does not: a plug blocks the patient's airway, causing coughing and difficulty breathing. Humidification is not a comfort measure alone; it is plug prevention.
10.13 Accidental Decannulation
10.14 Stoma and Inner Cannula Care
Her procedure, which is the last content slide of the module:
Open sterile equipment. Pour sterile water or normal saline into 2 compartments of a sterile container or 2 basins, then apply sterile gloves.
If present, unlock and remove the inner cannula. Many tracheostomy tubes do not have inner cannulas; care for those includes every step except inner cannula care.
Disposable inner cannula: replace with a new one.
Non-disposable inner cannula: immerse in sterile solution and clean inside and outside with a tube brush or pipe cleaners; rinse in sterile solution; remove and shake to dry; insert into the outer cannula with the curved part downward and lock in place.
Stoma care: remove dried secretions using a 4 × 4-inch gauze pad soaked in sterile water or saline; gently pat dry; and clean under the tracheostomy flange using cotton swabs.
She adds one instruction the slide does not: dry the inner cannula really well before reinserting it.
Glossary
Covers: abbreviations and terms used across both Module 2 decks, both lectures, and Lewis's Ch. 28 and Ch. 32
Abbreviations
ABG
Arterial blood gas
AC
Assist-control ventilation
AKI
Acute kidney injury
APRV
Airway pressure release ventilation
ARDS
Acute respiratory distress syndrome
ARF
Acute respiratory failure
BiPAP
Bilevel positive airway pressure
BVM
Bag-valve mask
CDU
Chest drainage unit
CNS
Central nervous system
CO
Cardiac output
CO2
Carbon dioxide
COPD
Chronic obstructive pulmonary disease
CPAP
Continuous positive airway pressure
CPT
Chest physiotherapy
CRF
Chronic respiratory failure
CRRT
Continuous renal replacement therapy
CT
Computed tomography
CTA
CT angiogram
CVP
Central venous pressure
CXR
Chest x-ray
2,3-DPG
2,3-diphosphoglycerate
ECMO
Extracorporeal membrane oxygenation
EN
Enteral nutrition
EPAP
Expiratory positive airway pressure
ET
Endotracheal
EtCO2
End-tidal carbon dioxide
FiO2
Fraction of inspired oxygen
HCO3
Bicarbonate
HCP
Health care provider
Hgb
Hemoglobin
HOB
Head of bed
ICP
Intracranial pressure
ICU
Intensive care unit
I:E
Inspiratory to expiratory ratio
IPAP
Inspiratory positive airway pressure
LOC
Level of consciousness
MAP
Mean arterial pressure
MI
Myocardial infarction
MODS
Multisystem organ dysfunction syndrome
MOV
Minimal occluding volume
NG
Nasogastric
NIF
Negative inspiratory force
NIV
Noninvasive ventilation
NMBA
Neuromuscular blocking agent
NPA
Nasopharyngeal airway
NT
Nasotracheal
O2
Oxygen
OG
Orogastric
OPA
Oropharyngeal airway
PaCO2
Partial pressure of arterial carbon dioxide
PaO2
Partial pressure of arterial oxygen
PC
Pressure control ventilation
PEEP
Positive end-expiratory pressure
P/F ratio
PaO2 to FiO2 ratio
PIP
Peak inspiratory pressure
PPI
Proton pump inhibitor
PPV
Positive pressure ventilation
PRVC
Pressure-regulated volume control
PSV
Pressure support ventilation
RR
Respiratory rate
RSBI
Rapid shallow breathing index
RSI
Rapid sequence intubation
RT
Respiratory therapist
SaO2
Arterial oxygen saturation
SAT
Spontaneous awakening trial
SBT
Spontaneous breathing trial
SCD
Sequential compression device
SIMV
Synchronized intermittent mandatory ventilation
SpO2
Oxygen saturation measured by pulse oximetry
TBI
Traumatic brain injury
VAP
Ventilator-associated pneumonia
V/Q
Ventilation-perfusion
VT
Tidal volume
VTE
Venous thromboembolism
WOB
Work of breathing
Key terms
Absorption atelectasis
Alveolar collapse that occurs when high concentrations of oxygen replace the nitrogen normally present in the alveolus; without nitrogen to hold its shape, the alveolus collapses.
Acute-on-chronic respiratory failure
Acute respiratory failure developing on top of pre-existing chronic respiratory failure — her example is a COPD patient who develops pneumonia.
Affinity
How tightly hemoglobin binds oxygen. Increased affinity (left shift) makes unloading at the tissues harder; decreased affinity (right shift) makes it easier.
Air trapping
Air left behind in the lungs after exhalation, making the next breath harder to take and eventually overinflating the lungs.
Alveolar-capillary membrane
The thin barrier between the alveolus and the pulmonary capillary where gas exchange occurs. Damage to it underlies diffusion impairment and ARDS.
Alveolar hypoventilation
A decrease in ventilation that increases the PaCO2. The fourth hypoxemic mechanism and the common pathway of hypercapnic failure.
Anatomic shunt
Blood passing through a channel in the heart and bypassing the lungs entirely — for example a ventricular septal defect.
Auto-PEEP
PEEP over and above the set level, caused by inadequate exhalation time so the lung never fully empties between breaths.
Barotrauma
Alveolar rupture from excess pressure during mechanical ventilation, allowing air to escape from the alveoli.
Capillary shunt
Blood flowing through pulmonary capillaries without taking part in gas exchange because the alveoli are filled with fluid — her example is pneumonia.
CO2 narcosis
Loss of the CO2-driven stimulus to breathe in a chronic CO2 retainer given excessive supplemental oxygen, causing CO2 to accumulate further.
Cooperativity
The property by which binding one oxygen molecule to hemoglobin makes the remaining binding sites easier to fill.
Decannulation
Removal of a tracheostomy tube from the trachea, whether planned or accidental.
Diffusion impairment
Impaired gas exchange from a thickened alveolar-capillary membrane or from fluid, white cells, or protein in the alveoli. Classic sign: hypoxemia that worsens with activity and improves with rest.
Enteral nutrition
Feeding into the stomach or gut through a tube. Preferred over parenteral because it preserves gut mucosa and prevents bacterial translocation into the bloodstream.
Extubation
Physical removal of the oral or nasal ET tube.
Heimlich (flutter) valve
A one-way valve attached to the external end of a chest tube to remove air from the pleural space, used for a small to moderate-sized pneumothorax and allowing patient mobility.
Hyaline membrane
A thickened layer of necrotic cells, protein and fibrin lining the inside of the alveolus. It thickens in ARDS and further impairs gas exchange and lung compliance.
Hypercapnia
An increase in arterial CO2 (PaCO2), resulting from insufficient CO2 removal.
Hypoxemia
A decrease in arterial oxygen — a fall in PaO2 and SaO2 — resulting from conditions that interfere with the diffusion of oxygen.
Hypoxia
A decrease in oxygen supply at the cellular level, occurring when the PaO2 falls low enough to produce signs and symptoms of inadequate oxygenation.
Intubation
The process of securing the airway with an oral or nasal endotracheal tube.
Milking (stripping) a chest tube
Pulling on the chest tube to move drainage along. No longer done — it can cause harm and can cause the tube to disconnect.
Optimal PEEP
The level of PEEP titrated so that oxygenation improves without compromising hemodynamics.
Oxygenation
The process of delivering oxygen to the body's tissues. Her frame: think of it as blood flow.
Oxygen toxicity
Injury from prolonged high-concentration oxygen. Free radicals cause inflammation and cell death by disrupting the alveolar-capillary membrane.
Parenteral nutrition
Intravenous feeding delivered directly into the bloodstream, used when enteral feeding is not possible.
Permissive hypercapnia
A PaCO2 that slowly rises above normal limits as a result of delivering a lower-than-normal tidal volume in ARDS. It is accepted, not sought.
Pleural space
The space between the lung and chest wall, normally at negative (subatmospheric) pressure. That negative pressure is what keeps the lung expanded.
Refractory hypoxemia
Hypoxemia that persists or worsens despite increasing oxygen concentrations. The classic sign and hallmark of ARDS.
ROME
Respiratory is Opposite, Metabolic is Equal — her optional mnemonic for reading an ABG.
Sensitivity
The ventilator setting that determines how much effort the patient must generate to trigger a breath.
Shunt
Blood exiting the heart without participating in gas exchange. Oxygen therapy alone does not correct the resulting hypoxemia.
Subcutaneous emphysema
Air leaking into the tissue around a chest tube site, felt as a crackling sensation on palpation. Dangerous if it tracks up toward the neck and head, where swelling can compromise the airway.
Surfactant
The substance made by alveolar type I and type II cells that maintains alveolar stability and prevents alveolar collapse. Lost in ARDS.
Tidaling
Normal up-and-down movement of the water in the water-seal chamber with the patient's breathing, reflecting intrapleural pressure changes. A sudden stop suggests occlusion; a gradual fade means the lung is re-expanding.
Tripod position
Sitting leaning forward with the arms propped, which increases the anteroposterior diameter of the chest and eases breathing. A marker of severe respiratory distress.
Ventilation
The process of moving air in and out of the lungs. Her frame: think of it as airflow.
Ventilator-associated pneumonia
Pneumonia developing 48 hours or more after intubation. Largely preventable through the bundle of nursing measures in §10.7.
Volutrauma
Alveolar injury from delivering too large a tidal volume into noncompliant lungs, with fluid and protein moving into the alveolar spaces.
V/Q mismatch
A mismatch between ventilation and perfusion in a lung region, most often from secretions in the airways or alveoli or from bronchospasm. Usually responds to oxygen therapy.
Water-seal chamber
The second chamber of a chest drainage unit, containing about 2 cm of water and acting as a one-way valve that lets air out and prevents it from returning to the patient.
Weaning
The process of gradually reducing ventilator support so the patient assumes greater responsibility for breathing spontaneously.
Work of breathing
The inspiratory effort needed to overcome the elasticity and viscosity of the lungs plus airway resistance — how hard the respiratory muscles must work to move air.
About This Guide
Where it comes from
This is the assigned reading for Module 2, worked through on its own terms — Lewis’s Medical-Surgical Nursing, 12th ed., Ch. 28 (airway management, ventilation and critical care) and Ch. 32 (respiratory failure and ARDS), plus the posted unit objectives.
Nothing here is attributed to the instructor, because none of it came from her. The boxes marked HIGH-YIELD are the textbook’s emphasis and this guide’s, which is why they are a different colour from the yellow instructor boxes in Lecture. There are no lecture play buttons in this view for the same reason.
1.1 Two Jobs, Not One: Ventilation and Oxygenation
The chapter opens with a sentence worth memorizing whole: exchange of O2 and CO2 is vital for life; without an optimal route for ventilation, O2 therapy will not benefit the patient; providing optimal ventilation is no guarantee that oxygenation improves — but without a patent airway, the patient will die. That sentence is the whole module in miniature. Airway first, then ventilation, then oxygenation, and the three are not interchangeable.
Ventilation is air movement: gas in and gas out. Oxygenation is gas transfer: O2 crossing from alveolus to capillary blood. A patient can ventilate beautifully and still be hypoxemic (fluid-filled alveoli), and can oxygenate acceptably on a high FIO2 while retaining CO2 to the point of narcosis. The exam separates them constantly, and each is measured by a different number.
Gas exchange only happens where ventilated alveoli sit against perfused capillaries. In normal lungs the two are nearly identical: alveolar ventilation 4–6 L/min against pulmonary blood flow 4–6 L/min, giving a V/Q ratio of 0.8 to 1.2. A perfect match is V/Q = 1 (1:1). Anything else is a V/Q mismatch.
Some mismatch is normal and regional, and knowing the pattern explains half the positioning questions in this module. The apex is relatively over-ventilated and under-perfused; the base is the reverse. Because apex and base changes balance each other, the blood leaving the lung is a mixture with a close overall match.
Lung region
V/Q
PaO2 (mm Hg)
PaCO2 (mm Hg)
What it means
Apex
3.3
132
28
More ventilation than perfusion — wasted air
Midpoint
1.0
108
39
The ideal match
Base
0.63
89
42
More perfusion than ventilation — wasted blood
Push each side of that ratio to its extreme and you get the two named failures of matching. Dead space is ventilation without perfusion (V/Q approaching infinity) — the alveolus fills with air that never meets blood, as distal to a pulmonary embolus. Shunt is perfusion without ventilation (V/Q approaching zero) — blood flows past an alveolus filled with fluid and leaves the lung exactly as it arrived.
1.3 The Oxyhemoglobin Dissociation Curve
Nearly every threshold in these two chapters — PaO2 60 mm Hg, SaO2 90%, SpO2 92% — is a point on one curve. The oxyhemoglobin dissociation curve plots the partial pressure of oxygen dissolved in plasma (PaO2, on the horizontal axis) against the percentage of hemoglobin carrying oxygen (SaO2, on the vertical axis). It is S-shaped, and the shape is the point.
PaO2
Corresponding SaO2
What it tells you
100 mm Hg
about 97%–98%
Normal arterial blood. Hemoglobin is nearly full — more PaO2 buys almost no additional saturation.
60 mm Hg
about 90%
The knee of the curve. This is why every target in these chapters is PaO2 >60 / SaO2 >90%.
40 mm Hg
about 75%
Normal mixed venous blood — hemoglobin has handed off about a quarter of its oxygen to the tissues.
27 mm Hg
about 50%
The P50, the standard reference point used to describe whether the curve has shifted.
The curve can slide left or right, changing how tightly hemoglobin holds oxygen at any given PaO2. A right shift means decreased affinity — hemoglobin lets go of oxygen more readily, so tissues get more oxygen but the blood saturates less well in the lung. A left shift means increased affinity — hemoglobin binds oxygen more tightly, loading well in the lung but releasing poorly at the tissue.
Holds O2 tightly; SaO2 looks higher for the same PaO2 but delivery to tissue falls
Aggressive hyperventilation on a ventilator; hypothermia. A reassuring SpO2 can hide tissue hypoxia.
1.4 Hypoxemia Versus Hypoxia
The two words are not synonyms and the chapters are careful with them. Hypoxemia is a laboratory finding: a decrease in arterial O2 (PaO2) and saturation (SaO2) below normal values. Hypoxia is a tissue event: a decrease in O2 supply at the cellular level, occurring when the PaO2 falls far enough to produce signs and symptoms of inadequate oxygenation. Hypoxemia is what the blood gas shows; hypoxia is what the patient is experiencing.
That chain is why a patient in respiratory failure can arrive with a metabolic acidosis on top of a respiratory one, and why lactate is a severity marker rather than a lung number. It also explains the multi-system findings: the CNS loses consciousness without enough blood, O2, and glucose to the brain, with permanent brain damage if hypoxia is severe and prolonged; the gut develops tissue ischemia and increased intestinal wall permeability, letting bacteria migrate from the GI tract into the systemic circulation; and the kidneys respond with sodium retention, peripheral edema, and acute kidney injury.
1.5 Early Signs and Late Signs
This is the single most examined discrimination in the respiratory module, because the correct answer is almost always the early sign that a distracted nurse would dismiss.
Timing
Findings
Why they appear when they do
Earliest
Restlessness, agitation, confusion — a change in mental status
The brain is exquisitely sensitive to changes in O2 (and to a lesser degree CO2) and to acid-base balance. It decompensates before anything else does.
Early
Tachycardia, tachypnea, pallor, a mild increase in work of breathing; hypertension
The heart and lungs compensating for decreased O2 delivery and rising CO2. Compensation, not failure.
Suggests CO2 retention
Morning headache, a low respiratory rate, decreasing level of consciousness, progressive somnolence
CO2 accumulates overnight during hypoventilation and dilates cerebral vessels. This picture is a ventilation problem, not an oxygenation one.
Late
Cyanosis; hypotension; dysrhythmias; paradoxical chest/abdominal movement; coma
Cyanosis is unreliable — it often does not appear until deoxygenated hemoglobin in the capillaries reaches about 5 g/dL, so an anemic patient may never look blue.
1.6 Work of Breathing, and What Position Tells You
Work of breathing (WOB) is the inspiratory effort needed to overcome the elasticity and viscosity of the lungs plus airway resistance — the effort required by the respiratory muscles to move air in. You cannot measure it at the bedside, but the patient's posture grades it for you.
Mild distress — the patient may still be able to lie down.
Moderate distress — the patient prefers to sit.
Severe distress — the patient cannot breathe unless sitting upright.
Tripod position — sitting with the arms propped on an overbed table or on the knees. This decreases WOB in moderate to severe COPD and in ARF because propping the arms increases the anteroposterior diameter of the chest and changes pressure in the thorax, giving the accessory muscles a fixed point to pull against.
Observation
Degree of distress it signals
Retraction of intercostal spaces or the supraclavicular area; accessory muscle use (e.g., sternocleidomastoid)
Often signifies a moderate degree of respiratory distress
Paradoxical breathing — abdomen and chest each move in the opposite direction instead of both moving out on inspiration
Severe respiratory distress; results from maximal accessory muscle use. Patient is often diaphoretic
A change from a rapid rate to a slower rate in a patient still in distress (e.g., acute asthma)
Ominous — signals severe respiratory muscle fatigue and an increased chance of respiratory arrest
"2-word" or "3-word" dyspnea — the patient can say only 2 or 3 words before pausing
A bedside grading of dyspnea severity that needs no equipment
Pursed-lip breathing is the one patient-controlled manoeuvre the chapters credit with raising SaO2: it works by slowing respirations, increasing the time available for expiration, and preventing the small bronchioles from collapsing.
1.7 Reading the Lung Fields
Auscultation finding
What it suggests
Fine crackles
Pulmonary edema
Coarse crackles heard on expiration
Fluid in the airways — pneumonia or some degree of heart failure
Absent or decreased breath sounds
Atelectasis, pleural effusion, or hypoventilation
Bronchial breath sounds over the lung periphery
Lung consolidation from pneumonia
Pleural friction rub
Pneumonia involving the pleura
Inspiratory stridor
Upper airway narrowing or obstruction — an airway emergency, not a lung-tissue finding
Two palpation findings matter as much as the sounds. Crepitus (subcutaneous emphysema) is air in the tissue and points to an air leak — from a chest tube site, a ruptured alveolus, or a tracheostomy. A deviated trachea is a late sign and, in a patient on positive pressure, means tension pneumothorax until proven otherwise.
Retained pulmonary secretions may cause or worsen acute respiratory failure because the movement of O2 into the alveoli and the removal of CO2 from them is severely limited or blocked. Secretions in the airway are one of the most common causes of V/Q mismatch, and secretions in the alveoli — as in pneumonia — produce shunt. Airway clearance techniques (ACTs) loosen mucus and secretions so they can be cleared by coughing, maintaining a patent airway.
ACTs are for patients who retain secretions: COPD, cystic fibrosis (CF), and bronchiectasis. The order of operations matters — bronchodilator therapy first, then the airway clearance technique, then effective coughing (for example huff coughing). Opening the airway before you try to move mucus through it is the entire rationale.
2.2 Breathing Retraining
Diaphragmatic (abdominal) breathing
Focuses on using the diaphragm instead of the accessory muscles of the chest to achieve maximum inhalation and slow the respiratory rate.
Ideal candidates: thoracic and abdominal surgery patients.
Caution: in COPD it may increase work of breathing and dyspnea. People with moderate to severe COPD and marked hyperinflation may not tolerate it at all — their diaphragms are already flattened and mechanically disadvantaged.
Pursed-lip breathing (PLB)
Purpose: prolong exhalation, which prevents bronchiolar collapse and air trapping. The back-pressure created at the lips splints the small airways open long enough for trapped air to escape.
Simple, easy to teach and learn; gives the patient more control over breathing, especially during exercise and periods of dyspnea. It slows the respiratory rate and is easier than diaphragmatic breathing.
Teach "just enough" positive pressure — excessive resistance increases the work of breathing and defeats the purpose.
In extreme acute dyspnea, the focus is helping the patient slow the respiratory rate using PLB.
PLB teaching step
Instruction
1
Inhale slowly and deeply through the nose.
2
Exhale slowly through pursed lips, as if whistling.
3
Relax facial muscles without puffing the cheeks while exhaling slowly.
4
Make exhalation 3 times as long as inhalation.
5
Practice aids: blow through a straw in water to form small bubbles; bend a candle flame without blowing it out; blow a table-tennis ball across a table.
6
Practice 8–10 repetitions, 3 or 4 times a day; use PLB before, during, and after any activity that causes shortness of breath.
2.3 Coughing Techniques
A cough only clears mucus if the airway stays open while the air moves. A hard conventional cough slams the glottis shut and collapses floppy airways in COPD, which is why the chapters teach three modified techniques instead.
Technique
How it is done
Who it is for and why
Huff coughing
Inhale slowly through the mouth from the diaphragm; hold 2–3 sec; exhale forcefully as if fogging a mirror (a "huff"); repeat 1 or 2 more times without a regular cough; cough when mucus is felt; rest 5–10 breaths; repeat 3–5 cycles
A forced expiratory technique made of a series of smaller coughs. Prevents the glottis from closing, so the airway stays open. COPD and emphysema patients generate higher flow rates with a huff than with a normal cough, and it is less tiring
Augmented (quad) coughing
Place 1 or both hands at the anterolateral base of the patient's lungs; as deep inspiration ends and expiration begins, move your hands forcefully upward
For the patient who lacks the strength or force to produce an effective cough. Increases abdominal pressure, raising expiratory flow
Staged cough
Sitting, breathe in and out 3 or 4 times through the mouth, then cough while bending forward and pressing a pillow inward against the diaphragm
Self-administered; the pillow both splints an incision and adds abdominal pressure
Position the huff-coughing patient sitting, head slightly flexed, shoulders relaxed, knees flexed, forearms supported by a pillow, and if possible feet on the floor.
2.4 Chest Physical Therapy
Chest physical therapy (CPT) consists of postural drainage, percussion, and vibration. It can be done on spontaneously breathing patients and on those intubated and mechanically ventilated, and is used for patients with excessive bronchial secretions who have difficulty clearing them. It should be done by a physiotherapist or other trained person. Complications of improperly performed CPT: fractured ribs, bruising of the chest wall, hypoxemia, and discomfort.
Postural drainage
Positioning techniques that drain secretions from specific lung segments into the trachea — each position drains one segment toward the larger airways, using gravity.
Which position depends on the lung areas involved, determined by patient assessment, chest x-rays, chest auscultation, and where possible patient preference. Left lower lobe involvement means draining only that region; a CF patient may need all segments.
A patient who cannot tolerate the head-down position may use a side-lying position instead.
Give aerosolized bronchodilators and hydration therapy BEFORE postural drainage.
The patient stays in each position about 5 minutes during percussion and vibration.
Frequency: commonly 2–4 times a day; in acute situations as often as every 4 hours.
Timing: at least 1 hour before meals or 3 hours after meals — the head-down position on a full stomach invites vomiting and aspiration.
Best for: atelectasis, cystic fibrosis, COPD, pneumonia.
Percussion and vibration
Percussion is done in the appropriate postural drainage position with the hands in a cuplike position, fingers and thumbs closed — as though scooping up water. The cupped hand creates an air pocket between chest and hand; both hands alternate rhythmically and a hollow sound confirms correct technique. The air-cushion impact promotes movement of thick mucus. Place a thin towel over the area for comfort.
Vibration promotes movement of secretions to the larger airways. It is performed by tensing the hand and arm muscles repeatedly and pressing mildly with the flat of the hand on the affected area while the patient slowly exhales a deep breath. Mechanical vibrators exist for hospital and home use.
2.5 Airway Clearance Devices
These devices are often easier to tolerate than CPT and take less time, and most let the patient treat themselves.
Device
How it works
Key nursing points
Flutter
Hand-held, shaped like a small fat pipe; contains a mouthpiece, a high-density stainless-steel ball, and a cone holding the ball. The patient exhales into it, the ball moves, and the resulting vibrations in the airways loosen mucus
Follow use with huffing and coughing. Clean daily in warm, soapy water
Acapella
Combines positive expiratory pressure (PEP) plus airway vibrations. Usable sitting, standing, or reclining. Set the resistance dial before use: 1 = minimal resistance, 5 = high resistance
You should hear the gentle noise of the rocker inside on exhalation. Can also deliver aerosolized drugs
TheraPEP
Similar to Acapella; a mouthpiece or mask on tubing connected to an adjustable resistor and a pressure indicator. Inhale, hold a few seconds, exhale through the resistor
The pressure indicator gives visual feedback about the pressure to hold during exhalation for maximal PEP benefit
High-frequency chest wall oscillation
An inflatable vest connected by hoses to a high-frequency pulse generator; the airwaves dislodge mucus and move it toward the larger airways
Can be used without another person's help; the unit weighs 23–30 lb (10–13 kg), is quiet and portable
2.6 Positioning
Position the patient with ARF upright and elevate the head of the bed at least 30 degrees, or use a reclining chair or chair bed. This maximizes respiratory expansion, decreases dyspnea, and mobilizes secretions.
Sitting improves pulmonary function by promoting the downward movement of the lungs. When the lungs are upright, ventilation and perfusion are best in the lung bases.
If there is any chance of aspiration, position the patient side-lying.
Patients with problems in both lungs — which is common in ARF — need repositioning at regular intervals on both sides.
2.7 Humidification and Hydration
Thin secretions with aerosols of sterile normal saline or with mucolytic drugs (e.g., acetylcysteine mixed with a bronchodilator) given by nebulizer. O2 given by aerosol mask can also thin secretions.
Caution: aerosol therapy may cause bronchospasm and severe coughing, which decreases PaO2. Frequent assessment of tolerance is critical — this is a therapy that can make the patient acutely worse.
Unless contraindicated, adequate fluid intake of 2 to 3 L/day keeps secretions thin and easier to remove. A patient in ARF may not manage this orally and may need IV hydration.
Assess cardiac and renal status before pushing fluids, to be sure the patient can tolerate the volume and to avoid precipitating heart failure and pulmonary edema.
Regularly assess for fluid overload: crackles, dyspnea, weight gain, increased CVP.
2.8 Suctioning the Patient Without an Artificial Airway
Suctioning is needed only if the patient cannot expectorate secretions on their own.
In the awake, non-intubated patient, a soft-tip suction catheter passed through a nasopharyngeal tube can remove secretions at the back of the throat.
Perform suctioning with caution — stimulating the gag reflex may induce vomiting, and a vomiting hypoxemic patient is now an aspiration problem as well.
Suction through an artificial airway only as needed, never on a routine schedule.
O2 is a colorless, odorless, tasteless gas constituting 21% of the atmosphere. Supplemental O2 increases the partial pressure of O2 in inspired air, and that is the whole mechanism: raise the pressure gradient across the alveolar-capillary membrane and more O2 diffuses into blood. O2 therapy requires an order from the health care provider, and the dose of O2 is the fraction of inspired oxygen (FIO2).
Target
Value
Where it comes from
General goal for most patients
SaO2 >92% at rest, during sleep, and with activity, or PaO2 >60 mm Hg
Ch. 28, O2 therapy goals
Delivery-device requirement in ARF
The device must maintain PaO2 at 60 mm Hg or higher and SaO2 at 90% or higher
Ch. 32, respiratory therapy
Modified goal in longstanding COPD
An SpO2/PaO2 greater than 88% may be accepted
Ch. 28 — these patients live chronically lower
Ventilated patient
Maintain SpO2 >92% and PaO2 between 60 and 100 mm Hg
Ch. 28 drug alert
Injury/reparative phase of ARDS
Accept PaO2 55–80 mm Hg and SpO2 88%–95%
Ch. 32 — a deliberate tolerance, not a failure
3.2 Low-Flow Versus High-Flow Systems
The distinction is not about how many liters per minute; it is about whether the device can meet the patient's entire inspiratory demand. A low-flow device delivers less gas than the patient draws in, so the patient entrains room air along with it — and the resulting FIO2 is a range, not a number. A high-flow device delivers everything the patient needs and more, so the FIO2 is fixed regardless of how the patient breathes.
Low-flow devices
High-flow devices
Patient type
Awake, alert, spontaneously breathing with a stable, intact respiratory drive
Awake, alert, spontaneously breathing but with higher O2 requirements a low-flow device cannot meet
O2 concentration
Do not meet all inspiratory demand; entrain room air, so the exact FIO2 is unknown — only a range
Deliver fixed concentrations (e.g., 28%, 35%) independent of respiratory rate or pattern
Use
General supplemental O2
Help achieve a specific PaO2 or SpO2 target
Examples
Nasal cannula, simple face mask, partial and non-rebreather masks
24% at 1 L/min up to 44% at 6 L/min. The most commonly used device
Patient can eat, talk, and cough with it in place. Amount inhaled depends on room air and breathing pattern. Most COPD patients tolerate 2–4 L/min. Assess nares and ears for breakdown; pad the tubing over the ears. Above 5 L/min nasal membranes dry → risk of nosebleeds
O2-conserving cannula (Oxymizer "moustache" or "pendant")
Built-in reservoir raises concentration and allows a lower flow, usually 30%–50%; can deliver up to 15 L/min
Generally for longer-term home O2 (CF, pulmonary hypertension). More expensive and highly visible. Cannot be cleaned — change it every week. May need ABGs and oximetry to set the flow rate
Simple face mask
35%–50% at 6–12 L/min
Requires a minimum of 6 L/min to wash exhaled gases out of the mask — below that, CO2 rebreathing is possible. Must fit snugly. Wash and dry under the mask q4hr and PRN. Watch for pressure necrosis at the top of the ears. Typically short-term only
Partial and non-rebreather masks
60%–90% at 10–15 L/min
Keep the flow high enough that the reservoir bag never deflates on inspiration — a deflating bag means CO2 rebreathing. Valves should open on expiration and close on inhalation. Monitor closely; escalation may be needed
3.4 High-Flow Delivery Devices
Device
Concentration and flow
Nursing points
High-flow nasal cannula
Blends O2 with compressed air; up to 100% O2 at flows up to 60 L/min, heated and humidified to 100% humidity
The cannula must be smaller than 50% of the nares so gas can escape during exhalation and flush out end-expiratory CO2. Well tolerated; patients can eat and drink with it in place. Patients often describe "rainout" — a constant feeling of needing to blow the nose
Venturi mask
Precise concentrations: 24%, 28%, 31%, 35%, 40%, and 50%
The single best choice for delivering a low, constant concentration to a COPD patient. The entrainment device must be changed to deliver a different concentration, and the air entrainment ports must never be occluded. Uncomfortable; must be removed for eating; voice may sound muffled
Tracheostomy collar
Delivers humidity and O2 through the tracheostomy; a Venturi device can be attached for exact concentrations
Some O2 is lost to the atmosphere because the collar does not fit tightly. Secretions collect inside the collar — remove and clean at least q4hr and PRN to prevent aspiration of fluid and infection. Periodically drain condensate from tubing distal to the tracheostomy
Tracheostomy T-piece
T-connector attached to an O2 blender; tighter fit means better O2 and humidity delivery than the collar
Allows an inline catheter for suctioning. The connector disconnects easily — monitor closely, and it may pull on the tracheostomy tube, causing irritation and tissue damage
3.5 Choosing a Device
Ch. 32 lists five factors, and a question that asks the "key consideration" in device selection is answered from this list, not from the device table: the patient's overall condition, the degree of respiratory failure, the ability to maintain a patent airway, the amount of FIO2 the device delivers, and the patient's ability to breathe spontaneously.
3.6 Humidification
O2 from cylinders and wall systems is a dry gas; dry O2 irritates mucous membranes and dries secretions.
Humidification adds sterile water to the delivery system — commonly the bubble-through humidifier, a small plastic jar of sterile water attached to the O2 source by a flowmeter.
Many agencies have moved away from humidifying low-flow devices. Humidification with high-flow devices is important. Follow agency policy.
3.7 Complications of Oxygen Therapy
Combustion
O2 supports combustion and increases the rate of burning. Smoking must be prohibited in any patient care area where O2 is in use; post a "No Smoking" sign on the patient's door. A cannula in place can ignite easily and cause significant burns and life-threatening airway injury.
O2 toxicity
Mechanism: prolonged exposure to a high FIO2 causes a severe inflammatory response because O2 free radicals damage the alveolar-capillary membrane → severe pulmonary edema, shunting of blood, and worsening hypoxemia. Ch. 32 adds increased pulmonary capillary permeability, decreased surfactant production, surfactant inactivation, and fibrotic changes in the alveoli.
Prevention — the governing rule: provide the FIO2 at the lowest possible level that still maintains an acceptable SpO2 and PaO2 for that specific patient. Monitor ABGs often to guide tapering.
Absorption atelectasis
Alveoli normally contain O2, CO2, and nitrogen, and it is nitrogen that maintains the size, shape, and structure of the alveolus. Give a very high FIO2 and O2 replaces the nitrogen. If a bronchial tube then becomes obstructed — with mucus, for instance — gas exchange stops, the remaining O2 is absorbed into the bloodstream, nitrogen is no longer there to hold the alveolus open, and the alveolus collapses, worsening hypoxemia. Prevention: frequent chest x-rays for patients on higher levels of O2, ABG monitoring, suctioning the airway as needed, and the lowest possible FIO2.
CO2 narcosis
Chemoreceptors control the drive to breathe, responding to CO2 and O2 concentrations in the blood. Normally, increased CO2 is the major stimulant of the respiratory center.
Some patients — classically COPD — develop a tolerance for high CO2; the respiratory center loses sensitivity to it, and hypoxemia becomes the major drive to breathe. Ch. 32 phrases the same idea as chronic hypercapnia blunting the response of the chemoreceptors to CO2 as a respiratory stimulant.
However: the hypoxic drive is complex and involves many other factors, and not all COPD patients retain CO2.
Practical rule: give O2 to any patient likely to benefit from it. The danger of NOT giving O2 far outweighs the risk of giving it when it is not needed. Where chronic hypercapnia is known, start low: nasal cannula at 1–2 L/min or a Venturi mask at 24%–28%, and monitor.
Infection
A rare complication, related to the device and how often it is cleaned or changed. Heated nebulizers present the highest risk because constant humidity supports bacterial growth. Use disposable and single-patient equipment wherever possible.
3.8 Oxygen Therapy at Home
Sources: a liquid O2 storage system, compressed O2 in tanks or cylinders, or an O2 concentrator/extractor. Choice depends on activity level, environment, insurance coverage, and proximity to a supply company.
Patients usually rent home systems, and the company sends a respiratory therapist to the home to teach use, maintenance, troubleshooting, recognizing a low supply, and reordering.
Some patients need O2 only during exercise and/or sleep — evaluated with a 6-minute walk test or overnight oximetry.
Long-term therapy is reassessed every 30 to 90 days during the first year, then yearly if stable.
Air travel: inform the airline when making reservations. O2 needs for flying are determined by pulmonary function test, 6-minute walk test, hypoxic challenge test, or a predictive formula. Portable O2 concentrators recharge at home or on DC (auto) power and several are airline-approved.
Home O2 teaching
The instruction
Flow rate
Set at the rate the HCP ordered. Do not change it without talking to the HCP first.
When to call
Shortness of breath, lightheadedness or dizziness, or new wheezing — call the HCP right away.
Infection control
Wash hands before and after using O2. Wash the nasal prongs with liquid soap and rinse thoroughly once or twice a week. Brush teeth or use mouthwash several times a day
Cannula replacement
Replace the cannula every 2–4 weeks, and again after a cold resolves
Fire safety
Keep tanks at least 5 feet (1.5 m) from any heat source. Post "No Smoking — Oxygen in Use" on the front and back doors. No smoking in the home and never while wearing O2
Storage and materials
Store tanks upright. Avoid fabrics that carry a static charge (wool, synthetics) and all flammable liquids — paint thinner, cleaning fluid, gasoline, kerosene, oil-based paint, aerosol sprays
Power
Inform the electric company if using a concentrator so a power failure is treated as a medical urgency
Supply
Check that there is enough O2 on hand for weekends and holidays
3.9 Nursing Management and Delegation
Use pulse oximetry and/or ABGs to determine the FIO2 each patient needs; titrate with close monitoring of PaO2 and PaCO2.
Evaluate the response to O2 therapy, especially whenever a change is made. A trend toward a normal PaO2 tells you the patient is responsive to O2 — and failure of the PaO2 to rise on increasing FIO2 is itself a diagnostic finding pointing toward shunt.
Assistive personnel may use pulse oximetry and report the value to the RN, assist the patient with adjusting the delivery device, and report any change in condition.
Collaborate with the respiratory therapist to choose the optimal device, keep equipment clean and replaced, check the accuracy of delivery, and assess the need for flow-rate adjustments.
UNIT 4
Airway Management
Covers: Lewis's Ch. 28 (pp. 539–575)
4.1 The Five Artificial Airways
Inserting a tube into the nose, mouth, or trachea bypasses the upper airway and laryngeal structures and creates a route for ventilation. The chapter names five commonly used artificial airways, and they sort cleanly by how far down they go and by what the patient's level of consciousness allows.
Airway
Where it sits
Consciousness
Main use
Nasopharyngeal (NPA)
Nostril to nasopharynx
Conscious OR unconscious
Maintains a route for ventilation when the tongue may obstruct; tolerated by an awake patient
Oropharyngeal (OPA)
Mouth to oropharynx
UNCONSCIOUS only
Holds the tongue off the posterior pharynx; also serves as a bite block
Endotracheal (ET)
Mouth (or nose) through the vocal cords into the trachea
Sedated/unconscious
Definitive airway for mechanical ventilation, typically less than 2 weeks
A small, flexible plastic tube inserted into the nostril to maintain a route for ventilation. Can be placed in a conscious or an unconscious patient — its flexibility and position mean it does not reliably trigger the gag reflex.
Sizing for length: hold the airway to the side of the face and measure from the tip of the nose to the tip of the ear.
Sizing for diameter: choose a tube slightly smaller in diameter than the patient's nostril.
Insertion: choose the nostril with the greatest airflow; lubricate; insert gently while rotating the tube toward the patient's ear; stop if you meet any obstruction or difficulty. Correctly placed, the flange rests comfortably against the nostril.
4.3 Oropharyngeal Airway
A shorter tube of firm, hard plastic, curved, with a flange at one end and a blunt opening at the other.
DO NOT insert an OPA in a conscious patient — it will induce vomiting and risk aspiration. Only insert into an UNCONSCIOUS patient.
Sizing: measure the tube against the corner of the mouth to the angle of the jaw or the earlobe.
Too short → it may push the tongue back into the oropharynx and occlude the airway — the exact problem it was inserted to fix.
Too long → it may damage the posterior oropharynx.
Insertion: lubricate with a water-soluble lubricant; insert with the bevel pointed toward the roof of the mouth; as the flange reaches the lips, rotate the airway 90 degrees so its curve follows the natural curve of the upper airway. The flange should then sit comfortably against the lips.
4.4 The Endotracheal Tube
Parts: a standard adaptor (the 15-mm connector that attaches a bag-valve mask or ventilator), the cuff, a pilot balloon with a spring-loaded inflation valve and inflation line, and radiopaque markings along the tube used to gauge the depth of insertion.
Most common sizes: 7F and 8F — size refers to the internal diameter. Commonly 7F for females, 8F for males.
Advantages of a larger-diameter tube: it reduces work of breathing (less airway resistance — resistance rises steeply as radius falls), makes it easier to suction and remove secretions, and makes bronchoscopy possible if it is needed.
Oral intubation is preferred because the airway can be secured rapidly, with a laryngoscope or bronchoscope passing the tube through the vocal cords.
Nasotracheal tube
Used when oral intubation is not possible — for example with an unstable cervical spine injury, a dental abscess, or epiglottitis. It is slightly longer than an oral ET tube and is placed blindly, without seeing the larynx. Mark the position of a nasotracheal tube at the nare rather than at the lip or teeth.
4.5 Indications for Intubation
Notice how many of these are airway-protection problems rather than oxygenation problems. A patient with a normal SpO2 who cannot clear secretions or protect their airway is still an intubation candidate — which is why a declining level of consciousness on noninvasive ventilation is such an ominous finding.
4.6 The Intubation Procedure
Preparation
Unless the situation is emergent, consent is obtained. Tell the patient and caregiver the reason and the steps, and explain that the patient will not be able to speak while intubated but that other means of communication will be provided. Warn them the hands may have removable mitts or the wrists soft restraints as a reminder not to touch the tube.
Have a self-inflating bag-valve mask (BVM) attached to O2 and suction equipment ready at the bedside. The BVM has a reservoir filled with O2 so it can deliver up to 100%.
A patent IV is needed to give pre-intubation drugs. Remove dentures or partial plates. Premedication varies with the patient's level of consciousness, the urgency, and provider preference.
Positioning
Oral intubation: supine with the head slightly extended and the neck flexed — the "sniffing" position. Rationale: it aligns the axes of the mouth, pharynx, and larynx so the vocal cords can be seen.
Nasal intubation: spray the nasal passages with a local anesthetic and vasoconstrictor (e.g., lidocaine with epinephrine) to reduce trauma and bleeding.
Timing rules
Step
Rule
Rationale
Preoxygenation
BVM with 100% O2 for at least 2 minutes before starting
Fills the functional residual capacity with oxygen, buying apneic time during the attempt
Each attempt
Limited to less than 30 seconds
The patient is apneic and unmonitored by the airway for the whole attempt
Between attempts
Ventilate with the BVM and 100% O2
Re-oxygenate before the next attempt rather than stacking desaturations
Throughout
Monitor heart rate and rhythm, visible chest movement, BP and MAP, and SpO2. Immediately inform the team if the SpO2 falls below 92%
Bradycardia and desaturation are the two events that end an attempt early
4.7 Rapid Sequence Intubation
RSI is the rapid, concurrent administration of a sedative and a paralytic during emergency airway management to induce unconsciousness for intubation. It decreases the risks of aspiration and injury — the patient is deeply unconscious and completely still, so the attempt is fast and the airway reflexes that would provoke vomiting are abolished.
Drugs: a sedative-hypnotic-amnesic (e.g., propofol, etomidate) to induce unconsciousness; a rapid-onset opioid (e.g., fentanyl) to blunt the pain of the procedure; then a drug producing skeletal muscle paralysis (e.g., rocuronium).
RSI is NOT indicated in patients in cardiac arrest or with a known difficult airway. In arrest there is no need to induce unconsciousness; with a known difficult airway, paralyzing a patient you may not be able to intubate removes their own respiratory effort as a fallback.
4.8 Confirming Tube Placement
Immediately after the tube passes, placement is confirmed by a sequence of checks — no single one is sufficient on its own, and the definitive check is radiographic.
#
Step
What confirms success
1
Inflate the cuff on the ET tube
A seal forms in the trachea
2
Continue manual ventilation with BVM and 100% O2
Oxygenation is maintained while you confirm
3
Auscultate the lungs and the epigastrium
Bilateral breath sounds present; NO air sounds over the epigastrium (gurgling over the stomach means esophageal placement)
4
Observe the chest
Symmetric chest wall movement; SpO2 stable or improving
5
EtCO2 detector
A steadily rising CO2 value with a waveform, or a color change on a colorimetric detector. At least 5 or 6 exhalations with a consistent CO2 level are required
6
Secure the tube; connect to the ventilator and a closed suction system
Assess the need to suction the tube and pharynx
7
Insert a bite block if needed — secured separately from the ET tube
Prevents the patient from biting the tube closed and cutting off O2 delivery
8
Chest x-ray
Tube tip 2 to 3 cm above the carina in the adult, so the patient can move the neck without the tube migrating into the right mainstem bronchus
9
Record and mark the position
At the lip or teeth for an oral tube (e.g., 21 cm at the teeth, 23 cm at the lips); at the nare for a nasotracheal tube
10
ABGs 15 to 30 minutes after intubation
Establishes baseline oxygenation and ventilation and guides the first ventilator changes
4.9 Risks Specific to Oral Intubation
Hard to place with limited head and neck mobility (e.g., spinal cord injury) — this is when nasotracheal intubation is chosen instead.
Teeth can be chipped or accidentally removed.
Patients can obstruct the tube by biting down; sedation plus a bite block or oropharyngeal airway prevents it.
Salivation increases and swallowing is difficult — suction the mouth often with a Yankauer.
Mouth care is a challenge because of limited space; use smaller or pediatric-sized oral products.
UNIT 5
Chest Tubes, Pleural Drainage & Chest Surgery
Covers: Lewis's Ch. 28 (pp. 539–575)
5.1 The Physiology a Chest Tube Restores
The pleural space normally holds a negative, subatmospheric pressure, and that negative pressure is what keeps the lung expanded against the chest wall. If enough fluid or air accumulates in the space, the negative pressure becomes positive and the lung collapses. A chest tube re-establishes negative pressure, drains the pleural space, and allows the lung to re-expand. Every rule that follows — why you never clamp, why the drainage unit stays below the chest, why a disconnection is an emergency — comes back to protecting that pressure gradient.
5.2 Sizes and What Each Drains
Chest tubes are about 20 inches (51 cm) long and range from 12F to 40F. Size is chosen by what has to move through the tube: blood is viscous and clots, so it needs the widest bore; air needs the least.
Size
Drains
Why
Large 36F–40F
Blood
Blood is viscous and clots — a narrow tube occludes
Medium 24F–36F
Fluid
Serous fluid and effusion move readily but still need bore
Small 12F–24F
Air
Air needs the least resistance and no clot clearance
Pigtail catheters 10F–14F
Air (pneumothorax)
Very small tubes with a curly end designed to keep them in place; sometimes a safe, effective alternative to a larger-bore tube
5.3 Insertion
May be done in the ED, the operating room, or at the bedside. Time permitting, a chest x-ray confirms the affected side first.
Positioning: raise the arm above the head on the affected side to expose the midaxillary area, the standard insertion site. Elevate the head up to 45 degrees when possible to lower the diaphragm and reduce the risk of injuring it.
After antiseptic prep and local anesthetic (1% lidocaine), a small incision is made over a rib and the tube is advanced up and over the TOP of the rib. Rationale: the intercostal nerves and blood vessels run along the inferior border of each rib, so going over the top avoids them.
The tube is sutured in place, connected to the drainage system, and covered with an occlusive dressing; most providers seal around the tube with petroleum (airtight) gauze.
Placement is confirmed by chest x-ray.
Chest tube insertion is painful — monitor comfort frequently and medicate.
5.4 The Three Chambers
Most disposable drainage units hold 2000 mL and contain three compartments in series. Understanding what each one does converts every chest-tube question into a reasoning problem instead of a memory problem.
Chamber
Function
What normal looks like
1. Collection
Receives fluid and air from the pleural space; drained fluid stays here and expelled air vents to the second chamber
Drainage is measured and marked hourly at first; you never empty it — change the unit when full
2. Water seal
Contains about 2 cm of water, acting as a one-way valve: air from the patient bubbles up through it and out, and the water prevents backflow of air into the patient
Tidaling (see 5.5). Brisk bubbling when a pneumothorax is first evacuated; intermittent bubbling on exhalation, coughing, or sneezing while air remains in the pleural space
3. Suction control
Applies suction to the unit. Two types: water (wet) and dry
Usual suction pressure −20 cm H2O; gentle continuous bubbling in a wet system, or a visible float/bellows in a dry system
5.5 Tidaling and Bubbling — Reading the System
These two observations are the water-seal chamber's entire vocabulary, and nearly every chest-tube exam question turns on telling them apart.
Observation
Meaning
Nursing action
Tidaling — water in the water-seal chamber moves up with inspiration and down with expiration
NORMAL. It reflects the changing intrapleural pressure of the patient's own breathing
Continue to monitor. As the lung re-expands, tidaling gradually slows and eventually stops
Tidaling stops suddenly
The tube may be occluded; alternatively the lung has re-expanded, or the system is attached to suction
Assess the chest tube immediately. If connected to suction, disconnect momentarily from wall suction to check for tidaling
Intermittent bubbling in the water seal on exhalation, coughing, or sneezing
Expected as long as there is air in the pleural space; it ceases as the leak resolves and the lung expands
Monitor; document that it is intermittent
Continuous bubbling in the water seal, or bubbling that increases
Suspect an air leak — either in the system or from the patient
Retape connections; ensure the dressing is occlusive. Briefly clamp at the chest — if the leak stops, it is coming from the patient. If not, move clamps down the tubing; the leak lies between the last 2 clamp points. If it reaches the unit, replace it
No bubbling in the SUCTION CONTROL chamber
Either there is no suction, the suction is not high enough, or the pleural air leak is so large that the suction cannot evacuate it
Check the wall source and the dial; reassess the patient
5.6 Wet Versus Dry Suction
Wet suction
Dry suction
How suction is set
A column of water controls the suction drawn from the wall regulator — the height of the water column determines the amount of suction
No water. Suction is set by turning a dial to the ordered amount
Setup
Add sterile water to the 2-cm mark in the water-seal chamber and to the 20-cm mark (or as ordered) in the suction control chamber
Add sterile water to the fill line of the air leak meter; attach wall suction and increase it until the bellows-like float moves across the display window
Confirming it works
Dial the wall regulator until there is continuous, GENTLE bubbling in the suction control chamber — no more than 120 mm Hg. Vigorous bubbling is unnecessary and just speeds evaporation
A visual alert (float or bellows) shows suction is working
Maintenance problems
Water evaporates and must be replaced. Problems arise if the unit is tipped or knocked over
To decrease suction, turn the dial down and depress the high-negativity vent, then assess for a rise in the water-seal level
5.7 The Flutter (Heimlich) Valve
A one-way rubber valve inside a rigid plastic tube, attached to the external end of the chest tube and used to remove air from the pleural space.
Mechanism: during inspiration, when pressure in the chest falls, the valve closes, preventing air from re-entering the chest; during expiration, when intrathoracic pressure rises, the valve opens and air escapes.
Used for a small to moderate-sized pneumothorax. It allows patient mobility — the small drainage bag can be hidden under clothing, and patients may go home with a flutter valve in place.
5.8 Nursing Management and Emergencies
Immediately after insertion, monitor closely for complications — vital signs including respiratory rate and rhythm — and monitor the color and amount of drainage HOURLY for the first few hours.
Report at once: drainage greater than 200 mL in the first hour, development of subcutaneous emphysema, or any signs of respiratory distress. Ongoing, notify the HCP for drainage greater than 100 mL/hr, and report any change in the character of drainage (clear yellow turning bloody).
If 1 to 1.5 L of fluid or blood is removed rapidly, re-expansion pulmonary edema or severe symptomatic hypotension may occur. Ask the HCP how much drainage to expect.
Subcutaneous emphysema is air leaking into the tissue around the site — you feel a "crackling" sensation when palpating the skin. A small amount is harmless and reabsorbs; severe subcutaneous emphysema around the head and neck can cause swelling with airway compromise.
Keep all connections tight and taped. Keep tubing loosely coiled below chest level so drainage flows freely, and never raise the drainage system to the level of the chest — fluid can drain back into the lungs.
Change the unit when the collection chamber is full. Do NOT try to empty it.
Encourage coughing, deep breathing, incentive spirometry every hour while awake, and range-of-motion exercises to the shoulder on the affected side to prevent atelectasis and shoulder stiffness. Use sterile technique for dressing changes.
5.9 Chest Tube Removal
Removed when the lung is re-expanded and drainage has ceased or is minimal. Sometimes suction is discontinued and the tube drains by gravity for 24 hours first.
Give pain medication about 30 to 60 minutes before removal.
The HCP or advanced practice nurse cuts the suture and removes the tube while the patient holds their breath or bears down (Valsalva maneuver) — raising intrathoracic pressure so air cannot be drawn in through the tract as the tube leaves.
The site is IMMEDIATELY covered with an airtight, occlusive dressing (petroleum gauze) with dry gauze over it, to prevent air entering the pleural space. The pleura seals and the wound heals in a few days.
A chest x-ray is done 30 to 60 minutes after removal to check for pneumothorax or fluid reaccumulation.
Assess for respiratory distress afterward — it may signal recurrence of the original problem. Notify the HCP at once.
5.10 Thoracentesis
Thoracentesis drains air or excess fluid from the pleural space with a needle rather than an indwelling tube. Usually no more than 1000 to 1200 mL of fluid is removed at one time. Rationale: rapid removal of a large volume of pleural fluid can cause hypotension, hypoxemia, or re-expansion pulmonary edema — the same physiology behind the 1 to 1.5 L chest-drainage warning. Bronchoscopy, by contrast, is both diagnostic and therapeutic: it removes mucous plugs and foreign bodies and can restore patency to an airway partly obstructed by tumor.
5.11 Chest Surgery
Approaches
Thoracotomy is a surgical incision into the chest to reach the heart, lungs, esophagus, thoracic aorta, or anterior spine.
Median sternotomy splits the sternum and is used mainly for surgery involving the heart.
Posterolateral thoracotomy is used for most lung surgery, made front to back at the level of the 4th, 5th, or 6th intercostal space, with mechanical retractors separating the ribs.
Anterolateral thoracotomy is made in the 4th or 5th intercostal space from the sternal border to the midaxillary line — used for trauma, mediastinal operations, and wedge resections of the upper and middle lobes.
Video-assisted thoracoscopic surgery (VATS) is a minimally invasive approach giving a real-time video image of the chest cavity through small incisions. Advantages: less pain, faster return to activity, shorter stay, lower postoperative morbidity — valuable for patients with low respiratory reserve. A chest tube is placed through one of the incisions at the end.
Procedure
What is removed
Chest tube after?
Wedge resection
A small localized lesion occupying only part of a segment — the most conservative approach
Yes
Segmental resection
One or more lung segments; remaining tissue expands to fill the space
Yes
Lobectomy
One lobe; lung tissue expands to fill the space
Yes
Pneumonectomy
The entire lung, when lesser resection will not remove all diseased tissue. Most common indication is lung cancer
May have one. Fluid gradually fills the empty space
Decortication
Thick fibrous membrane stripped from the visceral pleura (for empyema)
Yes
Exploratory thoracotomy
Nothing — an incision to find injured or bleeding tissue after chest trauma
Yes
Lung volume reduction
Diseased emphysematous tissue, by wedge excisions/VATS or bronchoscopically placed one-way valves that let air OUT but not IN, collapsing a segment
Varies
Perioperative care
Preoperative evaluation may include chest x-ray, ECG, ABGs, pulmonary function studies, CT or MRI, and laboratory studies (CBC, glucose, electrolytes, BUN, creatinine, PT/INR, aPTT).
Preoperative teaching should ALWAYS include deep breathing and incentive spirometry. Rationale: practicing before surgery makes them far easier to perform afterward, when the incision hurts. Teach splinting the incision with a pillow and have the patient teach back ROM exercises on the affected side.
Reassure the patient that the lungs have a large functional reserve — even after removal of one lung there is enough tissue to maintain adequate oxygenation.
The thoracotomy incision is the MOST PAINFUL surgical incision, because respiratory muscles are cut during surgery.
Pain management is a priority to prevent respiratory compromise. A multimodal approach is best: oral, subcutaneous, and/or IV opioids, PCA, epidural infusions, and/or intercostal nerve blocks. Rationale: effective analgesia is what allows the patient to breathe deeply, cough, move the arm and shoulder, and mobilize — every one of which prevents a pulmonary complication.
Postoperative priorities: assess respiratory rate and effort, breath sounds, and sputum volume and color; monitor chest tube drainage and function; expect daily chest x-rays; assess pain; monitor temperature; observe the surgical site.
Noninvasive ventilation (NIV, also called NIPPV) uses a mask instead of an ET tube — nasal, full face, or nasal pillows — to help oxygenate and ventilate. It is ideal for the patient who needs a higher level of ventilatory support but whose condition is not bad enough to require mechanical ventilation. It provides O2, decreases work of breathing, reduces respiratory muscle fatigue, helps open collapsed airways, decreases shunt, and avoids the need for intubation altogether.
CPAP
BiPAP
Pressure delivered
ONE level of pressure, delivered continuously during BOTH inspiration and expiration
TWO levels:IPAP (inspiratory, the HIGHER level) and EPAP (expiratory, the LOWER level)
What each level does
Helps restore functional residual capacity (FRC) by holding airways and alveoli open
IPAP helps with CO2 removal (it augments the breath, improving ventilation). EPAP keeps alveoli open at end expiration, assisting oxygenation
Classic use
Obstructive sleep apnea
COPD with an acute condition (pneumonia) or an exacerbation of a chronic one (heart failure, ARF). Use after extubation can help prevent reintubation
Caution
CPAP INCREASES work of breathing because the patient must forcibly exhale against it — use with caution in patients with heart problems and report any decline at once
BiPAP is the most frequently used NIPPV for ARF. Requires the patient to be awake, alert, breathing spontaneously, and able to tolerate the face piece
Nursing management of the patient on NIV
Patients need constant assessment of level of consciousness, hemodynamic stability, and work of breathing.
Elevate the head of the bed 30 to 45 degrees.
The patient MUST be able to remove the mask independently, because of the risk of vomiting.
Provide mouth, nare, and eye care.
Protect the skin — ANY degree of redness constitutes a Stage I pressure injury. Alleviate pressure from the tight mask by alternating the length of time it is on, trying different sizes and styles, and collaborating with the respiratory therapist.
6.2 Indications for Mechanical Ventilation
Mechanical ventilation is the process by which a ventilator delivers O2 to the lungs, supporting the patient until they recover the ability to breathe independently. It may be a bridge to long-term ventilation or to a decision to stop support. Mechanical ventilation is not curative — it buys time for the underlying problem to be treated.
Other patients who commonly receive it: hemorrhage, trauma, neuromuscular problems, drug overdose, burns, and shock. The chapter also raises an ethical point worth carrying: patients with chronic lung disease and their caregivers should discuss mechanical ventilation before a health crisis, and wishes about end-of-life treatment should be recorded in an advance directive. Where team, patient, and caregiver disagree, care conferences are essential and an ethics committee may be consulted.
6.3 Negative Versus Positive Pressure Ventilation
Negative pressure ventilation
Positive pressure ventilation (PPV)
Mechanism
Chambers encase the chest or body and surround it with intermittent subatmospheric pressure, pulling the chest wall outward and reducing intrathoracic pressure; air rushes in through the upper airway, which is outside the chamber
During inspiration the ventilator pushes air into the lungs under positive pressure, so intrathoracic pressure is INCREASED during lung inflation
Relationship to normal breathing
Like normal ventilation — decreased intrathoracic pressure produces inspiration; expiration is passive
The reverse of normal ventilation during inspiration; expiration is still passive
Airway
Does NOT require an artificial invasive airway — it is a form of NIV
Requires an ET tube or tracheostomy (or, for NIV, a mask)
Use today
The "iron lung" of the 1950s polio epidemic was the first. Portable versions exist for home use, mainly for chronic neuromuscular and CNS problems. Rarely used for acutely ill patients
The main method of mechanical ventilation used with acutely ill patients
6.4 Volume Versus Pressure Ventilation
Every positive-pressure breath is delivered by guaranteeing one variable and letting the other float. That is the entire distinction, and it determines what you monitor.
Volume ventilation
Pressure ventilation
What is preset
A predetermined tidal volume (VT) is delivered with each inspiration
The peak inspiratory pressure (PIP) is predetermined
What varies
The pressure needed to deliver that breath, which changes with lung compliance and resistance
The VT delivered, based on the set pressure plus compliance and resistance
What you monitor
VT is consistent breath to breath, so trend the airway pressures — a rising PIP means the lungs are getting stiffer or something is obstructing
PIP is never exceeded, so carefully monitor the exhaled VT to prevent hypoventilation and hypoxemia — a falling VT means the lungs are getting stiffer
Risk it creates
High pressures forced into stiff lungs → barotrauma and volutrauma
Volumes may quietly fall too low → hypoventilation and respiratory acidosis
6.5 Ventilator Settings
Settings are based on the patient's condition, level of consciousness, respiratory muscle strength, chest x-ray, and ABGs, and manipulating them corrects hypoxemia and hypercarbia. In most settings, changing ventilator settings is the responsibility of the HCP or respiratory therapist — but always assess the patient's response to any setting change.
Setting
What it controls
Typical value
Respiratory rate
Number of breaths the ventilator delivers per minute
12–20 breaths/min
Tidal volume (VT)
Volume of gas delivered with each ventilator breath
4–8 mL/kg
FIO2
Fraction of inspired O2. You would NEVER intubate a patient and place them on room air (21%)
Set between 30% and 100%; adjusted to keep PaO2 >60 mm Hg or SpO2 >92%
PEEP
Positive pressure applied at end expiration
5 cm H2O typically; commonly 5–10
Pressure support
Positive pressure augmenting the patient's own inspiratory effort during spontaneous breathing
5–10 cm H2O
I:E ratio
Duration of inspiration to duration of expiration
1:2 — exhalation twice as long as inspiration
Inspiratory flow rate and time
The speed at which the VT is delivered
40–80 L/min; 0.8–1.2 sec
Sensitivity
How much effort the patient must generate to trigger a breath; triggering can be by pressure or by flow
The maximal pressure the ventilator will generate to deliver the VT. When the limit is reached the ventilator ends the breath and spills the undelivered volume into the atmosphere
30 cm H2O
6.6 PEEP
Definition: positive pressure applied to the airway during exhalation. Normally airway pressure falls to near zero during passive exhalation; with PEEP, exhalation is still passive but pressure only falls to the preset level — often 5 to 10 cm H2O.
Effect: PEEP increases functional residual capacity and often improves oxygenation, by restoring the lung volume that should remain at end expiration.
Two mechanisms: (1) splinting open previously collapsed alveoli, increasing the surface available for O2 and CO2 to diffuse across the alveolar-capillary membrane; (2) preventing alveolar collapse throughout the respiratory cycle, so the alveolus does not have to be re-opened with every breath.
Physiologic PEEP is 5 cm H2O, used to replace the glottic mechanism, which is bypassed once an ET tube is in place. The glottis normally provides a small back-pressure at end expiration; the tube removes it, so the ventilator supplies it.
PEEP is indicated in ALL mechanically ventilated patients. An intubated patient would NEVER be placed on zero PEEP.
Optimal PEEP is PEEP titrated to the point where oxygenation improves without compromising hemodynamics. FIO2 can often be reduced once PEEP is applied, which is how PEEP protects against O2 toxicity.
The classic indication for PEEP therapy is ARDS, where levels of 10 to 20 cm H2O may be needed.
During weaning, PEEP improves gas exchange, vital capacity, and inspiratory force.
6.7 Modes — the Framework
The ventilator mode is the way the ventilator delivers ventilation, and it is selected based on how much work of breathing the patient can perform. Mode is mainly determined by level of consciousness, respiratory drive, work of breathing, and ABGs. Terminology varies among manufacturers, so the chapter tells you to hold on to two questions: how much work is the ventilator doing (full support, partial support, or spontaneous), and how is the breath delivered (by volume or by pressure).
Level of support
What it means
Modes
Full support
The ventilator does most of the work of breathing. Usually a set rate, set VT, and a PIP limit
Assist-control (AC), pressure control (PC), pressure-regulated volume control (PRVC)
Partial support
Shared responsibility. There may be a set rate or VT, but the patient assumes more of the breathing
SIMV; proportional assist ventilation (PAV)
Spontaneous
The patient is intubated but assumes responsibility for almost all breathing. Often used just before extubation
Pressure support ventilation (PSV), CPAP
The five most common modes in North America are assist control, pressure control, synchronized intermittent mandatory ventilation, pressure support, and CPAP.
6.8 Assist-Control (AC)
Settings: respiratory rate, VT, inspiratory time, and PEEP. The ventilator delivers a preset number of breaths at a designated VT.
If the patient initiates a spontaneous breath, a FULL breath with the designated VT is delivered. The ventilator senses the change in airflow in the circuit and responds with a whole machine breath.
The patient's respiratory rate on AC will never be below the set rate, and the patient may breathe over it whenever they want.
AC is the most common full-support mode when a patient is first intubated: new postoperative patients, neuromuscular disorders, and ARF.
Nursing focus: VT is consistent, so trend the PIP.
6.9 Pressure Control (PC)
Settings: respiratory rate, PIP, inspiratory time, and PEEP. The ventilator delivers a preset number of breaths up to a specific PIP. Patient-initiated breaths are also delivered up to that PIP.
The PIP limit is never exceeded, and there is no set VT.
Best for patients with decreased compliance and increased resistance — "stiff lungs." Rationale: controlling the amount of pressure entering the patient decreases the risk of volutrauma and barotrauma.
The classic example is ARDS. Ch. 32 adds that pressure control keeps inspiratory and plateau pressures from becoming too high, preventing alveolar overdistention and rupture — though no mode of mechanical ventilation is superior to the others.
Nursing focus: PIP is fixed, so trend the VT, which will be variable. A falling exhaled VT at an unchanged pressure means the lungs are getting stiffer.
Settings: respiratory rate and VT for the ventilator breaths, plus inspiratory time, sensitivity, and PEEP.
The ventilator delivers its preset breaths in synchrony with the patient's own inspirations. Between ventilator breaths the patient breathes at their own rate and achieves whatever VT they can — those spontaneous tidal volumes are variable.
Both patient and ventilator do the work of breathing, which is what makes it partial support.
Used when the patient's condition is too good for a full support mode but not ready for a spontaneous mode. Sometimes combined with pressure support.
Benefits: improved patient-ventilator synchrony, lower mean airway pressures, and prevention of respiratory muscle atrophy as the patient takes on more work.
Risk: muscle fatigue from the increased work of breathing. The same feature that prevents atrophy can exhaust a patient who is not ready.
6.11 Pressure Support Ventilation
Positive pressure is applied to the airway ONLY during inspiration. The patient must be able to initiate a breath.
Settings: inspiratory pressure level, PEEP, and sensitivity. When the patient triggers a breath, a high flow of gas is delivered to the preselected pressure level and held there through inspiration, then tapers toward the end of inhalation.
The patient determines their own inspiratory length, tidal volume, and respiratory rate.
PSV is the most common spontaneous mode in North America, and its purpose is to facilitate WEANING. It may be combined with SIMV when the respiratory drive is less than stable.
Advantages, each with its reason: increased comfort; decreased work of breathing because inspiratory efforts are augmented; decreased O2 consumption because inspiratory work is reduced; and increased endurance conditioning, because the patient is genuinely exercising the respiratory muscles.
Monitor for apnea — there is no backup rate in a purely spontaneous mode.
6.12 CPAP as a Ventilator Mode
A spontaneous mode in which the ventilated patient controls almost all aspects of the breath. Do not confuse it with noninvasive CPAP for sleep apnea — same pressure principle, different clinical setting.
Only FIO2 and PEEP are set. One level of pressure on both inspiration and expiration. No set respiratory rate, no set VT, no set PIP.
Used to assess the patient's respiratory rate and rhythm, work of breathing, and hemodynamic status after a period of intubation — in other words, as an extubation readiness test.
Usually used for a short period, around 30 to 120 minutes. If the patient stays stable, assessment parameters remain within normal limits, and there is no increased work of breathing or desaturation, the patient is often extubated.
Monitor for increased work of breathing and for apnea. The patient must be awake, alert, and breathing spontaneously.
6.13 The Newer Modes
Pressure-regulated volume control (PRVC)
A full support mode combining volume and pressure. Settings: respiratory rate, VT, PIP, PEEP, and sensitivity. There is a target VT and a PIP limit, and the ventilator attempts to deliver the desired VT with the LEAST amount of pressure, analyzing resistance and compliance breath by breath and adjusting continuously. Nursing: trend both VT and PIP, and monitor for increased work of breathing.
Airway pressure release ventilation (APRV)
Can be a full support OR a spontaneous mode. Set two pressures (P-high, P-low) and two times (T-high, T-low).
Most of the breath is spent at P-high and T-high — for example a pressure of 30 cm H2O for around 6 to 8 seconds — which holds collapsed alveoli open. A quick timed release to P-low for a very short T-low (about 0.8 second) allows CO2 elimination.
VT is not a set variable; it varies with the pressure levels, compliance, resistance, and spontaneous effort.
Adjust the pressure levels to meet OXYGENATION goals; adjust the timed releases to meet VENTILATION goals.
Permits spontaneous breathing at any point during the inspiratory cycle, which may reduce the need for deep sedation or paralysis. APRV increases venous return to the heart and hemodynamic improvement may occur. Trend ABGs and acid-base balance.
Proportional assist ventilation (PAV)
The ventilator generates and adjusts inspiratory pressure in proportion to the patient's own respiratory effort — support is given as a percentage of patient effort (e.g., 80%), so the harder the patient works to initiate a breath, the more support arrives. The patient determines their own inspiratory flow rate and volume. Decreased work of breathing and less dyssynchrony result. PAV is of no use in a patient who is not breathing spontaneously — it will give no support at all, because there is no effort to be proportional to.
6.14 All Modes Side by Side
Mode
Support
Set variables
The one thing to know
AC
Full
Rate, VT, inspiratory time, PEEP
Every breath — set or patient-triggered — gets the full VT. Risk: respiratory alkalosis
PC
Full
Rate, PIP, inspiratory time, PEEP
PIP is never exceeded; VT varies. For stiff lungs / ARDS
PRVC
Full
Rate, VT, PIP, PEEP, sensitivity
Target VT at the lowest possible pressure, adjusted breath by breath
SIMV
Partial
Rate, VT, inspiratory time, sensitivity, PEEP
Machine breaths synchronized to the patient; spontaneous breaths in between are whatever the patient can manage. Risk: muscle fatigue
PSV
Spontaneous
Inspiratory pressure level, PEEP, sensitivity
Augments the patient's own breath. Weaning mode. Monitor for apnea. Not for ARF
CPAP
Spontaneous
FIO2 and PEEP only
No rate, no VT, no PIP. Pre-extubation trial, 30–120 min
APRV
Full or spontaneous
P-high, P-low, T-high, T-low
Long high-pressure phase recruits alveoli; brief release clears CO2
PAV
Partial/spontaneous
Percentage of patient effort
Support proportional to effort; useless without spontaneous breathing
Artificial airway management is often shared with the respiratory therapist, and agency policy dictates who does what. The chapter frames the nurse's share as four responsibilities, and they make a usable mental checklist at the start of every shift.
7.2 Maintaining Correct Tube Placement
Continuously monitor placement: note the exit point at the mouth or nare, assess the integrity of the tape or securement device, observe for symmetric chest wall movement, and auscultate to confirm bilateral breath sounds.
Record and mark the position of the tube at the lip or teeth — for example 21 cm at the teeth, 23 cm at the lips.
Assess tube position at least once per shift, and with any change in patient position, with early mobility, and before and after transport.
The chapter also names the practical safeguards. When the ET tube is repositioned or re-taped, two staff members should ALWAYS perform it — one maintaining tube position while the other works — and the tube is moved to the opposite side of the mouth, after which cuff inflation and tube placement are reconfirmed. Always assess the skin under the tube, including the upper and lower lips and chin, and under any securement device; some commercial devices increase the risk of breakdown compared with tape.
7.3 Maintaining Proper Cuff Inflation
The cuff is an inflatable sleeve encircling the lower outer wall of the tube. It stabilizes and seals the tube in the trachea, prevents escape of ventilating gases, helps maintain tube position, and seals off the lower airway to protect against aspiration. Too little air and the seal fails; too much and the tracheal mucosa is damaged.
Element
The rule
Why
Pressure
Maintain cuff pressure at 20 to 30 cm H2O (15 to 22 mm Hg)
Higher pressures compress tracheal capillaries, limit blood flow, and predispose to tracheal necrosis; lower pressures let secretions and gases past the cuff
Frequency
Measure and record after intubation and routinely — e.g., every 8 hours
Cuff pressure drifts with position, temperature, and tracheal changes
Technique
Minimal occluding volume (MOV): for the ventilated patient, place a stethoscope over the trachea and add air until no air is heard at peak inspiratory pressure. For the spontaneously breathing patient, inflate until no sound is heard after a deep breath or a BVM breath
Uses the least air that still seals, rather than a fixed volume
Confirmation
Then confirm with a manometer that pressure is 20–30 cm H2O, and record it
MOV finds the seal; the manometer proves the pressure is safe
7.4 Maintaining Tube Patency — Suctioning
Do not suction routinely. Suction when the patient needs it, and assess the need hourly.
Indication to suction
What it reflects
Visible secretions in the ET tube
The most direct indication there is
Increase in respiratory rate or frequent coughing
The patient is trying to clear the airway themselves
Sudden decrease in SpO2
Secretions are obstructing gas exchange
Suspected aspiration of secretions
Material has entered the airway that must come out
Increase in peak airway pressure
The ventilator is meeting new resistance — a mechanical signal of obstruction
Coarse crackles or wheezes over the trachea and large airways; restlessness or agitation
Secretions are audible centrally and the patient is distressed by them
Neurologic patients may show no signs at all that they need suctioning — suctioning at minimum once per shift is recommended in that group. Always note the color, character, consistency, and amount of sputum.
Closed versus open technique
Closed-suction technique (CST) — the catheter is enclosed in a plastic sleeve connected directly into the patient-ventilator circuit. It reduces exposure to secretions and infection risk for both patient and staff, and it keeps the circuit closed so PEEP and oxygenation are not lost. CST is how most intubated patients are suctioned.
Open-suction technique (OST) — used when a sterile sputum sample is needed or CST is unavailable. Best performed with 2 people: one removes the patient from the ventilator and bags, the second suctions using sterile technique with one hand designated contaminated.
Step
The number
Reason
Suction pressure
No greater than 120 mm Hg with the tubing occluded
Higher pressures cause tracheal mucosal damage
Hyperoxygenation
Press the [100% FIO2] button on the ventilator — the SAFEST method. If bagging instead, give 5 or 6 breaths over 30 sec and attach a PEEP valve to the BVM for patients on more than 5 cm H2O PEEP
Prevents suction-induced hypoxemia. The PEEP valve prevents derecruitment in patients who depend on PEEP
Catheter insertion
Insert gently but quickly without suction; STOP when the patient begins to cough more forcefully. Do NOT insert until you meet resistance
Resistance means the catheter is hitting the carina, which is fragile, vascular tissue
Suction application
Continuous suction ON WITHDRAWAL, over about 10 seconds
Suctioning on the way in removes oxygen and traumatizes the airway for no benefit
Between passes
Wait at least 30 sec (ventilator) or 5–6 breaths (BVM); rinse the catheter with sterile saline, always away from the patient
Allows re-oxygenation and prevents flushing debris toward the airway
Afterward
Ensure FIO2 returns to its previous setting; reassess; auscultate; record time, amount, character, and response
A patient left on 100% FIO2 accumulates O2 toxicity risk
Three causes of dysrhythmias during suctioning: (1) hypoxemia leading to myocardial ischemia; (2) vagal stimulation from tracheal irritation — this is the bradycardia and hypotension route; (3) sympathetic stimulation from anxiety, discomfort, or pain — this is the tachycardia and hypertension route.
STOP AT ONCE and remove the catheter if the patient becomes bradycardic or hypotensive — a vagal response has occurred. Stop if any new dysrhythmia develops, if the SpO2 falls, or if coughing is sustained. Reassess until stability returns before trying again.
Tracheal mucosal damage comes from suction pressures greater than 120 mm Hg, overly vigorous insertion, and the catheter itself. Blood streaks or tissue shreds in the aspirate indicate mucosal damage and raise the risk of infection and bleeding — especially on anticoagulants.
Thick, hard-to-suction secretions are caused by inadequate hydration or humidification, or by infection. Treat the cause: hydrate, humidify inspired gases through the ventilator, turn every 2 hours and mobilize early, and give antibiotics if infection is the cause.
7.5 Ventilator Alarms
Ensure that ALL ventilator alarms are ALWAYS on. They alert you to patient-ventilator dyssynchrony, ventilator disconnection or malfunction, and unplanned extubation. Alarms may be silenced or suspended for up to 2 minutes for suctioning, after which they turn back on automatically — pause, never turn off, and reactivate all alarms before leaving the patient.
Alarm
Think about
Do
High pressure
Something is resisting the breath: secretions, coughing, water condensate in the tubing, kinked or compressed tubing, the patient biting the tube, bronchospasm, dyssynchrony, or a change in the lung itself (pulmonary edema, ARDS, pneumonia, atelectasis, tension pneumothorax)
Suction; unkink tubing; insert a bite block; drain water from the tubing; give a bronchodilator; reassure; analgesia/sedation; auscultate and obtain a chest x-ray
Low pressure
The circuit has lost pressure: disconnection, a cuff leak (the patient may be speaking or grunting), or partial or total loss of the airway
Check all connections; confirm adequate VT; reinflate the cuff PRN; confirm tube position by chest x-ray if time permits
Low VT / minute ventilation / rate
Cuff leak, inappropriate mode, insufficient gas flow, oversedation, or a leak in the circuit
Reduce sedation; assess the circuit for leaks; measure cuff pressure; change mode; if the patient is in distress, disconnect, bag, and call for help
High VT / minute ventilation / rate
Anxiety, pain, a change in condition (fever, hypoxia, hypercapnia, septic shock — or the patient simply improving), or condensate producing a false reading
Reassure; analgesia/sedation; reassess for a change in condition; change mode; remove water or secretions from tubing
Apnea
Change in condition, increased WOB, wrong mode, loss of airway, oversedation, respiratory arrest
Increase analgesia/sedation or change mode as appropriate; if in doubt, disconnect the patient, attach a BVM, and call for help
Ventilator inoperative
Internal battery not charged, malfunction, power failure
Keep the ventilator plugged into the correct power source at all times; disconnect, bag with 100% O2, and call for help
7.6 Analgesia, Sedation, and Neuromuscular Blockade
Patients on PPV may need analgesia (fentanyl, hydromorphone) and/or sedation (propofol).
Before giving either, try to identify the CAUSE of the distress. Common causes: PPV itself, hypoxemia, hypercapnia, drugs, environmental stressors (fear, sleep deprivation), and discomfort from the tube.
Assess effectiveness with a valid pain scale and a sedation scale — the Richmond Agitation and Sedation Scale (RASS) or Sedation Agitation Scale (SAS) — and a delirium scale. Consider relaxation techniques such as music therapy alongside drugs.
GOAL: a patient who is awake, interacting with their environment, breathing comfortably and in synchrony with the ventilator — not a snowed one.
Neuromuscular blocking agents
NMBAs paralyze skeletal muscles, including the diaphragm. Purpose: decrease work of breathing and provide effective synchrony with the ventilator, improving both oxygenation and ventilation. Ch. 32 names vecuronium and pancuronium.
The paralyzed patient CAN HEAR, SEE, AND FEEL. It is essential to give IV sedation and analgesia CONCURRENTLY. Always address the patient as if they were awake and alert.
Assess the depth of paralysis with train-of-four (TOF) peripheral nerve stimulation: four successive stimulating currents delivered along the ulnar nerve to elicit muscle twitches. The number of twitches falls as blockade deepens. Usual goal: 1 or 2 twitches out of 4.
Also monitor for signs of pain or anxiety (changes in heart rate and BP) and for ventilator dyssynchrony; bispectral index (BIS) monitoring can help guide therapy.
Never give an NMBA to a patient with a cholinesterase deficiency.Excess administration may cause prolonged paralysis and muscle weakness even after the drugs are stopped, so use the shortest duration and lowest dose possible.
7.7 Oral Care and VAP Prevention
Ventilator-associated pneumonia (VAP) is pneumonia occurring 48 hours or more after endotracheal intubation. It occurs in as many as 40% of all intubated patients, most often within 96 hours of starting ventilation, and it produces significantly longer ventilator days, longer hospital stays, and higher mortality.
Most common organisms are gram-negative:Escherichia coli, Klebsiella, Streptococcus pneumoniae, Haemophilus influenzae; also antibiotic-resistant Pseudomonas aeruginosa and oxacillin-resistant Staphylococcus aureus. Colonization of the oropharynx by gram-negative organisms predisposes to gram-negative pneumonia — which is exactly why oral care is an infection-control intervention.
Spread by: contaminated respiratory equipment, inadequate hand washing, poor room ventilation and high traffic, and the patient's decreased ability to cough and clear secretions.
Signs suggesting VAP: fever, high WBC count, change in the color and/or amount of sputum, crackles or wheezes, and new infiltrates on chest x-ray. Management: obtain sputum cultures and start broad-spectrum antibiotics.
Perform oral care every 2–4 hours using toothettes or a suction toothbrush, a Yankauer suction device, and toothpaste or mouthwash; use 0.12% chlorhexidine oral rinse twice daily (the narrative supports chlorhexidine at least 3 times a day to decrease oral contamination and VAP).
Provide oral care for 1–2 minutes, suctioning often, and apply a mouth moisturizer to the oral mucosa and lips with each cleaning. With an oral ET tube the mouth is always open and the mucosa dries.
Change all oral suction equipment and suction tubing every 24 hours. Use smaller or pediatric-sized products if space in the mouth is limited.
7.8 Nutrition
Why it is aggressive: nutrition problems make the patient prone to poor O2 transport from anemia, delay weaning, decrease resistance to infection, and slow extubation and recovery. Nutrition depletion causes loss of muscle mass including the respiratory muscles.
The ET tube eliminates the normal route for eating; an NG or OG tube is inserted and connected to low intermittent suction.
Enteral nutrition is preferred because it preserves the structure and function of the gut mucosa and stops the movement of gut bacteria across the intestinal wall into the bloodstream. If EN is not possible, parenteral nutrition is used.
Patients likely to remain intubated for 3 to 5 days should have a nutrition assessment on admission and enteral nutrition started within 24 hours (Ch. 32 states within 24 to 48 hours for ARF and ARDS). Consult the dietitian.
7.9 Prophylaxis, Mobility, and the ABCDEF Bundle
VTE: the intubated patient is immobile, blood stases in the lower extremities, and VTE risk rises. Start VTE prophylaxis as ordered and assist the patient to sit in a chair at the bedside.
GI/stress ulcers: serious illness, immobility, and ventilator discomfort raise the risk, and any circulatory compromise — including the reduced cardiac output caused by PPV — causes ischemia of gastric and intestinal mucosa and increases bacterial translocation. Higher risk with a pre-existing ulcer or corticosteroids. Prophylaxis: H2 blockers (e.g., ranitidine, famotidine), proton pump inhibitors (e.g., esomeprazole, pantoprazole), or enteral nutrition itself.
Constipation: immobility, sedation, impaired circulation, decreased oral intake, opioids, and stress all decrease peristalsis, and the patient cannot exhale against a closed glottis, which makes defecation difficult. Start a bowel regimen.
Early mobility: encourage most ventilated patients to exercise and mobilize as soon as possible. Exceptions: hemodynamic instability, patients receiving NMBAs, unstable cervical or thoracic spine fractures, and other medically contraindicated conditions. Use a portable ventilator or manual ventilation with a BVM and 100% O2 when ambulating.
ABCDEF bundle
Element
A
Assessment (of pain, agitation, delirium)
B
Breathing trials done daily
C
Correct Choice of analgesia and sedation
D
Delirium prevention and management
E
Early mobility
F
Family engagement
7.10 Communication and Psychosocial Care
Intubated patients are stressed by not being able to talk or communicate their needs. Methods: paper and pencil, a white board, a cellphone for texting, a communication board with pictures of common needs (convenient for patients who speak other languages), a visual alphabet for spelling (useful for patients who are weak or cannot write), picture boards, notepads, and computers.
Explain what will happen as part of every procedure. Look directly at the patient and use hand gestures.
The ICU has high levels of procedure-related touch and low levels of comfort-related touch; tolerance for touch varies with culture and personal history, so use comforting touch with ongoing evaluation of the response.
Encourage the caregiver to talk to the patient even if intubated, sedated, or apparently comatose — hearing is often the last sense to decrease.
Feeling safe is an overpowering need. Reduce anxiety by including patients and caregivers in conversations, explaining equipment and procedures, encouraging expression of concerns, and structuring the environment (photographs, personal items). Relaxation techniques and antianxiety drugs (e.g., lorazepam) may reduce the stress response.
7.11 Complications of Mechanical Ventilation
Complication
Mechanism
Prevention / response
Aspiration
The ET tube holds the epiglottis open, so the patient cannot protect the airway. The high-volume, low-pressure cuff cannot totally prevent a trickle of oral or gastric secretions past it, and secretions collect ABOVE the cuff — when the cuff is deflated they can move into the lungs
Keep the HOB elevated at least 30 degrees in all intubated patients receiving EN. Suction the mouth often with a Yankauer. Use tubes with a subglottic suction port (continuous low suction at 20 mm Hg) where available
Sodium and water retention
Fluid retention appears 48 to 72 hours after starting PPV, especially with PEEP. Decreased cardiac output lowers renal perfusion → renin → angiotensin and aldosterone → sodium and water retention
Also driven by ADH and cortisol from the stress response, less insensible water loss with humidified gas, and decreased atrial natriuretic peptide. Monitor daily weights and intake and output
Adverse hemodynamic effects
Increased mean airway pressure is transmitted to thoracic structures, compressing the vessels and decreasing venous return, preload, systolic BP, MAP, and cardiac output. Worse with PEEP above 5 cm H2O
Continuous ECG, BP/MAP, and SpO2 monitoring; treat with IV fluids, vasopressors, and inotropes as ordered
Alveolar hypoventilation
Inappropriate settings, air leaking from tubing or around the cuff, secretions or obstruction, or too much analgesia/sedation. A low VT or rate decreases minute ventilation → hypoventilation, atelectasis, and RESPIRATORY ACIDOSIS
Check the circuit and the cuff; suction; reduce sedation; adjust settings
Alveolar hyperventilation
Rate or VT set too high, or the patient hyperventilating on an assisted mode → RESPIRATORY ALKALOSIS
If hyperventilation is spontaneous, find and treat the cause — hypoxemia, pain, anxiety, or compensation for a metabolic acidosis. Sit with an anxious patient and coach them to breathe with the ventilator, or wean to a more appropriate setting
Barotrauma
Increased airway pressure distends the lungs and can rupture fragile alveoli or blebs. Risk rises with inflation pressures; patients with noncompliant (stiff) lungs, including ARDS, are at greatest risk
With PPV, a simple pneumothorax can become a life-threatening TENSION pneumothorax — the mediastinum and opposite lung are compressed and cardiac output falls. Immediate treatment is needed
Volutrauma
Too large a tidal volume delivered into noncompliant lungs causes alveolar rupture and movement of fluids and proteins into the alveolar spaces
Use low-volume ventilation (4–8 mL/kg) in stiff, noncompliant lungs
Auto-PEEP
Inadequate exhalation time traps air, creating PEEP over and above what was set. Consequences: increased WOB, barotrauma, hemodynamic instability
Sedation and analgesia; a large-diameter ET tube; bronchodilators; shorter inspiratory times; decreased respiratory rates; reduce water in the circuit
Ventilator disconnection and unplanned extubation
Most disconnections are discovered by the LOW-PRESSURE alarm, and the most frequent site is between the tracheal tube and the adapter — push connections together firmly.
Signs of unplanned extubation: the low-pressure alarm, decreased or absent breath sounds, respiratory distress, an audible cuff leak — and the patient may be talking to you. It is not always obvious: the tip may be sitting in the hypopharynx or esophagus.
Response:stay with the patient and call for help; support oxygenation with a nasal cannula or manual ventilation with BVM and 100% O2; notify the HCP and RT immediately; assess for respiratory distress and the need for reintubation; if the patient cannot protect the airway or is in distress, prepare for immediate reintubation; provide emotional support.
Prevention: ensure the tube is secured; support it during repositioning, procedures, and transfers; give adequate sedation and analgesia; follow weaning protocols, which decrease the incidence of self-extubation. Restraints deter self-extubation — explain their short-term use to patient and caregiver, discuss alternatives, and reassess the continued need.
7.12 Rescue Therapies
Rescue therapies alleviate hypoxemia in patients who cannot maintain reasonable oxygenation despite appropriate mechanical ventilation, high FIO2, and PEEP.
These gas molecules regulate pulmonary vascular tone; inhibiting NO produces vasoconstriction, and continuous inhaled NO produces pulmonary vasodilation, increasing pulmonary arterial blood flow and decreasing pulmonary pressures
Improves gas exchange and arterial oxygenation by redistributing blood flow to ventilated lung
Prone positioning
Gravity reverses the effect of fluid in the dependent lung; the heart rests on the sternum, away from the lungs, producing more uniform pleural pressures; lung recruitment improves
Requires increased sedation and is nurse intensive. Effective in severe ARDS. Patients with refractory hypoxemia should remain prone at least 12 hours per day (Ch. 32: up to 16 hours per day)
ECMO
Blood is removed through large-bore vascular access catheters, infused with O2 while CO2 is removed, and returned. The circuit is a blood pump, an oxygenator, and a heating-cooling element
Very labor intensive; needs a skilled team including a perfusionist. Requires systemic anticoagulation — bleeding risk is weighed before starting
7.13 Weaning — Prerequisites and Trials
Weaning is the process of gradually reducing ventilator support and allowing the patient to assume greater responsibility for breathing spontaneously. Preparation begins almost as soon as the patient is intubated. Short-term ventilation (3 to 5 days) — after heart surgery, for example — usually means a straightforward wean. Long-term ventilation (longer than 5 days) tends to consist of alternating gains and losses.
Nonrespiratory factors matter as much: neurologic status, hemodynamic stability, acid-base balance, nutrition status, fluid and electrolyte balance, and hemoglobin. The ideal candidate is alert, well-rested, well-informed, and relatively free of pain and anxiety. This does not mean complete withdrawal of sedatives or analgesics — the drugs should be titrated to achieve comfort without excessive drowsiness.
Trial
What it is
Pass / fail
Spontaneous awakening trial (SAT)
Stopping ALL sedatives and, in patients without active pain, ALL opioids
Fail (increased respiratory rate, falling saturations, low VT) → restart sedation at 50% of the previous dose. Pass → sedation remains off
Spontaneous breathing trial (SBT)
Breathing with little or no ventilator assistance — may use low FIO2, low PEEP, or low-level pressure support. At least 30 minutes but no more than 120 minutes
Tolerating it may lead to extubation. Failure should prompt a search for reversible or complicating factors and a return to the previous mode. Unless contraindicated, all patients should have an SBT daily
Conducting the trial
There is no "right" way to wean. Most providers attempt it early in the morning after a good night's rest, with the patient hemodynamically stable and comfortable, in a semi-recumbent position in bed or sitting in a chair. Obtain baseline vital signs and respiratory parameters, and make sure the whole team knows the plan.
Approaches: decreasing the number of ventilator-delivered breaths in SIMV, or gradually decreasing the degree of pressure support daily. PSV provides gentle, slow respiratory muscle conditioning and may benefit deconditioned patients or those with heart problems.
END the trial for: tachypnea, dyspnea, tachycardia, dysrhythmias, sustained desaturation (SpO2 less than 92%), hypertension or hypotension, agitation, diaphoresis, anxiety, and changes in mental status.
If the trial fails, let the respiratory muscles REST between trials — once fatigued, they may need 12 to 24 hours to recover. Pushing a fatigued patient into another trial guarantees another failure.
7.14 Weaning Readiness — the Numbers
Criterion
Threshold
Neurologic
Awake, alert, easily rousable
Underlying cause
Reversal of the condition that caused respiratory failure
Hemodynamics
Stable — no dysrhythmias or myocardial ischemia; no clinical hypotension; low-dose or no vasopressor
Oxygenation
PaO2/FIO2 >300 · SpO2 ≥92% · PEEP ≤5–8 cm H2O · FIO2 ≤40% · pH ≥7.35
Respiratory drive
Stable, intact drive with the ability to initiate spontaneous respirations
Other (HCP decision)
Hemoglobin ≥7 g/dL · core temperature ≤101.3°F (38.5°C)
The negative pressure the patient can generate — a measure of muscle strength and ability to cough
−20 to −30 cm H2O
More negative than −20 cm H2O. The MORE NEGATIVE the number, the better
Rapid shallow breathing index (RSBI)
The Tobin number: rate ÷ VT in liters — e.g., 30 ÷ 0.400 = 75
<105
<105
7.15 Extubation
Assess muscle strength (negative inspiratory force) and endurance (spontaneous VT, vital capacity, minute ventilation, RSBI). There should be minimal secretions and an intact ability to cough and gag.
Procedure: (1) hyperoxygenate and suction; (2) have an alternative O2 delivery device (e.g., nasal prongs) set up before you start; (3) loosen the tapes or holder; (4) have the patient take a deep breath and, AT THE PEAK OF INSPIRATION, deflate the cuff and remove the tube in one smooth motion. Rationale: the airway is at its widest at peak inspiration, and the patient exhales or coughs as the tube leaves, expelling secretions rather than inhaling them.
After removal: encourage deep breathing and coughing; suction the oropharynx as needed; assess the ability to speak; give supplemental O2 and provide oral care.
Monitor vital signs, respiratory status, and oxygenation closely immediately after extubation and for the first 2 to 3 hours.
Signs of NOT tolerating extubation: decreased SpO2, tachypnea or bradypnea, tachycardia, decreased LOC, a decrease in PaO2 and an increase in PaCO2. Immediate reintubation, or a trial of noninvasive ventilation, may be needed.
UNIT 8
Tracheostomy
Covers: Lewis's Ch. 28 (pp. 539–575)
8.1 Indications and Advantages
A tracheostomy is a surgically created stoma in the anterior part of the trachea. Where the ET tube is the emergency answer, the tracheostomy is the durable one.
Early tracheotomy — done within 10 to 14 days — appears to have advantages over delayed tracheotomy when a prolonged artificial airway is expected: fewer ventilator-dependent days, reduced length of stay, decreased pain, and improved communication.
Compared with an ET tube, the tracheostomy tube is shorter and slightly wider, which makes it easier to keep clean and promotes better oral and bronchial hygiene; it may increase comfort because no tube sits in the mouth; and there is less risk of long-term damage to the vocal cords.
8.2 Tube Anatomy and Types
All tracheostomy tubes have a faceplate (flange) resting against the neck and an obturator used to insert the tube. Many have an outer cannula (keeps the airway patent) and an inner cannula (disposable or reusable, removed for cleaning). Others parts: 15-mm adapter, cuff, pilot balloon, inflation tube, one-way valve, rounded tip, and tie strings.
Cuffed tubes are used most, especially if the patient needs mechanical ventilation. The cuff ensures the patient receives the volume of air delivered by the ventilator and decreases the risk of aspiration. A properly inflated low-pressure, high-volume cuff distributes pressure over a large area, minimizing pressure on the tracheal wall.
Cuffless tubes are used for longer-term tracheostomies, when mechanical ventilation is not needed and aspiration risk has decreased; talking and eating may be possible.
A fenestrated tube has an opening (a hole) on its dorsal surface, which promotes spontaneous breathing. With a cuffed fenestrated tube, when the cuff is DEFLATED and the inner cannula REMOVED, air can pass from the lungs up through the opening, through the vocal cords and into the upper airway — so the patient can breathe spontaneously and SPEAK. Reinflate the cuff and reinsert the inner cannula and air can no longer reach the cords.
Specialty tube
How it works
Nursing management
Fenestrated tube with cuff, inner cannula, and decannulation plug
With the non-fenestrated inner cannula out, the cuff down, and the plug in, air flows around the tube, through the fenestration, and over the vocal cords — the patient can speak
Assess aspiration risk before removing the inner cannula (speech pathologist may help); deflate the cuff and note coughing. A non-fenestrated inner cannula MUST be used to suction, so the catheter cannot pass through the fenestration and damage the trachea
Talking tracheostomy tube (cuff plus 2 external tubings)
One tubing leads to the cuff; the other to an opening above the cuff. Connect that port to an air source and air flows up over the vocal cords, allowing speech even with the cuff inflated
Patient must be awake, alert, stable, and able to tolerate cuff deflation. Identify the CORRECT tubing — gas into the cuff will overinflate and RUPTURE it. Use the lowest flow that produces speech, typically 4–6 L/min
Foam-filled cuff tube (Bivona, Fome-Cuf)
The cuff is filled with plastic foam. Deflated before insertion, it self-inflates afterward and stays inflated. The pilot tubing is NOT capped, no cuff pressure monitoring is needed, and the patient cannot speak
Withdraw all air with a 20-mL syringe and cap the pilot tubing before insertion; remove the cap afterward so the cuff reinflates passively. Never inject air or cap the tubing in situ. Deflate daily to check cuff integrity. Usable up to 1 month at home
8.3 Insertion Techniques
Most patients who need mechanical ventilation get an oral ET tube first, because it can be inserted quickly in an emergency.
When swelling, trauma, or upper airway obstruction prevents oral intubation, an emergent surgical CRICOTHYROIDOTOMY is needed — an incision through the skin and cricothyroid membrane on the anterior neck, completed in minutes.
Surgical tracheostomy is usually done in the operating room under general anesthesia, often electively on an already intubated patient expected to need prolonged ventilation. A horizontal incision is made, the tube inserted, the incision sutured, and a sterile dressing applied.
Percutaneous tracheostomy uses local anesthesia, sedation, and video guidance: the ET tube is withdrawn to the glottis, a needle is placed between the SECOND and THIRD tracheal rings, and the opening is progressively enlarged with dilators. Advantages: less risk of bleeding and fewer postoperative complications.
Both approaches may be done at the bedside in the ED or ICU.
8.4 Immediately Before, During, and After
Before: explain the purpose to patient and caregiver; if done at the bedside, ensure appropriate personnel including RT are present, and that a BVM, suction, and emergency resuscitation equipment are at the bedside, functional and ready. Record baseline vital signs, ensure the IV is patent, position the patient SUPINE, and give analgesia and sedation as ordered.
During: monitor hemodynamic status and the response to sedation. Observe the SpO2 and immediately notify the HCP if it falls below 92%.
After: the cuff is inflated IMMEDIATELY. Confirm placement by one of four methods — auscultation of the chest for air entry, EtCO2 capnography, video-assisted confirmation (percutaneous), or passage of a suction catheter through the tube. Once placement is confirmed the ET tube is removed.
Secure the tube with cotton ties, tapes, or Velcro straps. Monitor vital signs and SpO2, obtain a chest x-ray, and record ventilator settings including mode, FIO2, and PEEP.
Observe the amount of blood on the dressing at the insertion site — bleeding is the immediate care priority in the first few hours. Notify the HCP if bleeding persists.
8.5 Ongoing Care in the First Days
Task
Frequency / rule
Rationale
Site assessment and patency
At a minimum every shift, or more often based on assessment
Observe for redness, inflammation, edema, ulceration, or signs of infection
Dressing change
STERILE, every 12 to 24 hours (more often if soiled); clean around the stoma with normal saline and apply a sterile PRE-CUT dressing
A cut gauze sheds fibers into the stoma; you may need a second person
Cuff pressure
Measure with a manometer at least every 8 hours; do not exceed 20 to 30 cm H2O (15 to 22 mm Hg); inflate with the least air that seals, using MOV
Higher pressures compress tracheal capillaries, limit blood flow, and predispose to TRACHEAL NECROSIS
Inner cannula
Disposable — replace per policy. Non-disposable — clean at least every shift: immerse in sterile solution, clean inside and out with a brush or pipe cleaners, rinse, shake dry, and reinsert with the curved part downward and lock
Cleaning removes mucus from inside the tube to prevent airway obstruction
Tracheostomy tapes
Do NOT change for at least 24 hours after the procedure, then as needed. Two-person technique — one stabilizes the tube while the other changes the tapes; tie with room for 2 fingers, using a double knot on the SIDE of the neck
A new tracheostomy is difficult to reinsert, so the tube must never be allowed to move
Suctioning
As needed. AVOID suctioning through a newly created tracheostomy in the first few hours
Early suctioning worsens discomfort and promotes bleeding
Humidification
Provide humidified air at first
Compensates for the loss of the upper airway's ability to warm and moisturize; keeps secretions thin, decreases mucous plugs, and promotes comfort
Replacement tube
Keep a replacement tube of EQUAL OR SMALLER SIZE at the bedside at all times
For emergency reinsertion if the tube is dislodged; a smaller tube will pass a swollen or narrowed tract
First tube change
Performed by the HCP, usually NO SOONER THAN 7 DAYS after the tracheotomy
The tract must mature before the tube is manipulated
8.6 Accidental Decannulation
If the tracheostomy tube is accidentally dislodged, IMMEDIATELY CALL FOR HELP. While waiting for the HCP or RT, the options depend on agency policy and scope of practice — and on one variable above all: how old the stoma is.
Situation
Action
First: always
Call for help. Quickly assess level of consciousness, ability to breathe, and the presence of respiratory distress
Mature tract (more than 1 week old) — option 1
Use a hemostat to spread the stoma; insert the obturator into the replacement tube, lubricate with saline, and insert. REMOVE THE OBTURATOR AT ONCE — it blocks the lumen, so no air flows until it is out
Mature tract — option 2
Insert a suction catheter to allow air passage and use it as a guide, threading the tracheostomy tube over it, then remove the catheter
Immature tract (less than 1 week old) or the tube cannot be replaced
Place the patient in SEMI-FOWLER'S position to decrease dyspnea; cover the stoma with a sterile dressing and VENTILATE WITH A BVM OVER THE NOSE AND MOUTH. Severe dyspnea and hypoxemia may progress to respiratory and cardiac arrest
EXCEPTION — total laryngectomy
There is complete separation between the upper airway and the trachea, so bagging the face accomplishes nothing. Ventilate this patient THROUGH THE TRACHEOSTOMY STOMA
8.7 Speech and Swallowing
The spontaneously breathing patient may be able to talk. If the patient is at low risk of aspiration: (1) remove the inner cannula if non-fenestrated, (2) DEFLATE the cuff, (3) place the cap on the tube. With the cuff deflated, exhaled air can flow upward over the vocal cords.
Passy-Muir valve: a one-way valve attached to the hub of the tracheostomy tube, used with the cuff DEFLATED. On inspiration the valve OPENS, letting the patient inhale through the tube; on exhalation it CLOSES, so air is redirected upward around the tube and through the vocal cords — the patient exhales through the nose and mouth instead of the tracheostomy, which produces speech. Patients may tolerate only short periods at first. Remove the valve immediately at any sign of respiratory distress.
An inflated cuff may cause swallowing problems by interfering with the normal function of the muscles used to swallow. A speech language therapist should assess swallowing, using thickened fluids of different consistencies to test for aspiration. If the patient can swallow without aspirating when the cuff is deflated, the cuff may be left deflated or a cuffless tube inserted, and varying levels of thickened fluids and soft foods become possible.
8.8 Planned Decannulation
Decannulation is possible when the primary condition has resolved and the patient is hemodynamically stable, has a stable intact respiratory drive, can adequately exchange air, and can independently expectorate secretions.
Procedure: explain what will happen; monitor vital signs; suction through the tracheostomy; clear the mouth of oral secretions; loosen or cut the tapes; remove visible sutures; deflate the cuff; and pull the tube outward in one smooth motion. STOP if you meet any resistance and notify the HCP immediately.
After removal: apply a sterile occlusive dressing and monitor for bleeding; change the dressing if soiled; close the stoma with tape strips if needed. Monitor respiratory status and O2 saturation for airway compromise, and apply an alternate O2 device if needed.
Teach the patient to splint the stoma with the fingers when coughing, swallowing, or speaking.
Epithelial tissue begins to form in 24 to 48 hours and the opening closes within 4 or 5 days. Surgery to close the tracheostomy is usually not needed.
8.9 The Long-Term and Home Tracheostomy
Care is the same as for a new tracheostomy — site observation, inner cannula cleaning, suctioning, tape changes.
Tube change schedule: about 1 MONTH after the first tube change, then EVERY 1 TO 3 MONTHS. The rationale for changing it at all is that doing so permits assessment of the stoma and cleaning of the tube.
Teach the patient signs and symptoms of infection and how to change the tube at home using CLEAN technique. Note the contrast: sterile technique in the hospital, clean technique at home. Engaging patients in their own care decreases complications and infection and promotes well-being.
Home mechanical ventilation: chronically ill ventilated patients meeting specific criteria may go home. Both negative and positive pressure ventilators can be used; negative pressure ventilators need no artificial airway and are less complicated, while small portable positive pressure ventilators mount on a wheelchair or bedside table with simpler settings and alarms.
Advantages: less strain on family dynamics than a hospital stay; more mobility and participation in ADLs on a personalized schedule. Disadvantages: equipment problems, reimbursement (disposables may not be covered), and caregiver stress and fatigue.
Nursing actions: carefully assess financial resources, and hold a care conference BEFORE starting a discharge teaching plan. Caregivers may seem enthusiastic without understanding the financial and personal sacrifices ahead. Encourage respite care.
UNIT 9
Acute Respiratory Failure
Covers: Lewis's Ch. 32 (pp. 672–692)
9.1 What Acute Respiratory Failure Is
ARF occurs when oxygenation, ventilation, or both are inadequate. The chapter is emphatic about one framing: ARF is not a disease — it is a symptom that reflects insufficient lung function. That matters clinically, because the primary aim of care is always to identify and treat the underlying cause; the ventilator only buys time. ARF occurs with problems involving the lungs or other body systems — a spinal cord injury and a drug overdose both produce it with structurally normal lungs.
9.2 Classification
Hypoxemic respiratory failure
Hypercapnic respiratory failure
Also called
Oxygenation failure
Ventilatory failure
Defining value
PaO2 <60 mm Hg on room air at sea level, with a normal or slightly subnormal PaCO2
PaCO2 >50 mm Hg, which may be accompanied by hypoxemia and/or acidemia (arterial pH <7.35)
Core problem
Inadequate exchange of O2 between the alveoli and the pulmonary capillaries. The low PaO2 may persist despite supplemental O2
Insufficient CO2 removal. As PaCO2 climbs, the body eventually cannot compensate and acidemia worsens
Each type is further divided by speed: acute (minutes to hours) and chronic (several days or longer). Five conditions can produce either type and appear at the top of both columns of the causes table: ARDS, asthma, chronic bronchitis, emphysema, and pulmonary edema.
9.3 Acute Versus Chronic — and Acute-on-Chronic
Acute respiratory failure
Chronic respiratory failure
Speed of change
Significant changes in PaO2 and PaCO2 over several minutes to a few hours to 1 or 2 days
Usually more stable, because the body had time to compensate for small, subtle changes. Not typically immediately life-threatening
Example
Severe asthma exacerbation; opioid overdose
COPD with a chronically elevated PaCO2 and a compensating bicarbonate
9.4 The Four Mechanisms of Hypoxemia
Every hypoxemic patient in this module is hypoxemic by one or more of four mechanisms. Learn them as a set, because acute hypoxemic respiratory failure is rarely caused by a single factor — most often it is a combination of two or more, and the treatment differs by mechanism.
Mechanism
What is wrong
Does O2 therapy fix it?
1. V/Q mismatch (most common)
Ventilation and perfusion are unequally distributed — some units get air without enough blood, others blood without enough air
Yes — most patients with hypoxemic V/Q mismatch respond to O2 therapy
2. Shunt (most common)
Blood exits the heart without having taken part in gas exchange at all. An extreme V/Q mismatch
NO — O2 therapy alone is not effective at increasing PaO2 if hypoxemia is due to shunt
3. Diffusion limitation
The alveolar-capillary membrane is thickened or the blood passes too quickly for gas to cross
Partially; the classic clue is hypoxemia that worsens with exercise but not at rest
4. Alveolar hypoventilation
Not enough air movement, which raises the PaCO2
O2 raises the PaO2 but does nothing for the CO2 — this patient needs ventilation
9.5 Mechanism 1 — V/Q Mismatch
Most common causes: increased secretions in the airways (COPD), increased secretions in the alveoli (pneumonia), or bronchospasm (asthma). Also pain, alveolar collapse (atelectasis), and pulmonary emboli.
Pulmonary emboli affect perfusion: they limit blood flow distal to the occlusion, so some areas remain normally ventilated while others lose perfusion. A large embolus blocking a major pulmonary artery can cause severe hemodynamic instability.
Treatment: treat the cause. O2 therapy is an appropriate first step to reverse the hypoxemia. Monitor with frequent ABGs, pulse oximetry, continuous assessment of level of consciousness, respiratory rate and rhythm, and the response to O2.
9.6 Mechanism 2 — Shunt
Anatomic shunt: blood passes through an anatomic channel in the heart — for example a ventricular septal defect — and bypasses the lungs entirely.
Capillary shunt: blood flows through pulmonary capillaries without taking part in gas exchange, because the alveoli are filled with fluid (as in pneumonia, pulmonary edema, or ARDS).
Patients with shunt are usually MORE hypoxemic than patients with V/Q mismatch and often need mechanical ventilation with a high FIO2.
9.7 Mechanism 3 — Diffusion Limitation
Gas exchange across the alveolar-capillary membrane is compromised by a process that damages or destroys the membrane or affects blood flow through the capillaries.
Conditions that thicken (fibrose) the membrane slow gas transport: pulmonary fibrosis, interstitial lung disease, ARDS. Accumulation of fluid, white blood cells, or protein in the alveoli — as in pulmonary edema — has the same effect.
Classic sign: hypoxemia that worsens with exercise but not at rest. With exercise, blood moves quickly through the lungs, decreasing the time available for O2 to diffuse across the membrane.
The same time problem occurs when cardiac output is markedly increased — high-output heart failure, for example — because blood circulates through the pulmonary capillary bed too fast for full equilibration.
9.8 Mechanism 4 — Alveolar Hypoventilation
A decrease in ventilation that increases the PaCO2. Common causes are CNS problems, chest wall dysfunction, acute asthma, and restrictive lung disease. It is mainly a mechanism of hypercapnic respiratory failure, but it contributes to hypoxemia as well — alveolar gas that is not refreshed accumulates CO2 and loses O2.
9.9 Hypercapnic Respiratory Failure
The respiratory system cannot keep CO2 within normal limits, from either an increase in CO2 production or a decrease in alveolar ventilation. The important structural point: hypercapnic ARF from CNS, neuromuscular, and/or chest wall causes can occur with completely normal lungs. The bellows fails, not the gas exchanger.
Category
Examples
How it produces failure
CNS
Opioid or sedative overdose; brainstem infarction; severe head injury; high spinal cord injury
CNS depressants decrease CO2 reactivity in the brainstem in a dose-related manner. Brainstem injury means the medulla does not sense the rising PaCO2, so no increase in respiratory rate occurs. High cord injuries cut the nerve supply to the chest wall and diaphragm
Respiratory muscle weakness or paralysis means CO2 cannot be eliminated. Also occurs from muscle wasting during critical illness
Chest wall
Severe obesity, flail chest, kyphoscoliosis, thoracic trauma, pain
Obesity: the weight of chest and abdominal contents limits expansion. Flail chest: fractures prevent normal rib cage expansion. Kyphosis: the spinal configuration compresses the lungs
Airways and alveoli
COPD, asthma, cystic fibrosis
The underlying pathophysiology causes airflow obstruction and air trapping; respiratory muscle fatigue and ventilatory failure follow from the added work of breathing needed to inspire against increased resistance and trapped air
Fatigue; inability to speak in complete sentences without pausing to breathe
Neuromuscular: decreased deep tendon reflexes; muscle weakness; tremors and seizures (late)
9.11 Assessment and Diagnostics
PRIORITY: immediately assess the patient's ability to maintain a patent airway and to breathe. Everything else follows that.
Observe TRENDS in ABGs, pulse oximetry, and assessment findings, and remain alert to subtle changes. A thorough assessment may allow early detection of respiratory insufficiency and prevent progression to failure.
Monitor patients with pre-existing cardiac and/or respiratory disease closely — any change in overall condition can cause significant respiratory and hemodynamic decompensation.
Most common studies: chest x-ray and ABG analysis. The chest x-ray identifies causes (atelectasis, pneumonia); ABGs evaluate oxygenation, ventilation, and acid-base balance; pulse oximetry monitors oxygenation indirectly.
Other studies: CBC, serum electrolytes, urinalysis, 12-lead ECG, blood and sputum cultures, CT or V/Q lung scan if pulmonary embolus is suspected, and EtCO2 for ventilation trends in severe ARF.
Initially cardiac output may be INCREASED because of the stress response; as hypoxemia, hypercapnia, and acidosis become more severe, cardiac output FALLS. The same reversal appears in the vital signs — tachycardia progressing to bradycardia, hypertension progressing to hypotension.
9.12 Management
Severity
Where and how
Monitoring
Mild to moderate ARF
O2 via a high-flow delivery device. Noninvasive ventilation such as BiPAP if the patient is awake, alert, able to maintain a patent airway, and able to clear secretions
Pulse oximetry, ABGs, mental status, respiratory rate, and the response to O2
Severe ARF
Care in the ICU, including mechanical ventilation
Continuous pulse oximetry and arterial BP monitoring; frequent ABGs; ScvO2 or SvO2 for adequacy of tissue perfusion; CVP; advanced hemodynamic monitoring for ejection fraction, cardiac output, and pulmonary capillary wedge pressure
Prevention matters most in patients with neuromuscular, cardiac, or respiratory problems.Preventing atelectasis and pneumonia, preventing complications of immobility, and optimizing hydration and nutrition decreases the risk for ARF. Early teaching strategies: deep breathing and coughing, incentive spirometry, and early ambulation.
Overall goals for the patient with ARF: independently maintain a patent airway; absence of dyspnea or a return to baseline breathing; effective cough with secretion clearance; normal ABGs or values within the patient's baseline; breath sounds within baseline.
Nutrition: the hypermetabolic state of critical illness raises calorie needs, and nutrition depletion causes loss of muscle mass including the respiratory muscles, which delays recovery. Ideally start enteral nutrition within 24 to 48 hours.
9.13 Drug Therapy
Goal
Drugs
What to know
Relieve bronchospasm
Short-acting bronchodilators (albuterol)
Relief of bronchospasm increases alveolar ventilation. Give at 15- to 30-minute intervals until a response occurs, by nebulizer or MDI with spacer. Side effects: tachycardia and hypertension; monitor vital signs and ECG
Reduce airway inflammation
Corticosteroids (IV methylprednisolone)
Used with bronchodilators. IV corticosteroids take several hours to work; inhaled corticosteroids take 4 to 5 days for optimum effect and will NOT quickly relieve dyspnea
Relieve pulmonary congestion
IV furosemide, morphine, nitroglycerin
Interstitial fluid accumulates from injury to the alveolar-capillary membrane from heart failure or fluid overload. Use caution: changes in heart rate and rhythm and significant decreases in BP are common
Treat infection
IV antibiotics
Lung infections cause excessive mucus, fever, increased O2 consumption, and inflamed, fluid-filled, or collapsed alveoli that cannot take part in gas exchange. Chest x-rays localize; sputum cultures identify the organism and its sensitivities
Reduce anxiety, pain, and restlessness
IV benzodiazepines (lorazepam, midazolam); opioids (morphine, fentanyl, hydromorphone)
These states increase O2 consumption and CO2 production and increase work of breathing. In the non-intubated patient they cause tachypnea and ineffective ventilation; in the intubated patient, ventilator dyssynchrony and risk of unplanned extubation. Start at the lowest dose possible
9.14 Gerontologic Considerations
The reduced ventilatory capacity that accompanies aging increases the risk for ARF.
Physiologic changes: alveolar dilation, larger air spaces, loss of surface area for gas exchange, decreased elastic recoil, decreased chest wall compliance, and decreased respiratory muscle strength.
In older adults the PaO2 falls further and the PaCO2 rises higher before the respiratory system is stimulated to change the rate and depth of breathing. That delayed response is itself a contributor to respiratory insufficiency — the warning system is slow, so the patient presents later and sicker.
A history of tobacco use accelerates age-related respiratory changes, and poor nutrition status with less cardiopulmonary reserve increases the risk of further compromise.
UNIT 10
Acute Respiratory Distress Syndrome
Covers: Lewis's Ch. 32 (pp. 672–692)
10.1 Definition and Scale of the Problem
ARDS is a sudden and progressive form of acute respiratory failure in which the alveolar-capillary membrane becomes damaged and more permeable to intravascular fluid. Hold that definition precisely: the injury is to the membrane, the consequence is that fluid crosses where it should not, and everything else — the shunt, the refractory hypoxemia, the stiff lungs — follows from that.
Number
Value
Share of adult ICU admissions
About 10%
US incidence
More than 200,000 cases each year
Mortality despite supportive therapy
Around 35%
Main cause of death
Multisystem organ dysfunction syndrome (MODS), often with sepsis
Recovery of lung function
Most patients recover within a year, many with normal to near-normal lung function
Next to septic shock, ARDS is one of the most common conditions seen in the adult ICU. Besides the lungs, the vital organs most often involved are the kidneys, liver, and heart.
10.2 Etiology — Direct and Indirect Lung Injury
The most common cause of ARDS is SEPSIS. It may also develop from multisystem organ dysfunction syndrome, and patients with multiple risk factors are 3 or 4 times more likely to develop ARDS.
Direct lung injury
Indirect lung injury
Mechanism
The pathogen comes into contact with lung tissue — for example, aspiration of gastric contents immediately initiates the inflammatory response
The problem starts elsewhere in the body. Widespread inflammation and infection release septic mediators into the bloodstream, which travel to the lungs — a favorable, dark, moist environment for proliferation
Common causes
Aspiration; bacterial or viral pneumonia; sepsis
Massive trauma; sepsis and septic shock (especially gram-negative); severe TBI; shock states (hypovolemic, cardiogenic)
Less common causes
Chest trauma (blunt or penetrating); embolism (fat, air, amniotic fluid, thrombus); inhalation of toxic substances; near-drowning; O2 toxicity; radiation pneumonitis
One injury to the alveolar-capillary membrane sets off the release of inflammatory mediators, and from there five parallel consequences converge on the same endpoint.
Step
What happens
Result
Membrane permeability rises
Blood cells and fluid migrate outward from the capillaries into the interstitium and then the alveolus
Pulmonary edema — non-cardiogenic, because the problem is a leaky membrane, not a failing heart
Type II alveolar cells damaged
Decreased surfactant production, plus inactivation of existing surfactant by fluid and protein
Decreased alveolar compliance and recoil → alveoli become unstable and collapse (atelectasis)
Bronchoconstriction
Airways narrow
Increased airway resistance and increased work of breathing
Vascular narrowing and obstruction
Microemboli form and pulmonary arteries constrict
Pulmonary hypertension
Hyaline membranes form
Necrotic cells, protein, and fibrin line the inside of each alveolus and the membrane thickens
Decreased lung compliance and a diffusion barrier → impaired gas exchange
The neutrophil is the cell at the center of it. The exact cause of the membrane damage is unknown, but it is thought to be stimulation of the inflammatory and immune systems, which attracts neutrophils to the pulmonary interstitium. Those neutrophils release biochemical, humoral, and cellular mediators producing increased pulmonary capillary membrane permeability, destruction of collagen, formation of pulmonary microemboli, and pulmonary artery vasoconstriction.
10.4 Phase 1 — Injury or Exudative Phase
Timing: usually 24 to 72 hours after the initial insult; generally lasts 7 to 10 days.
Engorgement of the peribronchial and perivascular interstitial space causes interstitial edema; that fluid then crosses the alveolar membrane into the alveolar space.
V/Q mismatch and shunt develop because the alveoli fill with fluid — blood in the capillary network cannot be oxygenated.
The early breathing pattern is deceptive: hypoxemia and stimulation of juxtacapillary receptors in the stiff lung (the J reflex) cause an increased respiratory rate with a decreased tidal volume. More CO2 is blown off, producing respiratory alkalosis, and cardiac output increases as a compensatory response to hypoxemia.
As atelectasis, pulmonary edema, and shunt increase, compensation FAILS → hypoventilation, decreased cardiac output, and decreased tissue O2 perfusion.
As the lungs become less compliant, the patient must generate higher airway pressures to inflate stiff lungs; the work of breathing rises, and at this point the patient needs mechanical ventilation.
10.5 Phase 2 — Reparative or Proliferative Phase
Timing: begins 1 to 2 weeks after the initial lung injury.
Continued influx of neutrophils, monocytes, lymphocytes, and fibroblasts as part of the inflammatory response.
Increased pulmonary vascular resistance and pulmonary hypertension occur because fibroblasts and inflammatory cells destroy the pulmonary vasculature.
Lung compliance continues to decrease due to interstitial fibrosis, and hypoxemia continues because of the thickened alveolar membrane, causing V/Q mismatch, diffusion limitation, and shunting. Fluid in the lungs and secretions in the airways increase airway resistance.
The phase is complete when dense, fibrous tissue replaces the diseased lung. If the reparative phase persists → widespread fibrosis. If it stops → the lesions often resolve.
10.6 Phase 3 — Fibrotic Phase
Timing: may start as early as 24 hours after the initial injury. Note that the phases overlap rather than following one another cleanly.
Not all patients who develop ARDS enter the fibrotic stage; for those who do, it carries a poorer prognosis and they may need several weeks of long-term mechanical ventilation.
Collagenous and fibrous tissues remodel the lung: diffuse scarring, interstitial fibrosis, and alveolar duct fibrosis decrease lung compliance and reduce the surface area available for gas exchange, so hypoxemia continues.
Varying degrees of pulmonary hypertension result from pulmonary vascular destruction and fibrosis.
Factors determining the clinical course: the nature of the initial injury; the extent and severity of comorbidities; how quickly the patient received medical care; and additional pulmonary complications such as pneumothorax. Genetics may play a part. It is not known why injured lungs repair in some patients and worsen in others.
10.7 Clinical Manifestations as ARDS Evolves
Stage
Findings
Chest x-ray
Early (initial injury through 24–72 hours) — presentation is often SUBTLE
May have no respiratory symptoms, or only mild dyspnea, tachypnea, cough, and restlessness. Auscultation may be normal or reveal fine, scattered crackles. ABGs show mild hypoxemia and respiratory alkalosis from hyperventilation
May be normal, or show diffusely scattered but minimal interstitial infiltrates
As it evolves
Respiratory distress becomes evident as work of breathing rises: tachypnea, intercostal and suprasternal retractions, tachycardia, diaphoresis, mental status changes, cyanosis, pallor. Auscultation: scattered to diffuse crackles and coarse crackles on expiration
After 72 hours, diffuse and extensive BILATERAL interstitial and alveolar infiltrates
As it progresses
Refractory hypoxemia.Hypercapnia signifies that respiratory muscle fatigue and hypoventilation have severely affected gas exchange — respiratory failure is imminent. Profound dyspnea; severe hypoxemia, hypercapnia, metabolic acidosis, and organ failure
"Whiteout" — consolidation and infiltrates throughout the lungs with few recognizable air spaces; pleural effusions may be present
10.8 The P/F Ratio
The PaO2/FIO2 (P/F) ratio is the patient's PaO2 divided by the FIO2 they are receiving, expressed as a decimal. It exists because a PaO2 means nothing without knowing what oxygen was needed to produce it: a PaO2 of 80 on room air is healthy, and a PaO2 of 80 on 100% oxygen is catastrophic.
P/F ratio
Severity
Additional Berlin requirement
>400
Normal
—
<300
Mild ARDS
PEEP or CPAP ≤5 cm H2O
<200
Moderate ARDS
PEEP or CPAP ≤5 cm H2O
<100
Severe ARDS
PEEP or CPAP ≤5 cm H2O
Berlin criterion
Requirement
Timing
Within 1 week of a known clinical insult, or new or worsening respiratory symptoms
Chest x-ray
Bilateral opacities — not fully explained by effusions, lobar or lung collapse, or nodules
Oxygenation
P/F ratio in the mild, moderate, or severe band, with PEEP or CPAP ≤5 cm H2O
10.9 Management — Seven Best Practices
Management of ARF applies to the patient with ARDS; the following is additional care. Patients with moderate to severe ARDS are cared for in an ICU, and all mechanically ventilated ARDS patients have continuous heart rate, respiratory rate, BP, and SpO2 monitoring, with EtCO2 monitoring as standard. Overall goals: a PaO2 of 60 mm Hg or higher and adequate ventilation to correct acid-base imbalance; longer-term, a PaO2 within normal limits for age on room air, SaO2 greater than 90%, resolution of the cause, and clear lungs on auscultation.
Oxygen administration
Initially a high-flow system delivering higher concentrations may be all that is needed, with continuous SpO2 monitoring to assess effectiveness. For most patients with ARDS, high-flow O2 (including BiPAP) is temporary — as the failure worsens it cannot keep the PaO2 acceptable.
Patients with moderate to severe ARDS and refractory hypoxemia need mechanical ventilation.
Even on the ventilator, the patient may need an FIO2 of 70% or higher to keep the PaO2 at least 60 mm Hg, and most providers agree that in the injury and reparative phases they may have to accept a lower-than-normal PaO2 (55 to 80 mm Hg) and SpO2 (88% to 95%).
Mechanical ventilation and low tidal volumes
Pressure-control ventilation helps keep inspiratory and plateau pressures from becoming too high, preventing alveolar overdistention and rupture — by reducing the pressure going into stiff, noncompliant lungs, further lung injury is prevented. However, no mode of mechanical ventilation is superior to the others.
Patients with ARDS are ventilated with a low tidal volume of 4 to 8 mL/kg. Delivering a large VT into stiff lungs causes volutrauma and barotrauma; volutrauma causes alveolar fractures — damage or tears in the alveolar-capillary membrane — and the movement of fluids and protein into the alveolar spaces.
Low VT ventilation reduces mortality and the risk of volutrauma. This is the single intervention most likely to be the correct answer to "which intervention prevents or limits volutrauma."
Permissive hypercapnia
Definition: as a result of delivering a lower-than-normal tidal volume, the PaCO2 slowly rises above normal limits. It is a CONSEQUENCE of low VT ventilation, not a strategy in its own right.
A PaCO2 of up to 60 mm Hg is acceptable in the early phase of ARDS, and the patient usually tolerates it if the rise is GRADUAL, allowing the brain and systemic circulation to compensate.
Frequent ABGs are needed, with careful monitoring of pH, PaO2, and PaCO2. The pH is kept between 7.30 and 7.45.
Because acidosis and rising CO2 are powerful stimulants to breathe, the patient receives continuous IV analgesia and sedation — otherwise they would fight the ventilator constantly.
CONTRAINDICATED in pregnancy and in patients with traumatic brain injury or increased ICP, because a rising CO2 dilates cerebral vessels and raises intracranial pressure further.
PEEP in ARDS
PEEP at 5 cm H2O is applied routinely to compensate for the loss of glottic function with an ET tube. It increases functional residual capacity — the volume of air remaining in the lungs at the end of a normal expiration — and helps open ("recruit") collapsed alveoli.
Application: increments of 3 to 5 cm H2O until oxygenation is adequate, with an FIO2 of 60% or less if possible. PEEP allows the FIO2 to be lowered, which is how it protects against O2 toxicity.
ARDS patients may need higher levels — 10 to 20 cm H2O. There is no identified optimal level of PEEP for ARDS.
Complications, with the mechanism: added intrathoracic and intrapulmonic pressure is transmitted to surrounding structures — the inferior vena cava and the heart — at end expiration, which compromises venous return to both sides of the heart, producing dramatic reductions in preload, cardiac output, and BP. High PEEP or excess inspiratory pressures cause barotrauma and volutrauma.
10.10 Prone Positioning and Rotation Therapies
Indication: patients with refractory hypoxemia and ARDS who do not respond to other strategies to increase the PaO2.
Mechanism: turning the patient prone better matches perfusion to ventilation. Air-filled alveoli in the anterior (ventral) lung become dependent, so their overdistention decreases; alveoli in the posterior (dorsal) lung are recruited — given the chance to re-expand — so collapse decreases. Oxygenation improves.
Staffing: an ICU intensivist, a respiratory therapist, and AT LEAST 3 NURSES. Special attention must be given to securing and maintaining the airway before, during, and after proning, and the patient is reattached to hemodynamic monitoring once positioned.
Effects: some patients improve enough to allow a reduction in FIO2 or PEEP. Watch for hemodynamic instability (dysrhythmias, falling BP) from fluid shifts, and expect more need for suctioning as secretions mobilize.
Timing: prone EARLY in the course of ARDS. Patients can stay prone for up to 16 hours per day (Ch. 28 states that patients with refractory hypoxemia and ARDS should remain prone at least 12 hours per day). The optimal length of time is not known.
Alternative
Description
Continuous lateral rotation therapy (CLRT)
Continuous, slow, side-to-side turning by rotating the bed frame less than 40°. The bed moves laterally for 18 of every 24 hours to simulate postural drainage and mobilize secretions; some beds add a vibration feature providing chest physiotherapy
Kinetic therapy
The same idea, but patients rotate side to side 40° or more
For either therapy, obtain baseline pulmonary assessments — respiratory rate and rhythm, breath sounds, ABGs, SpO2 — and continue to monitor throughout.
10.11 ECMO
ECMO is used most often in specialized ICUs in major cities. A large blood vessel — most often the internal jugular, femoral artery, or femoral vein — is cannulated; blood exits the body into the ECMO unit where O2 is delivered and CO2 removed, and oxygenated blood is returned. ECCO2R is similar but does not require as high a blood flow rate. Both are expensive and require specially trained personnel, and ECMO requires systemic anticoagulation, so bleeding risk is weighed before starting.
10.12 Supportive Therapy
Analgesia, sedation, and neuromuscular blockade
Essential, by direct IV push or continuous infusion, to decrease the discomfort of the ET tube, reduce work of breathing, and prevent ventilator dyssynchrony.
Patients breathing asynchronously may benefit from adjusting ventilator inspiratory flow rates or other settings first.
Those who remain asynchronous despite aggressive analgesia and sedation may need an NMBA (vecuronium, pancuronium) to relax skeletal muscle and promote synchrony.
A patient receiving neuromuscular blockade can appear to be asleep but still be awake and in pain. ALWAYS give concurrent analgesia and sedation. Use the NMBA for the shortest duration and lowest dose possible.
Monitoring sedation depth under blockade is difficult: assess the respiratory rate and whether the patient is taking breaths above the set rate, use EtCO2 monitoring, and use a peripheral nerve stimulator to assess the depth of paralysis.
Promoting tissue perfusion
Patients with ARDS are at risk for hemodynamic compromise, and those on PPV and PEEP often have decreased cardiac output.
Causes of the decreased cardiac output: decreased venous return from the PEEP-induced increase in intrathoracic pressure; dysrhythmias; decreased preload; and changes in intrathoracic or intrapulmonary pressures from PPV. Alveolar hyperinflation and increased right ventricular afterload limit blood flow from the right heart through the pulmonary vasculature to the left heart.
BP and MAP are important indicators of the adequacy of cardiac output. Monitor ECG, arterial BP, and SpO2 continuously; CVP may be ordered; newer technologies allow noninvasive monitoring of stroke volume variation, cardiac output, and ScvO2/SvO2.
Closely monitor BP and indicators of cardiac output and tissue perfusion with the START of, or CHANGES in, mechanical ventilation — that is when the pressure shift happens. Treat a decreased cardiac output with IV fluids, drugs, or both: norepinephrine, vasopressin, dopamine, dobutamine.
Fluid balance and nutrition
For nutrition, the reasoning is the same as in ARF: nutrition depletion causes loss of muscle mass including the respiratory muscles, which may prolong mechanical ventilation and delay recovery. Consult the dietitian and start enteral nutrition as soon as possible, ideally within 24 to 48 hours.
10.13 Complications
Complication
Why it happens
Prevention
VAP
Impaired host defenses, invasive monitoring devices, aspiration (especially with enteral nutrition), and prolonged mechanical ventilation
Implementing a ventilator bundle protocol reduces the incidence of VAP — hand washing, HOB 30–45°, daily assessment of readiness for extubation, GI and VTE prophylaxis, daily 0.12% chlorhexidine oral care, strict infection control
Barotrauma
Fragile alveoli are overdistended by the high peak airway pressures needed for ARDS lungs. Escaping air → interstitial emphysema, pneumothorax, subcutaneous emphysema, pneumopericardium, tension pneumothorax
Ventilation with a smaller VT (4 to 8 mL/kg) and varying amounts of PEEP
GI ulcers
Blood is diverted from the GI tract to the respiratory system to help meet the body's O2 demand, leaving the gastric mucosa ischemic
Correct predisposing conditions — hypotension, shock, acidosis. PPIs (pantoprazole) and mucosal-protecting drugs (sucralfate). Early enteral nutrition helps prevent mucosal damage
VTE
Immobility and venous stasis → DVT and pulmonary emboli
Intermittent pneumatic compression stockings, anticoagulation, and early ambulation when possible
Acute kidney injury
Decreased renal perfusion and decreased O2 delivery to the kidneys — most often from hypotension in septic shock; also hypoxemia or nephrotoxic drugs (e.g., vancomycin)
Monitor intake and output, daily weight, and daily creatinine and urea. CRRT is slow, gentle, and continuous — for the unstable patient on vasopressors who cannot tolerate hemodialysis fluid shifts. Mortality is higher in ARDS patients needing CRRT
Psychological injury
The ICU experience, delirium, and prolonged illness
Survivors report anxiety, memory and attention problems, nightmares, depression, and PTSD — which can occur up to 5 years later. Delirium and PTSD are listed as complications of ARDS itself
On long-term lung function: most patients recover from ARDS within a year, many with normal to near-normal lung function — but not all. Abnormal lung function can persist for years or for the rest of the patient's life, and the key factors are the severity of scarring and changes within the lungs, with contributions from mechanical ventilation, the duration of ventilation, and the use of extracorporeal life support. Survivors commonly report fatigue, chest pain, shortness of breath after minimal activity, and persistent dyspnea.
Ch. 32 defines both types of respiratory failure by blood gas values, and Ch. 28 uses the gas to set ventilator settings, to judge weaning readiness, and to detect the complications of ventilation. ABGs evaluate oxygenation (PaO2), ventilation (PaCO2), and acid-base balance (pH and bicarbonate); pulse oximetry monitors oxygenation only, and only indirectly.
Percentage of hemoglobin saturated. Below 90% is hypoxemia
EtCO2
35–45 mm Hg
Exhaled CO2 — a continuous, noninvasive index of ventilation and airway patency
11.2 A Four-Step Method
The direction rule in steps 2 and 3 has a physiologic reason. CO2 dissolves to form carbonic acid, so it behaves like an acid: more CO2 means a lower pH. Bicarbonate is a base, so it behaves like a base: more bicarbonate means a higher pH. Whichever value is moving with the acid-base disturbance is the cause; whichever is moving against it is compensating.
11.3 Worked Examples From the Chapters
ABG
Reading it
Interpretation
pH 7.27 · PaO2 75 · PaCO2 54 · HCO3 25 — a patient intubated for pneumonia and sepsis
pH low → acidosis. PaCO2 high (opposite direction to pH) → respiratory. HCO3 normal → no compensation yet
Uncompensated respiratory acidosis with hypoxemia. The patient is hypoventilating; the ventilator answer is to increase minute ventilation (rate or tidal volume)
pH 7.23 · PaO2 59 · PaCO2 57 · HCO3 16 — a patient with ARDS on FIO2 100%, PEEP 15
pH low → acidosis. PaCO2 high → respiratory acidosis. HCO3 also low, which would itself lower the pH → a metabolic acidosis is present too
Combined respiratory and metabolic acidosis. The metabolic half is the lactic acidosis of tissue hypoxia. P/F ratio = 59 ÷ 1.0 = 59 → severe ARDS
pH 7.50 · PaCO2 30 · HCO3 24 — a postoperative patient waking on AC ventilation, breathing 26 over a set rate of 12
pH high → alkalosis. PaCO2 low → respiratory alkalosis. HCO3 normal → uncompensated
Uncompensated respiratory alkalosis from hyperventilation on AC — every triggered breath is delivered at the full tidal volume. Find and treat the cause of the tachypnea (pain, anxiety, hypoxemia)
pH 7.32 · PaCO2 58 · HCO3 30 — a COPD patient with a chest infection
pH low → acidosis. PaCO2 high → respiratory. HCO3 high, moving against the disturbance → the kidneys are compensating, but the pH is still abnormal
Partially compensated respiratory acidosis — the classic acute-on-chronic picture: a chronic bicarbonate buffer that is now being overwhelmed
pH 7.38 · PaO2 94 · PaCO2 37 · HCO3 24 — a patient being screened for weaning
Everything is within range
Normal ABG. With a pH ≥7.35 this satisfies the acid-base part of the weaning criteria
11.4 Ventilator Changes and the Gas They Fix
A great many questions ask which setting to change given an ABG. The mapping is short, because CO2 is controlled by minute ventilation and O2 is controlled by FIO2 and PEEP.
Problem on the gas
The mechanism
The lever
High PaCO2 (respiratory acidosis)
Alveolar hypoventilation — minute ventilation is too low
Increase the respiratory rate and/or the tidal volume. Also check for a cuff leak, circuit leak, secretions or obstruction, and excess sedation
Low PaCO2 (respiratory alkalosis)
Alveolar hyperventilation — mechanical overventilation, or the patient is triggering over the set rate
Decrease the rate or tidal volume; if the hyperventilation is the patient's own, find and treat the cause — hypoxemia, pain, anxiety, or compensation for a metabolic acidosis
Low PaO2 with a low FIO2 requirement
Insufficient oxygen in the delivered gas
Increase the FIO2, aiming for PaO2 >60 mm Hg or SpO2 >92%
Low PaO2 that does not rise as FIO2 climbs
Shunt — the oxygen cannot reach blood that is passing collapsed or fluid-filled alveoli
Increase PEEP to recruit alveoli, so the FIO2 can then be lowered. Consider prone positioning and other rescue therapies
Metabolic acidosis alongside the respiratory picture
Lactic acid from anaerobic metabolism — tissue hypoxia, not a lung problem
Treat the cause: restore oxygen delivery and perfusion. A ventilator change alone will not fix it
Twenty NCLEX-style questions covering the whole guide. Answer each before reading the rationale — the rationale is where the learning is, not the letter.
Question 1
A patient admitted with pneumonia has an SpO2 of 91% on 3 L/min by nasal cannula. Over the past hour the patient has become restless and repeatedly asks the same question. Which action should the nurse take FIRST?
a. Administer the ordered PRN lorazepam
b. Assess the patient's oxygenation and respiratory status
c. Reorient the patient and dim the room lights
d. Document the change and reassess in one hour
Answer
b. Assess the patient's oxygenation and respiratory status. Restlessness and a change in mental status are the FIRST signs of hypoxemia, because the brain is the organ most sensitive to falling O2. Sedating this patient would remove the only warning sign present and further depress ventilation.
Question 2
A patient with COPD requires an oxygen concentration that will not vary with changes in respiratory rate or depth. Which delivery device should the nurse anticipate?
a. Nasal cannula at 4 L/min
b. Simple face mask at 8 L/min
c. Venturi mask
d. Non-rebreather mask at 12 L/min
Answer
c. Venturi mask. It is a high-flow device that delivers a precise, fixed concentration (24%, 28%, 31%, 35%, 40%, or 50%) independent of the patient's breathing pattern, which is exactly what is needed to give a low, constant concentration in COPD. The other three are low-flow devices that entrain room air, so the actual FIO2 is unknown.
Question 3
While assessing a spontaneously breathing patient with a chest tube, the nurse observes that the water in the water-seal chamber rises with inspiration and falls with expiration. What is the appropriate action?
a. Continue to monitor the patient
b. Clamp the chest tube near the insertion site
c. Add sterile water to the water-seal chamber
d. Notify the health care provider of an air leak
Answer
a. Continue to monitor the patient. This is tidaling, and it is normal — it reflects the changing intrapleural pressure of the patient's own breathing. Tidaling gradually slows and stops as the lung re-expands; it is the sudden ABSENCE of tidaling that signals a possible occlusion.
Question 4
While repositioning a patient, the nurse accidentally disconnects the chest tube from the drainage system. What is the nurse's immediate priority?
a. Clamp the chest tube close to the patient's chest
b. Place the distal end of the chest tubing in sterile water
c. Apply an occlusive petroleum gauze dressing over the insertion site
d. Obtain a stat chest x-ray
Answer
b. Place the distal end of the chest tubing in sterile water. The immediate priority is to re-establish a water seal. The tube is never clamped, because the danger of air rapidly accumulating in the pleural space and causing a tension pneumothorax far exceeds the danger of a small amount of atmospheric air entering.
Question 5
A patient with pneumonia has been receiving BiPAP for 6 hours. Which assessment finding is MOST concerning?
a. New onset of confusion to time and place
b. Respiratory rate of 24 breaths/min
c. Reddened area over the bridge of the nose
d. Complaint of a dry mouth
Answer
a. New onset of confusion to time and place. A decreased level of consciousness means the patient can no longer reliably protect the airway, clear secretions, or remove the tight-fitting mask if they vomit — this patient needs intubation and mechanical ventilation. The reddened nose is a Stage I pressure injury requiring intervention, but it is not the airway threat.
Question 6
The nurse is caring for a patient receiving oxygen at 6 L/min by nasal cannula who reports nasal dryness and has had two small nosebleeds. Which nursing actions are appropriate? (Select all that apply.)
a. Assess the nares and the skin over the ears for breakdown
b. Discuss adding humidification with the respiratory therapist
c. Increase the flow rate to 8 L/min to improve oxygenation
d. Pad the tubing where it passes over the ears
e. Discuss with the provider whether a different delivery device is appropriate
Answer
a, b, d, e. Flow rates above 5 L/min dry the nasal membranes and create a risk for nosebleeds, so assessing the nares, padding pressure points, adding humidification, and reconsidering the device are all appropriate. Option c is wrong: raising the flow worsens the drying, and a patient needing more than 6 L/min should be moved to a different device rather than pushed higher on a cannula.
Question 7
For which patients would chest physiotherapy be contraindicated? (Select all that apply.)
a. A patient with cystic fibrosis and thick secretions
b. A patient with a traumatic brain injury and increased intracranial pressure
c. A patient with new hemoptysis
d. A patient with fractured ribs and a flail segment
e. A patient with atelectasis of the left lower lobe
f. A patient with an acute pulmonary embolus
Answer
b, c, d, f. Chest physiotherapy is contraindicated in traumatic brain injury or increased ICP, hemoptysis or hemorrhage, unstable orthopedic injuries including fractured ribs, chest trauma, heart disease, pulmonary embolus, and any unstable patient. Cystic fibrosis and atelectasis are two of its best indications.
Question 8
Which action has the highest priority when suctioning a patient with an oral endotracheal tube?
a. Hyperoxygenate with 100% FIO2 before suctioning
b. Instill 5 mL of normal saline to loosen secretions
c. Apply suction while advancing the catheter
d. Advance the catheter until resistance is met
Answer
a. Hyperoxygenate with 100% FIO2 before suctioning. Suctioning removes oxygen along with secretions, and hypoxemia is the root cause of the dangerous complications, including dysrhythmias from myocardial ischemia. Suction is applied only on withdrawal, and the catheter is never advanced to resistance because that means it is striking the carina.
Question 9
A ventilated patient's low exhaled tidal volume alarm is sounding, air is audibly escaping around the mouth, and the patient is making faint sounds. What should the nurse suspect and do first?
a. A kinked ventilator circuit; unkink the tubing
b. A cuff leak; assess and measure cuff pressure
c. Bronchospasm; administer the ordered bronchodilator
d. Excess secretions; suction the endotracheal tube
Answer
b. A cuff leak; assess and measure cuff pressure. Audible air escaping and any vocalization mean the cuff is no longer sealing the trachea, which produces low-pressure and low exhaled tidal volume alarms. Reinflate using the minimal occluding volume technique and confirm 20–30 cm H2O by manometer; a kink or secretions would raise, not lower, the pressure.
Question 10
The nurse notes continuous bubbling in the water-seal chamber of a patient's chest drainage system. Which conclusion is correct?
a. This is expected and requires no action
b. The suction pressure is set too high
c. There is an air leak in the system or from the patient
d. The lung has fully re-expanded
Answer
c. There is an air leak in the system or from the patient. Intermittent bubbling in the water seal on exhalation or coughing is expected while air remains in the pleural space, but continuous bubbling indicates a leak. Briefly clamping at the chest distinguishes a patient source from a system source.
Question 11
A postoperative patient is on assist-control ventilation with a set rate of 12. As anesthesia wears off, the patient begins breathing at 28 breaths/min. Which ABG result should the nurse anticipate?
a. pH 7.28, PaCO2 55 — respiratory acidosis
b. pH 7.51, PaCO2 29 — respiratory alkalosis
c. pH 7.31, HCO3 17 — metabolic acidosis
d. pH 7.48, HCO3 30 — metabolic alkalosis
Answer
b. pH 7.51, PaCO2 29 — respiratory alkalosis. In assist-control, every patient-initiated breath is delivered at the FULL set tidal volume, so a rise in spontaneous rate raises minute ventilation sharply and blows off CO2. This hyperventilation risk is the named hazard of the AC mode.
Question 12
A patient with ARDS has PEEP increased from 5 to 15 cm H2O. Which assessment finding would most concern the nurse?
a. SpO2 increases from 86% to 93%
b. Blood pressure falls from 118/70 to 84/50 mm Hg
c. FIO2 is decreased from 90% to 70%
d. Peak inspiratory pressure rises from 28 to 32 cm H2O
Answer
b. Blood pressure falls from 118/70 to 84/50 mm Hg. Higher PEEP raises intrathoracic pressure, which compresses the great vessels, decreases venous return and preload, and drops cardiac output and blood pressure. Optimal PEEP is the level that improves oxygenation without compromising hemodynamics, so this finding means the benefit is being bought at too high a price.
Question 13
Which findings indicate that a mechanically ventilated patient is ready for a weaning trial? (Select all that apply.)
a. Patient is alert and follows commands
b. PEEP of 5 cm H2O and FIO2 of 40%
c. Rapid shallow breathing index of 128
d. Hemoglobin of 12 g/dL
e. ABG: pH 7.38, PaCO2 37, HCO3 24, PaO2 94
f. Norepinephrine infusion titrated up over the last 2 hours
Answer
a, b, d, e. Readiness requires an awake, easily rousable patient, PEEP ≤5–8 cm H2O, FIO2 ≤40%, pH ≥7.35, hemoglobin ≥7 g/dL, and hemodynamic stability on low-dose or no vasopressor. An RSBI of 128 exceeds the threshold of 105 and predicts failure, and escalating vasopressor support is the opposite of hemodynamic stability.
Question 14
A patient with ARDS has a PaO2 of 72 mm Hg on an FIO2 of 0.60. How should the nurse interpret the PaO2/FIO2 ratio?
a. 120 — moderate ARDS
b. 120 — severe ARDS
c. 43 — severe ARDS
d. 432 — normal oxygenation
Answer
a. 120 — moderate ARDS. 72 ÷ 0.60 = 120, which falls below 200 but not below 100, placing the patient in the moderate band. Learn the body-text cutoffs: less than 300 is mild, less than 200 moderate, and less than 100 severe.
Question 15
Which interventions are appropriate in the management of a patient with moderate ARDS? (Select all that apply.)
a. Prone positioning
b. Aggressive IV fluid resuscitation to support blood pressure
c. Low tidal volume ventilation at 4–8 mL/kg
d. IV surfactant replacement
e. Positive end-expiratory pressure
f. Continuous IV analgesia and sedation
Answer
a, c, e, f. Prone positioning, low tidal volume ventilation, PEEP, and continuous analgesia and sedation are all part of ARDS management. The ARDS patient is kept on the dry side rather than aggressively resuscitated with fluid, and IV surfactant is not a treatment for ARDS.
Question 16
A patient's PaO2 remains at 54 mm Hg despite an increase in FIO2 from 60% to 100%. Which mechanism best explains this finding?
a. Alveolar hypoventilation
b. Intrapulmonary shunt
c. Dead space ventilation
d. A left shift of the oxyhemoglobin dissociation curve
Answer
b. Intrapulmonary shunt. In shunt, blood passes alveoli that are collapsed or filled with fluid, so it never contacts the oxygen no matter how high the FIO2 is — this is refractory hypoxemia, the hallmark of ARDS. The intervention that helps is PEEP to recruit those alveoli, not more oxygen.
Question 17
Six hours after a surgical tracheostomy, the patient coughs forcefully and the tracheostomy tube is expelled. The patient is in respiratory distress. After calling for help, what should the nurse do?
a. Insert the obturator into the stoma to hold it open
b. Place the patient in semi-Fowler's position, cover the stoma with a sterile dressing, and ventilate with a BVM over the nose and mouth
c. Reinsert the same tube using the obturator and inflate the cuff
d. Insert a suction catheter into the stoma and suction deeply
Answer
b. Place the patient in semi-Fowler's, cover the stoma, and ventilate with a BVM over the nose and mouth. The tract is less than 1 week old and therefore immature, so blind reinsertion risks creating a false passage. The upper airway is still continuous with the trachea, so bagging the face ventilates the patient — unless the patient has had a total laryngectomy, in which case you ventilate through the stoma.
Question 18
A patient has a cuffed fenestrated tracheostomy tube and wishes to speak. Which sequence is correct?
a. Insert the decannulation plug, then deflate the cuff, then remove the inner cannula
b. Deflate the cuff, remove the non-fenestrated inner cannula, then insert the decannulation plug
c. Remove the inner cannula, inflate the cuff, then insert the decannulation plug
d. Insert the decannulation plug and leave the cuff inflated for airway protection
Answer
b. Deflate the cuff, remove the non-fenestrated inner cannula, then insert the plug. Capping the tube with the cuff inflated or the solid inner cannula in place leaves the patient with no route for air at all and precipitates respiratory arrest. Aspiration risk should be assessed before the cannula is removed, and a non-fenestrated inner cannula must be replaced before suctioning.
Question 19
Which findings suggest hypoxemic rather than hypercapnic respiratory failure? (Select all that apply.)
a. Cyanosis
b. Tachypnea
c. Morning headache
d. Paradoxical chest and abdominal movement
e. Pursed-lip breathing
f. Progressive somnolence
Answer
a, b, d. Cyanosis (a late sign), tachypnea, and paradoxical breathing are manifestations of hypoxemia. Morning headache, pursed-lip breathing, and progressive somnolence belong to hypercapnia — CO2 retention sedates the patient and dilates cerebral vessels rather than driving up the respiratory effort.
Question 20
A patient returns to the unit after a right pneumonectomy. How should the nurse position the patient?
a. On the left side, to keep the good lung down
b. On the right (operative) side, to promote expansion of the remaining lung
c. Prone, to recruit dorsal alveoli
d. Flat and supine, to prevent mediastinal shift
Answer
b. On the right (operative) side, to promote expansion of the remaining lung. Pneumonectomy is the exception to the "good lung down" rule: there is no lung on the operative side to compress, and lying on that side allows the remaining lung full expansion. The empty space is expected to fill gradually with fluid, and a chest tube may not be placed at all.
Alveolar collapse that follows when a high FIO2 washes nitrogen out of the alveolus; nitrogen normally maintains alveolar size, shape, and structure.
Alveolar hypoventilation
A decrease in ventilation that raises the PaCO2; one of the four mechanisms of hypoxemia and the main mechanism of hypercapnic failure.
Anatomic shunt
Blood passing through a channel in the heart (e.g., a ventricular septal defect) that bypasses the lungs entirely.
Auto-PEEP
PEEP over and above the set level, produced by inadequate exhalation time and trapped air.
Barotrauma
Lung injury from increased airway pressure distending and rupturing fragile alveoli or blebs; greatest risk in stiff, noncompliant lungs.
Capillary shunt
Blood flowing through pulmonary capillaries past alveoli filled with fluid, so no gas exchange occurs.
Cricothyroidotomy
An emergent incision through the skin and cricothyroid membrane, used when swelling, trauma, or obstruction prevents oral intubation.
Decannulation
Removal of a tracheostomy tube from the trachea.
Dead space
Ventilation without perfusion — alveoli receive air that never meets blood, as distal to a pulmonary embolus.
Diffusion limitation
Impaired gas transfer across a thickened alveolar-capillary membrane, or across a normal one when blood moves too quickly; classically produces hypoxemia that worsens with exercise.
Extubation
Physical removal of the oral or nasal endotracheal tube.
Fenestrated tube
A tracheostomy tube with an opening on its dorsal surface that, with the cuff deflated and inner cannula removed, allows air to reach the vocal cords so the patient can speak.
Flutter (Heimlich) valve
A one-way valve attached to a chest tube that opens on expiration and closes on inspiration, allowing air out of the pleural space but not in.
Huff coughing
A forced expiratory technique of small coughs that keeps the glottis open, generating higher flow rates than a normal cough in COPD with less fatigue.
Hypoxemia
A decrease in arterial oxygen (PaO2) and saturation (SaO2) below normal values — a laboratory finding.
Hypoxia
A decrease in oxygen supply at the cellular level, sufficient to produce signs and symptoms of inadequate oxygenation.
Intubation
Securing the airway with an oral or nasal endotracheal tube.
Minimal occluding volume (MOV)
Cuff inflation technique using the least air that stops an audible leak at peak inspiration, then confirmed at 20–30 cm H2O by manometer.
Negative inspiratory force
The negative pressure a patient can generate; a measure of muscle strength and cough ability. The more negative, the better.
Optimal PEEP
PEEP titrated to the point at which oxygenation improves without compromising hemodynamics.
Paradoxical breathing
Chest and abdomen moving in opposite directions during the respiratory cycle, from maximal accessory muscle use; a sign of severe distress.
Passy-Muir valve
A one-way valve on the tracheostomy hub, used with the cuff deflated, that opens on inspiration and closes on expiration so exhaled air passes the vocal cords, producing speech.
Permissive hypercapnia
The gradual rise in PaCO2 (accepted up to 60 mm Hg) that results from low tidal volume ventilation; a consequence of the strategy, not a strategy itself.
Physiologic PEEP
PEEP of 5 cm H2O, applied to replace the glottic mechanism bypassed by an endotracheal tube.
Postural drainage
Positioning that drains secretions from specific lung segments toward the larger airways using gravity.
Pursed-lip breathing
Exhaling through pursed lips to prolong expiration, preventing bronchiolar collapse and air trapping and slowing the respiratory rate.
Rapid sequence intubation
Concurrent rapid administration of a sedative and a paralytic to induce unconsciousness for emergency intubation, decreasing the risks of aspiration and injury.
Rapid shallow breathing index
The Tobin number — spontaneous respiratory rate divided by tidal volume in liters; less than 105 predicts successful weaning.
Refractory hypoxemia
Hypoxemia unresponsive to increasing oxygen concentrations, caused by severe shunt; the hallmark of ARDS.
Rescue therapy
Treatment used when reasonable oxygenation cannot be maintained despite appropriate ventilation, high FIO2, and PEEP — inhaled pulmonary vasodilators, prone positioning, ECMO.
Shunt
Blood exiting the heart without taking part in gas exchange; an extreme V/Q mismatch that does not respond to oxygen therapy alone.
Subcutaneous emphysema
Air leaking into the tissue around an insertion site, felt as crackling on palpation; dangerous when severe around the head and neck.
Tidaling
Normal up-and-down movement of the water in the water-seal chamber with the patient's breathing, reflecting intrapleural pressure changes.
Tracheostomy
A surgically created stoma in the anterior trachea, used for long-term ventilation, upper airway obstruction, secretion removal, and weaning.
Tripod position
Sitting with the arms propped forward, which increases the anteroposterior chest diameter and changes thoracic pressure to decrease work of breathing.
V/Q mismatch
Unequal distribution of ventilation and perfusion; the most common mechanism of hypoxemia and generally responsive to oxygen therapy.
Ventilator-associated pneumonia
Pneumonia occurring 48 hours or more after endotracheal intubation, occurring in up to 40% of intubated patients.
Volutrauma
Alveolar rupture and movement of fluid and protein into the alveolar spaces caused by excessive tidal volume in noncompliant lungs.
Weaning
Gradually reducing ventilator support so the patient assumes greater responsibility for spontaneous breathing.
Work of breathing
The inspiratory effort needed to overcome the elasticity and viscosity of the lungs plus airway resistance.
About This Guide
What this guide is
Everything on the instructor’s posted Respiratory Exam Study Guide, taught rather than summarized, with the figures from her own slides placed beside the text that explains them. Same unit and section numbers as the Lecture Focused guide — 10.3 here is 10.3 there — so the two can be used side by side.
Built from her 21-topic posted study guide, both Module 2 decks, both recorded lectures, the 09-01 in-person session, and Lewis’s Medical-Surgical Nursing (12th ed.) Ch. 28 and Ch. 32. Instructor: Livneet Takhar, DNP, FNP.
What this version is
This is the exam-scoped guide, written the way the Lecture Focused guide is written. Every one of her 21 listed topics is covered, and each one is taught — the mechanism first, then the facts that fall out of it — so that a question you have not seen before is still answerable. Tables are used where two or more things are being compared on shared dimensions; prose is used where something has to be understood rather than recalled.
The section numbering is untouched, so “go read 10.3” points at the same place in both guides. What is different here is the filter: content the instructor covered but never put on her study guide is trimmed, and the sections that survive are the ones her 21 topics reach.
Figures
Every figure in this guide is a page from one of her two Module 2 decks, placed immediately after the text that explains it rather than collected in an appendix. That placement is deliberate: she writes exam questions from what is on her slides, so the visual you are being asked about should sit beside the explanation of it. Twenty-three of her eighty Module 2 slides carry a real visual, and all twenty-three are here.
Her 21 topics, and where each one lives
Her study-guide topic
Where it is here
1. Hypercapnia; risk factors for hypercapnic failure
2.1, 2.2, 2.10, 2.11
2. Four causes of hypoxemic failure
2.4, 2.5, 2.6, 2.7, 2.8
3. Acute-on-chronic respiratory failure
2.3
4. Diagnostics for hypoxemia and hypoxia
2.9, 3.5, 7.4
5. Hypoxia symptoms
2.9, 3.2, 3.3
6. Mild to severe respiratory distress
3.3, 3.4, 3.6
7. Noninvasive ventilation
5.1 — 5.6
8. ARF goals and treatment; albuterol and hypokalemia
16. ET tube — placement, x-ray, cuff, dislodgement, care
8.8, 8.9, 10.1, 10.2, 10.8
17. Suctioning the ET tube — indications
10.3
18. VAP prevention
10.7
19. Tracheostomy — care and dislodgement
10.11 — 10.14
20. Oxygen therapy — patient education
7.1, 7.2, 7.11
21. Causes of shifts on the oxyhemoglobin curve
1.5, 1.6
The two boxes
Key Concept (blue) — a cluster worth holding as one unit, or a piece of reasoning that lets you rebuild the facts instead of recalling them. This is the guide’s own emphasis, not hers.
Instructor Exam Tip (yellow) — something the instructor herself flagged, repeated, spent disproportionate time on, added beyond her slide, or explicitly excluded. Every yellow box names its evidence in the sentence.
What is deliberately not here
Pruning is information. These sections exist in the Lecture Focused guide and are left out of this one, with the reason:
Section
Why it is not in this version
6.3 Chest tube insertion
Her topic 10 asks for chambers, tidaling versus bubbling, and complications — not the insertion procedure, which is the provider’s.
6.10 Chest tube removal
Does not appear anywhere on her study guide. It is taught in full in the Lecture Focused guide if you want it.
9.3 Ventilator alarms
She said twice, unambiguously, that ventilator alarms will not be on the test. This is the clearest exclusion in the module — do not spend time here.
10.5 Prophylaxis and early mobility
Folded into 10.6 and 10.7, where the same items appear as complications and as the VAP bundle.
Conventions
Priority is ABC. She states it directly for the deteriorating respiratory patient: assess the ability to maintain a patent airway and to breathe, before oxygen, before labs, before positioning.
Numbers are hers where hers and the chapter’s differ, with the difference named. Where only the chapter has a number, it is labeled as coming from the chapter.
Arrows: ↑ means increased or rising, ↓ decreased or falling.
UNIT 1
Gas Exchange & the Oxyhemoglobin Dissociation Curve
Covers: Respiratory Failure and ARDS deck slides 3-6; Lewis’s Ch. 32 for gap-fill.
1.1 The Normal Gas Exchange Unit
She opens the entire module here, and she opens it by walking the blood through. Deoxygenated blood arrives from the right heart through the pulmonary artery and enters the pulmonary capillary that wraps the alveolus. At the capillary, carbon dioxide leaves the blood and enters the alveolus to be exhaled, and oxygen leaves the alveolus and enters the blood. Newly oxygenated blood returns to the left heart through the pulmonary vein.
The thin white space between the alveolus and the capillary is the alveolar-capillary membrane. Every respiratory problem in this module is, at bottom, a problem with that membrane or with what is on either side of it: fluid in the alveolus, a clot in the capillary, a membrane that has grown too thick, or a set of alveoli that have collapsed. Nothing on her study guide tests this slide directly, but the four hypoxemic mechanisms in Unit 2 and the whole of ARDS are read off it, so it is worth two minutes.
Her normal gas exchange unit. Trace the direction of flow: pulmonary artery in (deoxygenated), gas exchange at the alveolar-capillary membrane, pulmonary vein out (oxygenated). Fix this picture — she returns to it for V/Q mismatch, shunt, diffusion impairment and ARDS.
1.2 Oxygenation Is Blood Flow; Ventilation Is Airflow
This is her organizing frame for the whole module, and it is worth more than it looks. Oxygenation is the process of delivering oxygen to the body’s tissues — think of it as blood flow, think perfusion. Ventilation is the process of moving air in and out of the lungs — think of it as airflow, think CO2 removal.
1.3 SaO2 and PaO2 — Two Different Measurements
The curve only makes sense once these two are separate in your head, and she takes real time to separate them. Oxygen saturation (SaO2 / SpO2) is the amount of oxygen bound to hemoglobin and being carried to the tissues — a percentage, and what the pulse oximeter on the finger reads. Partial pressure of oxygen (PaO2) is the oxygen not bound to hemoglobin, dissolved and available in the plasma; it tells you how much oxygen is actually there to be bound.
SaO2 / SpO2 — oxygen saturation
PaO2 — partial pressure
What it is
Oxygen bound to hemoglobin and being carried to the tissues
Oxygen not bound — dissolved and free in the plasma, available for binding
How you get it
Pulse oximeter on the finger
Arterial blood gas only. A pulse oximeter cannot give you a PaO2
Normal
Above 92% for most patients
80-100 mm Hg
She adds a point the slide leaves out: PaO2 can only be measured with an arterial blood gas. That is why the diagnostic workup for respiratory failure always includes ABGs and not just continuous pulse oximetry — the oximeter tells you about the hemoglobin, the ABG tells you about the blood.
Each hemoglobin molecule has four binding sites for oxygen. Her arithmetic, spoken and not on the slide: if three of the four sites are occupied, that hemoglobin is 75% saturated. Saturation is simply the fraction of available sites that are filled, averaged across all the hemoglobin in the sample.
1.4 Cooperativity and Affinity
Cooperativity is the reason the curve is S-shaped rather than straight. When one oxygen molecule binds to a hemoglobin, the molecule changes shape slightly and the remaining sites become easier to fill. Her image for it: think of the additional oxygen molecules as followers — one binds and the others want to follow.
Affinity is the word for how tightly hemoglobin holds oxygen. High affinity means it grabs oxygen readily and is reluctant to let go; low affinity means it binds less eagerly and releases more easily. Every shift in the curve is a change in affinity, and every consequence follows from whether the change makes loading or unloading easier. She scoped this section out loud — only the causes of the shifts are wanted — so read it for the mechanism and move on to 1.5.
1.5 Left Shift and Right Shift
Hold one idea steady and the rest follows: the shift is named for which way the curve moves, and what matters clinically is what happens at the tissues.
Left shift — hemoglobin has increased affinity for oxygen. It binds oxygen more avidly, so unloading at the tissue is harder and less oxygen is released for use. Loading in the lung is easy; delivery is the problem.
Right shift — hemoglobin has decreased affinity. It holds oxygen more loosely, so unloading is easier and more oxygen becomes available to the tissues.
Her oxyhemoglobin dissociation curve, with the normal line and both shifts plotted. Read the vertical axis as saturation and the horizontal axis as PaO2. At any given PaO2, the left-shifted curve sits higher — more oxygen still bound, less delivered.
She also points students to a video she uploaded to the Canvas module site for this curve, saying it can be confusing. If the shift logic does not settle from the slide alone, that video is her own recommended route.
1.6 What Causes a Shift
Her slide gives four factors for the right shift and then says the left shift is a decrease in all of the same four. That symmetry is the efficient way to learn it — memorize one column and invert.
Factor
Right shift (unloads easily)
Left shift (holds on)
CO2
↑ CO2
↓ CO2
pH
Acidosis (↓ pH)
Alkalosis (↑ pH)
2,3-DPG
↑ 2,3-DPG
↓ 2,3-DPG
Temperature
↑ temperature (fever)
↓ temperature
2,3-DPG is a molecule inside the red blood cell that regulates how readily hemoglobin releases oxygen to the tissues. Her definition is the one to use: it does not carry oxygen, it governs the handoff.
Covers: Respiratory Failure and ARDS deck slides 7-17; Lewis’s Ch. 32 pp. 672-681 for gap-fill.
2.1 What Acute Respiratory Failure Is
Acute respiratory failure occurs when oxygenation, ventilation, or both are inadequate. Not enough oxygen is transferred into the blood, or not enough CO2 is removed from the lungs, or both at once. Two definitions carry the rest of the unit, and she stops on these two words and says outright that they are the two to know — because the two classifications of respiratory failure are named after them.
Hypoxemia — a decrease in arterial oxygen: a fall in PaO2 and in SaO2. It results from conditions that interfere with the diffusion of oxygen.
Hypercapnia — an increase in arterial CO2 (PaCO2). It results from insufficient CO2 removal.
Get the vocabulary exactly right before going further. Hypoxemia and hypoxia are different words for different things (2.9), and hypercapnia is a synonym for neither.
2.2 The Two Classifications
Her classification slide is the single most testable slide in deck one, because everything downstream sorts into these two columns. Learn the numbers first — the numbers are the definitions.
Hypoxemic respiratory failure
Hypercapnic respiratory failure
Also called
Oxygenation failure
Ventilatory failure
Defining numbers
PaO2 <60 mm Hg with a normal or slightly subnormal PaCO2
PaCO2 >50 mm Hg, with hypoxemia and/or acidemia (pH <7.35)
Core problem
Inadequate exchange of oxygen between alveoli and pulmonary capillaries
Insufficient CO2 removal, so PaCO2 climbs
What the number tells you
There is not enough oxygen in the arterial blood
The body compensates for a while, then cannot, and acidemia worsens
Each type further divides into acute and chronic. Her flowchart slide is that whole structure on one page, and it is worth reproducing from memory.
Her classification flowchart. Respiratory failure splits into hypoxemic (PaO2 ≤60 on ≥60% oxygen) and hypercapnic (PaCO2 >50 with pH <7.35), and each of those splits again into acute and chronic. If you can redraw this tree with the numbers on it, 2.2 is done.
2.3 Acute, Chronic, and Acute-on-Chronic
Chronic respiratory failure develops over days to weeks. The patient is usually more stable, because time has let the body compensate for small, subtle changes, and it is usually not immediately life-threatening. Acute failure develops over minutes to hours or a day or two, and the compensation has not had time to build — which is why the acute patient looks so much sicker at the same numbers.
Onset
Picture
Chronic
Days to weeks
More stable — time has let the body compensate. Usually not immediately life-threatening. Classic example: COPD, managed for years with medications
Acute
Minutes to hours, or a day or two
Compensation has not had time to build. Expect hemodynamic instability (tachycardia, hypotension), increased respiratory effort, decreased level of consciousness; urgent intervention needed
2.4 Hypoxemic Mechanism 1 — V/Q Mismatch
Four mechanisms can cause hypoxemic respiratory failure. She teaches them in order and the order is worth keeping: V/Q mismatch, shunt, diffusion impairment, alveolar hypoventilation. In normal lungs the amount of blood perfusing the lungs and the amount of gas reaching the alveoli are almost identical.
Her regional detail, which is on the slide and is examable: the base of the lungs has less ventilation than perfusion, because gravity pulls blood down; the apex has more ventilation than perfusion. Those two regional imbalances offset each other, so the net effect across the whole lung is close to a match.
A mismatch happens when one side of that pairing is disturbed. Her causes: increased secretions in the alveoli or the airways, or bronchospasm — so COPD, pneumonia and asthma. She then splits the concept into its two directions using the picture:
A ventilation problem. Something fills or blocks the alveolus — pus, blood, fluid, or a mucus plug. Perfusion through the capillary underneath is still fine, but gas exchange cannot happen because the air side is blocked.
A perfusion problem. The alveolus is normal and ventilating well, but a clot in the capillary — a pulmonary embolism — prevents blood from reaching it. Exchange happens for whatever blood arrives, but not enough blood arrives.
Treatment: treat the cause. If it is an embolism, treat the embolism; if it is secretions from pneumonia, treat the pneumonia. Add oxygen therapy, frequent ABGs, and continuous assessment including pulse oximetry.
Her V/Q mismatch slide. Left (A): an alveolus blocked by secretions — a ventilation problem with intact perfusion, so V/Q falls. Next (B): a smaller mucus plug, the same problem less severely. Centre (C): a normal V/Q unit for comparison. Right (D, E): a clot in the capillary — a perfusion problem with intact ventilation, so V/Q rises.
2.5 Hypoxemic Mechanism 2 — Shunt
A shunt occurs when blood exits the heart without participating in gas exchange at all. The blood bypasses the exchange process entirely. There are two types.
Type
What is happening
Her example
Anatomic shunt
Blood passes through a channel inside the heart and bypasses the lungs altogether
Ventricular septal defect — blood crosses right ventricle to left without going to the lungs
Capillary shunt
Blood flows through the pulmonary capillaries without taking part in gas exchange, because the alveoli are filled
Pneumonia — secretions filling the alveoli
2.6 Hypoxemic Mechanism 3 — Diffusion Impairment
Gas exchange is impaired by any process that damages the alveolar membrane or affects blood flow through the capillaries. Two routes to it:
The membrane thickens. Pulmonary fibrosis, ARDS and interstitial lung disease make the alveolar-capillary membrane thicker and fibrotic, which slows gas transport.
The alveolus fills. Pulmonary edema — fluid, white blood cells or protein accumulating in the alveoli — decreases exchange the same way.
The classic sign: hypoxemia that worsens with activity and is better with rest.
Alveolar hypoventilation is a decrease in ventilation that increases the PaCO2. Her causes: CNS problems, chest wall dysfunction, acute asthma, and restrictive lung disease. This is mainly a mechanism of hypercapnic failure — it is the one item that appears on both lists — but it contributes to hypoxemia as well, which is why it sits fourth here.
2.8 The Mechanisms Rarely Act Alone
Her slide closes the four mechanisms with one line: it is rare that respiratory failure is caused by a single mechanism. She then works a full example that the slide does not contain.
2.9 From Hypoxemia to Hypoxia
Hypoxemia can lead to hypoxia, and the two words are not interchangeable. Hypoxemia leads to hypoxia because blood that is not carrying enough oxygen cannot deliver enough oxygen.
Term
What it means
How it is measured
Hypoxemia
A decrease in the oxygen available in the arterial blood — a low PaO2
Arterial blood gas. This is the only route
Hypoxia
A decrease in oxygen supply at the cell, once the PaO2 drops low enough to produce signs and symptoms of inadequate oxygenation
Oxygen saturation and the patient’s presentation
Her point, made twice: a saturation of 85% lets you call the patient hypoxic, but you cannot call them hypoxemic without an ABG. That is the whole reason 1.3 spends time separating a pulse ox reading from a partial pressure.
Extreme restlessness; cyanosis (a late sign); falling heart rate; decreasing level of consciousness
Her infographic of the symptoms of hypoxia. Note the split she teaches: restlessness, headache, confusion, tachycardia, tachypnea, anxiety and dyspnea early; slow heart rate, extreme restlessness and cyanosis once it is severe. The early column is all central nervous system and compensation — the late column is failure of both.
2.10 The Four Causes of Hypercapnic Failure
Hypercapnic failure — ventilatory failure — means the respiratory system cannot maintain a normal CO2 level, either from increased CO2 production or from decreased alveolar ventilation. Her slide gives four categories of cause, and this is her topic 1b, the risk factors. Learn it as the matched pair to the four hypoxemic mechanisms.
Category
Mechanism
Examples
1. CNS problems
The drive to breathe is suppressed. CNS depressants decrease CO2 reactivity in the brainstem, so CO2 rises
Opioids and other CNS depressants; brainstem injury
2. Neuromuscular problems
Muscle weakness includes the respiratory muscles, so chest rise and fall is inadequate and CO2 is harder to eliminate
Guillain-Barré syndrome, multiple sclerosis
3. Chest wall abnormalities
The rib cage cannot expand normally, limiting lung expansion
Obesity; flail chest from multiple rib fractures
4. Airway and alveolar problems
Increased airway resistance and air trapping raise the work of breathing until the respiratory muscles fatigue
COPD, asthma, cystic fibrosis
Work of breathing (WOB) is the effort the respiratory muscles must make to move air into the lungs. In category 4 it is the whole story: the patient has to push air against increased resistance and against air already trapped in the alveoli, the muscles fatigue, and ventilatory failure follows. She explains air trapping in a way the slide does not — normally exhalation empties the lungs, but in air trapping some air is left behind after each breath, which makes the next breath harder to take deeply and over time overinflates the lungs, further limiting ventilation.
2.11 Why the Body Tolerates CO2 Better Than Low Oxygen
Her slide ends the hypercapnia section with a comparison that explains a great deal of COPD management: the body will tolerate an increased CO2 better than a decreased oxygen.
Covers: Respiratory Failure and ARDS deck slides 18-25; Lewis’s Ch. 32 pp. 681-686 for gap-fill.
3.1 What Determines the Clinical Picture
Her slide gives three variables, and they explain why two patients with identical ABGs can look completely different. The signs of respiratory failure are related to the extent of the change in PaO2 and PaCO2, the speed of that change, and the patient’s ability to compensate for it. When the compensatory mechanisms fail, respiratory failure occurs. Nothing on her study guide tests this directly, but it is the frame for everything in 3.3 and 3.6 — every assessment you make is really an assessment of where the patient sits on that compensation curve.
3.2 Mental Status Changes Come First
One of the first signs of hypoxemic acute respiratory failure is a change in mental status. Restlessness, confusion and agitation all suggest inadequate oxygen delivery to the brain. Her reason, which the slide does not give: the brain is more sensitive to changes in oxygen than other tissue, so when the lungs stop delivering enough oxygen, mental status changes appear before almost anything else.
3.3 Hypoxemia and Hypercapnia — Manifestations Side by Side
Her slide separates the two lists, and side by side is the way to hold them. Notice that the mental-status row is shared but arrives by two different routes — hypoxemia starves the brain of oxygen, hypercapnia sedates it with CO2.
Hypoxemia
Hypercapnia
Respiratory
Accessory and intercostal muscle use, nasal flaring, dyspnea, tachypnea
Confusion, restlessness, agitation — the earliest signs
Morning headache, decreased level of consciousness, progressive somnolence
Respiratory rate
Increased
Often decreased
She explains pursed-lip breathing beyond the slide, which lists only the words. Patients with COPD do it because it slows the respiratory rate, increases the time available for expiration, and prevents the smaller bronchioles from collapsing. It is a self-taught form of positive expiratory pressure, and the reason it raises the saturation is that a longer expiration empties trapped air.
3.4 Reading the Patient — Position and Speech
This is her topic 6, and her slide turns it into three quick observations that cost nothing and grade severity from across the room, before any equipment is involved.
Observation
Severity
Can lie down flat
Mild distress
Prefers to stay still, does not want to move around
Moderate distress — moving costs oxygen they do not have. Especially true in diffusion impairment
The patient manages two or three words before pausing for a breath. Fewer words = more severe
Breath sounds
Auscultate for diminished areas, wheezing, or anything suggesting a blockage causing the failure
Her positioning slide. The tripod position — sitting, leaning slightly forward, arms propped on an over-bed table, pillows or knees — is not a comfort preference, it is a severity marker. The panel on the right gives her mechanism: greater chest expansion and better use of the accessory muscles.
3.5 Diagnostic Studies
Her topic 4. The list is short; what matters is what each study is actually for, because the questions ask which one you would anticipate rather than what the list contains.
Study
What it gives you
ABG
Ventilation (PaCO2), oxygenation (PaO2), and acid-base balance (pH, HCO3). The only way to get a PaO2, and the only way to diagnose either hypoxemia or hypercapnia
Chest x-ray
The fastest first test. Shows the cause — pneumonia, pulmonary edema, atelectasis
Pulse oximetry
Oxygenation, indirectly and continuously. Tells you hypoxia, not hypoxemia
End-tidal CO2
Ventilation. Attached to the ET tube; also confirms the tube is in the trachea. She notes it gives a trend, not the precise number an ABG gives
CBC, electrolytes, urinalysis, CMP
Supporting data. Anemia limits oxygen carriage regardless of lung function; creatinine and GFR say whether the kidneys can buffer an acidosis
EKG
Whether a cardiac problem is contributing, and dysrhythmias from hypoxemia and acidosis
Blood / sputum culture
Identifies the organism when infection is the cause; can identify tuberculosis
CT of the chest, or V/Q scan
Pulmonary embolism
3.6 Nursing Management by Severity
Severity
Management
Mild to moderate
Oxygen by a high-flow device; then noninvasive ventilation such as BiPAP. Least invasive first
Severe
ICU; mechanical ventilation likely. Continuous pulse oximetry and blood pressure, frequent ABGs, central or mixed venous O2 saturation, central venous pressure monitoring
3.7 Patient Goals and Prevention
Her five patient goals, which double as the evaluation criteria:
Independently maintain a patent airway.
Absence of dyspnea, or recovery to the baseline breathing pattern.
Effective cough, able to clear secretions.
ABGs normal, or within the patient’s own baseline.
Breath sounds within the patient’s baseline.
Three of the five say within the patient’s baseline rather than normal, and that distinction is the point of the list. For a COPD patient a normal ABG is neither achievable nor the target.
3.8 Oxygen Therapy — Goal and the Lowest Effective Dose
The goal of oxygen therapy is to correct the hypoxemia. The rule that governs how you do it is to administer oxygen at the lowest possible FiO2 that achieves an acceptable saturation — which is the same rule that generates every complication in 3.9 when it is broken.
FiO2 is the fraction of inspired oxygen — the percentage of the air the patient is breathing that is oxygen. Her reference point: a normally breathing person on room air is at about 21%; a ventilated patient’s range starts at 30%.
Monitor the response through mental status, ABGs and respiratory rate. A PaO2 trending toward normal means the patient is responding.
Trials to lower the FiO2 are normal and are led by respiratory therapy — they may not succeed the first time, and that is expected.
3.9 Complications of Prolonged High-Concentration Oxygen
Her topic 11. Oxygen is a drug and her slide treats it as one — three mechanisms to be able to explain, not just name.
Complication
Mechanism
Oxygen toxicity
High oxygen levels generate oxygen free radicals, which inflame and kill cells by disrupting the alveolar-capillary membrane. The result is pulmonary edema and hypoxemia — the treatment starts causing the disease
Absorption atelectasis
Alveoli normally hold oxygen, CO2 and nitrogen. Nitrogen is inert and its bulk is what holds the alveolus open. High-concentration oxygen replaces the nitrogen, the oxygen is then absorbed into the blood, and with nothing left to hold the shape the alveolus collapses
Other effects
Increased pulmonary capillary permeability; decreased surfactant production and surfactant inactivation; fibrotic changes in the alveoli
She defines surfactant here rather than waiting for ARDS: it is a lubricating substance in the alveoli that lets them open and close smoothly. Losing it stiffens the lung, and that definition carries straight into Unit 4.
3.10 COPD and the Oxygen Target
This is her most fully developed clinical teaching point in the ARF section, and the numbers are examable in both directions.
Patient
Saturation target
Most patients
SaO2 >92%, or PaO2 >60 mm Hg
Longstanding COPD
Providers are often satisfied with SpO2 88-92%
3.11 Mobilizing Secretions
Retained secretions can worsen or cause acute respiratory failure, because they limit the movement of oxygen into the alveoli and the removal of CO2. Her methods:
Positioning — upright, head of the bed elevated at least 30 degrees.
Effective coughing, and the incentive spirometer, which helps the patient cough.
Chest physiotherapy — she describes what she has seen: respiratory therapy percusses areas of the chest, or applies a vest that vibrates, to break secretions loose.
Suctioning — especially the ventilated patient who is coughing, restless or desaturating and cannot tell you they are short of breath. Covered in detail in 10.3.
Humidification and hydration — thin the secretions so they can be moved. Fluid 2-3 L/day unless contraindicated (chapter).
Early ambulation when possible, which opens the lungs and helps the patient cough secretions up.
3.12 Drug Therapy
Her topic 8b. Four goals: reduce airway inflammation and bronchospasm, relieve pulmonary congestion, treat infection, and reduce anxiety, pain and restlessness. The drug matches the cause of the failure.
Purpose
Drug
Key points
Relieve acute bronchospasm
Short-acting bronchodilator — albuterol
Works fast — the rescue inhaler or nebulizer. Relieves the spasm, not the inflammation. Side effects: shakiness, anxiety, tachycardia, and hypokalemia with frequent or continuous use
Reduce inflammation and bronchospasm
Corticosteroid — IV methylprednisolone
Takes several hours, so it will not relieve dyspnea or increased work of breathing quickly. Watch: hyperglycemia, hypokalemia, hypertension, insomnia and hallucinations in older patients; prolonged use causes adrenal insufficiency
Treat infection
IV antibiotics
For pneumonia and acute bronchitis, which can cause or worsen ARF
Reduce anxiety and hyperventilation
IV benzodiazepine — lorazepam
Anxiety and pain raise oxygen consumption, CO2 production and work of breathing. Calming a hyperventilating patient also reduces the swing toward alkalosis — but not in a patient already breathing slowly
Relieve pain
Opioid — morphine
Her post-CABG example: chest pain stops deep breaths and causes hypoventilation. Useful, but assess rate and level of consciousness first (2.10)
Relieve pulmonary congestion
Loop diuretic — furosemide
For the heart failure exacerbation driving the respiratory failure — pull the extra fluid off
Her last item is nutrition therapy. Nutrition depletion causes loss of muscle mass — and that includes the respiratory muscles, which delays recovery. The same reasoning returns in 10.4 as the reason ventilated patients are fed early.
UNIT 4
Acute Respiratory Distress Syndrome (ARDS)
Covers: Respiratory Failure and ARDS deck slides 26-34; Lewis’s Ch. 32 pp. 686-692 for gap-fill.
4.1 What ARDS Is
ARDS is a sudden and progressive form of acute respiratory failure in which the alveolar-capillary membrane becomes damaged and more permeable to intravascular fluid and protein. Go back to the gas exchange unit in 1.1: the membrane between the alveolus and the capillary starts leaking, so fluid crosses into the alveolar space, and gas exchange fails.
The most common cause is sepsis. She says this twice in two sentences.
Multisystem organ dysfunction syndrome (MODS) is another cause.
Injury type
Mechanism
Her examples
Direct
A pathogen or substance comes into direct contact with lung tissue
Aspiration of gastric contents into the lung; bacterial pneumonia; chest trauma
Indirect
A problem elsewhere in the body causes widespread inflammation that eventually reaches the lungs
Sepsis — the infection is elsewhere; the systemic inflammatory response arrives at the lungs
4.2 Phase 1 — The Injury or Exudative Phase
There are three phases, and she says outright that the three phases are something to know. Learn each one by its timing and its defining process. The timelines vary from patient to patient, so hold them as ranges rather than as fixed days.
What happens, in her order:
Engorgement of the peribronchial and perivascular interstitial space produces interstitial edema.
Fluid crosses into the alveolar space. As the alveoli fill, V/Q mismatch and shunt both develop — the two mechanisms from 2.4 and 2.5, now occurring together.
The membrane damage is thought to come from stimulation of the inflammatory and immune systems, which draws neutrophils into the pulmonary interstitium.
The neutrophils release biochemical, humoral and cellular mediators, which increase pulmonary capillary permeability, destroy collagen, form pulmonary microemboli, and constrict the pulmonary arteries.
Respiratory rate rises and tidal volume falls. Cardiac output rises in response to the hypoxemia, as the body tries to push more blood through the lungs.
Eventually compensation fails: hypoventilation, falling cardiac output, and falling tissue oxygen perfusion.
4.3 Surfactant, Atelectasis, and the Hyaline Membrane
This is the chain that turns a leaky membrane into a stiff lung, and it is the highest-value mechanism in the unit because so many later facts hang off it.
Alveolar type I and type II cells make surfactant, which maintains alveolar stability and prevents alveolar collapse.
In ARDS those cells are damaged, so surfactant production falls and existing surfactant is inactivated — surfactant dysfunction.
Without surfactant the alveoli become unstable and collapse — atelectasis.
Widespread atelectasis decreases lung compliance — the lung will not expand and recoil the way it should — which compromises gas exchange and worsens the hypoxemia.
A hyaline membrane — made of necrotic cells, protein and fibrin — forms and thickens on the inside of the alveolus, further impairing gas exchange and compliance.
The patient must generate higher airway pressures to inflate the stiff lungs, so the work of breathing rises — and at that point mechanical ventilation is needed.
Her ARDS pathophysiology map. Follow the left branch: injury to the alveolar-capillary membrane → damaged type II alveolar cell → less surfactant → decreased compliance and recoil → atelectasis → hyaline membrane → impaired gas exchange → ARDS. The right branch is the inflammatory mediators: bronchoconstriction, vascular narrowing, pulmonary hypertension, and increased permeability leading to pulmonary edema.
4.4 Refractory Hypoxemia — the Hallmark
Refractory hypoxemia is the classic sign and the hallmark of ARDS: despite higher and higher oxygen concentrations, the patient’s condition may still get worse.
4.5 Phase 2 — The Proliferative Phase
The inflammatory response is still going.
There is damage to the pulmonary vasculature, and lung compliance continues to fall because of interstitial fibrosis.
Hypoxemia continues because of the thickened alveolar membrane — producing V/Q mismatch, diffusion limitation and shunting all at once.
The phase ends when dense, fibrous tissue replaces the diseased lung.
If this phase stops, the lesions often resolve. That is the good outcome.
The surface area available for gas exchange is reduced, so hypoxemia continues.
4.7 The Three Phases Side by Side
Phase
Timing
Defining process
1. Injury / exudative
Starts 24-72 hr after the insult; lasts 7-10 days
Interstitial then alveolar edema; V/Q mismatch and shunt; surfactant loss, atelectasis, hyaline membrane
2. Proliferative
Begins 1-2 weeks after injury
Inflammation continues; damage to the pulmonary vasculature; interstitial fibrosis keeps compliance falling. Ends when dense fibrous tissue replaces diseased lung. If it stops here, the lesions often resolve
3. Fibrotic
May start as early as 24 hr after injury
Lung remodeling — diffuse scarring, interstitial and alveolar duct fibrosis; reduced surface area, so hypoxemia continues. Not everyone enters it; poorer prognosis if they do
4.8 Clinical Progression and the Chest X-Ray
Her topics 12b and 12c — the physical exam findings and the symptoms. ARDS is dangerous partly because it starts quietly.
Stage
Findings
Early
Possibly no respiratory symptoms, or mild dyspnea, tachypnea, cough, restlessness. Lungs: fine, scattered crackles. ABG: mild hypoxemia and respiratory alkalosis. CXR: normal or diffusely scattered minimal infiltrates
Worsening
Respiratory distress becomes evident as work of breathing rises — tachypnea, intercostal and suprasternal retractions, tachycardia, mental status changes, cyanosis, pallor. Lungs: scattered to diffuse and coarse crackles
Established
Refractory hypoxemia. After 72 hours the CXR shows extensive bilateral interstitial and alveolar infiltrates
She also flags the long view: patients with ARDS may need several weeks of mechanical ventilation, which is why she raises advance directives here and tells you to talk with patients and families about their wishes before a crisis rather than during one.
4.9 The P/F Ratio
The PaO2/FiO2 ratio — the P/F ratio — evaluates the severity of hypoxemia. It is the patient’s PaO2 divided by the FiO2 they are receiving, with the FiO2 expressed as a decimal.
P/F ratio
Interpretation
>400
Normal
<300
Mild ARDS
<200
Moderate ARDS
<100
Severe ARDS
4.10 Complications of ARDS
Complication
Mechanism and management
VAP
The mechanical airway is open to bacteria, host defenses are impaired, and the patient can aspirate. Prolonged ventilation and invasive monitoring devices add to the risk. See 10.7
Barotrauma
Fragile alveoli are overdistended by excess pressure during mechanical ventilation and rupture, so alveolar air escapes. Minimized by small tidal volumes and appropriate PEEP
GI ulcers
Blood is diverted from the GI tract to the respiratory system to meet oxygen demand, so the protective mucosal layer thins. Prophylaxis with a PPI; early enteral nutrition helps prevent mucosal damage
Venous thromboembolism
Immobility and venous stasis. SCDs, prophylactic heparin or enoxaparin, early ambulation or passive range of motion if the patient cannot walk
Acute kidney injury
Decreased renal perfusion means decreased oxygen delivery to the kidneys. Monitor intake and output, daily weights, creatinine and GFR. May need CRRT
Abnormal lung function
Scarring can persist for years or for life. Post-ARDS: fatigue, chest pain, shortness of breath after minimal activity, persistent dyspnea
Psychological issues
For the patient and the family, after a frightening and prolonged critical illness
4.11 Nursing Management — the Seven Best Practices
The overall goal is a PaO2 of 60 mm Hg or higher and adequate lung ventilation to help with acid-base balance. Her slide then lists seven best practices, numbered, and the list is worth memorizing as a list.
Practice
What it is and why
Low tidal volume
4-8 mL/kg. Her reasoning: delivering a large volume into stiff lungs causes volutrauma or barotrauma and damages the alveoli. A stiff lung cannot accept a normal breath without being injured by it
Permissive hypercapnia
The PaCO2 slowly rising above normal limits as a consequence of delivering a lower than normal tidal volume — not a goal in itself. You accept the rising CO2 as the price of not injuring the lung
PEEP
Pressure applied at end expiration to splint collapsed alveoli open, which improves oxygenation and may let you lower the FiO2. ARDS patients often need higher levels — if the surfactant that normally holds alveoli open is gone, external pressure has to do that job instead (4.3). Full treatment in 9.14
Prone positioning
Turning the patient onto the stomach. Anterior alveoli stop being overdistended and posterior alveoli are recruited, so perfusion and ventilation match better. Used for refractory hypoxemia not responding to other strategies; up to 16 hours a day; needs at least 3 nurses plus the intensivist and respiratory therapist (chapter)
ECMO
Blood leaves the body, is oxygenated by the machine, and is returned — her description: the machine does the job of the lungs. The chapter adds that it needs large-bore vascular access and systemic anticoagulation, so bleeding risk is weighed first
UNIT 5
Noninvasive Ventilation
Covers: Respiratory Failure and ARDS deck slides 35-37; Lewis’s Ch. 28 pp. 556-558 for gap-fill.
5.1 What NIV Is and Who Gets It
Noninvasive ventilation uses a mask instead of an invasive endotracheal tube. It is for the patient who needs a high level of ventilatory support but whose condition is not bad enough to require mechanical ventilation. Her framing is that NIV is what you try before intubating — and that high-flow oxygen, which she names by the trade name Vapotherm, comes before even that. Least invasive first, at every step.
Her list
Useful for
COPD exacerbation and heart failure
Not a candidate
Acute MI or GI bleed; decreased level of consciousness
Requirements
Awake, alert, able to breathe spontaneously, and able to remove the mask themselves
Chapter’s fuller exclusions
Also high oxygen requirements, facial trauma, hemodynamic instability, excessive secretions
5.2 Mode 1 — CPAP
Continuous positive airway pressure provides one level of pressure continuously, through both inspiration and expiration.
Delivered through a tight-fitting mask. The familiar outpatient use is sleep apnea.
It increases the work of breathing, because the patient must forcibly exhale against the pressure.
Use with caution in patients with cardiac problems.
5.3 Mode 2 — BiPAP
Bilevel positive airway pressure provides two levels of positive pressure support — one for inhaling, a different one for exhaling.
IPAP — inspiratory positive airway pressure. The higher of the two, and the one that helps with CO2 removal.
EPAP — expiratory positive airway pressure. The lower level; it keeps the alveoli open at end expiration, the same job PEEP does on a ventilator.
The patient must be awake, alert and able to breathe spontaneously to use it.
5.4 CPAP versus BiPAP
CPAP
BiPAP
Pressure levels
One, continuous through inspiration and expiration
Two — IPAP on inspiration, EPAP on expiration
Helps oxygenation
Yes
Yes — via EPAP holding alveoli open
Helps ventilation / CO2 removal
No
Yes — via the higher IPAP
Best for
A patient who needs alveoli held open
A patient retaining CO2 — the COPD exacerbation
Watch out for
Increases work of breathing; caution with cardiac problems
Patient must be able to protect their airway
5.5 Nursing Management of the Patient on NIV
Her slide is a list of assessments; the reasons are hers, spoken. Read the right-hand column — it is what makes an unfamiliar NIV stem answerable.
Assessment / action
Why
Level of consciousness
A patient with a declining LOC cannot maintain their airway and needs intubation at that point
Hemodynamic stability
Tachycardia or hypotension means re-evaluate whether NIV is still appropriate
Work of breathing
Rising work of breathing means NIV is failing and invasive ventilation is coming
Skin at the nasal bridge
The tight mask presses there. Respiratory therapy often applies a silicone dressing or padding before the mask goes on
Mouth, nare and eye care
Air escaping around the mask seeps toward the eyes and dries the nose and mouth
Patient can remove the mask
Risk of vomiting and aspiration
Head of bed 30-45 degrees
Prevents aspiration and improves air movement
Suction at the bedside
She confirmed this as a correct action in her own in-class question
Her photograph of a patient on noninvasive ventilation. Look at where the mask seals — the nasal bridge and cheeks are the pressure points that need padding, and the straps must still be loose enough for the patient to pull the mask off themselves.
5.6 When NIV Is Not Enough
If the patient cannot tolerate noninvasive ventilation, or their respiratory status declines on it, they move to mechanical ventilation. Her topic 7c asks what to do when the patient is getting worse on NIV, so this section is an answer to a question she has already written down. BiPAP is the last step before intubation — when it stops working, the next step is the tube.
Her indications for mechanical ventilation, which close deck one and open deck two: acute respiratory failure; apnea; inability to breathe or to protect the airway; acute respiratory distress; severe hypoxemia and/or hypercapnia; respiratory muscle fatigue. A ventilator delivers oxygen to the lungs and supports the patient until they can breathe spontaneously again.
Her mechanical ventilation slide, closing deck one. The indications on the left are the ones listed above; the photograph is the destination when the ordered response in this section runs out of noninvasive steps.
UNIT 6
Chest Tubes
Covers: Ventilators, Chest Tubes & ABG deck slides 2-7; Lewis’s Ch. 28 pp. 549-556. Not taught in the in-person session — this comes from the assigned recorded lecture, which is where her only literal test callout lives.
6.1 Why a Chest Tube — the Pressure Physiology
Her slide gives one line of physiology. She gives the whole system, and the whole system is what makes every later chest tube rule reasonable rather than memorizable.
The pathology follows directly. If enough fluid or air accumulates in the pleural space, the normally negative pressure becomes positive, and the lung collapses. A chest tube drains the pleural space, re-establishes negative pressure, and lets the lung re-expand. Every rule in this unit is about protecting that negative pressure — which is why the emergencies in 6.9 all reduce to “do not let atmospheric air in.”
Her chest tube slide. Locate the pleural space between the visceral and parietal pleura, the tube entering over the top of a rib, and the two typical positions — anterior and high to remove air, low and posterior to drain fluid and blood.
6.2 Indications and Sizes
Her three indications for a chest tube are spoken and appear nowhere on the slide: pneumothorax, hemothorax, or pleural effusion. She opens the entire ventilator lecture with them, which makes them the first thing she thought students needed. Chest tube sizes run 12F to 40F, and the size chosen depends on what is being drained.
Size
Drains
Why
Large, 36F-40F
Blood
Her rule of thumb: blood is the thickest, so it needs the largest tube
Medium, 24F-36F
Fluid
Thinner than blood
Small, 12F-24F
Air
Air is the thinnest thing you can drain, so it needs the smallest tube
6.4 The Three Chambers
Chamber
What it does
Key detail
1. Collection
Fluid and air from the pleural space collect here
The fluid stays in this chamber; the expelled air vents onward to chamber 2
2. Water seal
Acts as a one-way valve. Air enters from the collection chamber and bubbles up through the water
Contains 2 cm of water. The water prevents air from traveling back into the patient
3. Suction control
Applies suction to the drainage unit
Two kinds: wet (water) and dry suction control
Her photograph of two real drainage units — A with wet suction control, B with dry. Identify each chamber and say what it does before reading the labels; that is the exercise she is pointing at when she says to know how they work. Note the air-leak monitor sitting beside the water seal on both units.
6.5 Suction Control — Wet and Dry
Both types connect to wall suction; the difference is how the amount of suction is regulated, and that difference is what generates the maintenance rules.
Wet (water) suction control
Dry suction control
How suction is set
By the height of a column of water in the third chamber
By turning a dial to the ordered amount; a visual alert shows the suction is working
Maintenance
Water must be added as it evaporates
No water; nothing to refill
If the unit tips over
Disrupted
Not disrupted
6.6 Bubbling and Tidaling
This is her topic 10a, the assessment section, and the content she repeats most often in the whole lecture. Four findings, and each has an action attached.
Finding
Normal?
What it means / what to do
Intermittent bubbling in the water seal — on exhalation, coughing, sneezing
Normal
Expected while there is still air in the pleural space. It stops as the leak resolves and the lung fully expands
Continuous bubbling
Not normal
An air leak. Check the tubing and connections — make sure nothing is disconnected and nothing is leaking anywhere
Tidaling — the water rising and falling with the patient’s breathing
Normal
Reflects intrapleural pressure changes with inspiration and expiration. It slows and stops as the lung re-expands — that is good news
Tidaling suddenly stops
Concerning
Assess the tube immediately for an occlusion
6.7 The Heimlich (Flutter) Valve
Not on her study guide — read it once for the mechanism and spend your time on 6.4 and 6.6. A Heimlich valve is a flutter valve attached to the external end of the chest tube, used to remove air from the pleural space in a small to moderate-sized pneumothorax. It replaces the whole three-chamber unit for the right patient, which is why she raises it under mobility: it is far more comfortable than carrying the large drainage unit, and patients can sometimes go home with one.
Her Heimlich flutter valve. A: the valve itself. B: in place at the external end of the chest tube, draining into a bag on the chest wall — note the vent opening on the bag, which is what keeps a tension pneumothorax from developing.
6.8 Nursing Management
Her topic 10c — assessment of the patient with a chest tube.
Action
Detail
Monitor vital signs after placement
Especially respiratory rate and rhythm
Watch the volume drained
If 1 to 1.5 L of fluid and/or blood is removed rapidly, expect re-expansion pulmonary edema or severe hypotension
Know what drainage to expect
Ask the provider. Report drainage >200 mL in the first hour
Assess for subcutaneous emphysema
Air leaking into the tissue around the insertion site — palpate for it routinely, not only when suspicious
Sterile technique for dressing changes
Prevents infection
Pulmonary hygiene
Coughing, deep breathing, incentive spirometry, range of motion exercises
Do not milk or strip the tube
See 6.9
The direction of the blood pressure change in rapid drainage is the physiologically correct one and worth holding: a large, sudden volume shift out of the thorax drops the pressure. The chapter’s thoracentesis rule reflects the same concern — remove no more than 1000 to 1200 mL at one time.
6.9 The Four Chest Tube Emergencies
These are the items most likely to be written as a “what do you do first” question, and two of them look alike on purpose.
Event
Priority action
Rationale
Tube disconnected from the drainage unit
Re-establish the water seal — immerse the exposed end of the tube in sterile water as a temporary seal
Without a seal, atmospheric air travels straight into the pleural space
Tube comes out of the patient
Cover the site immediately with an occlusive dressing, then notify the provider right away
Prevents more air entering through the open chest wall
Should you clamp?
No. Only briefly, to check for an air leak or change the unit, and only per hospital policy
Clamping traps air in the pleural space — tension pneumothorax
Milking or stripping
Do not. She defines it as pulling on the tube to move drainage along
May cause more problems and may cause an easy disconnection
UNIT 7
Oxygen Therapy & ABG Interpretation
Covers: Ventilators, Chest Tubes & ABG deck slides 8-12; Lewis’s Ch. 28 pp. 542-549 for gap-fill.
7.1 Oxygen Therapy — Goals and Orders
Oxygen is the most common therapy for hypoxemia and hypoxia, and it requires a provider order.
The dose of oxygen administered is the FiO2 — the fraction of inspired oxygen.
Goal for most patients: SaO2 >92% or PaO2 >60 mm Hg.
Patients with COPD may be acceptable at SpO2 >88%.
These are the same targets she taught with the mechanism in 3.10. Seeing them a second time in a different lecture is itself the signal — the numbers appear in both decks, and that is unusual for this module.
7.2 Low-Flow versus High-Flow Systems
Low-flow
High-flow
Patient
Alert, awake, breathing spontaneously
The same, but with higher oxygen requirements
Concentration
Does not meet all of the patient’s inspiratory demand, so the delivered FiO2 is unknown
Delivers a fixed concentration independent of the patient’s rate or pattern; meets or exceeds inspiratory demand
Her examples
Nasal cannula, simple mask, non-rebreather mask
High-flow nasal cannula (she notes the trade name Vapotherm), Venturi mask
7.3 Complications of Oxygen Therapy
Complication
Detail
Oxygen toxicity
FiO2 >60% for >24 hours in a mechanically ventilated patient. Signs: blurred vision, coughing, chest pain, dyspnea, seizures. Give the lowest FiO2 that maintains an acceptable SpO2 and PaO2, monitor ABGs, taper when possible
Combustion
Smoking is prohibited in any area where oxygen is in use. A patient smoking on oxygen risks burns and airway injury
CO2 narcosis
The danger of giving a COPD retainer too much oxygen — see 3.10
Infection
Related to the device and how often it is cleaned or changed
Absorption atelectasis
See 3.9 — oxygen replaces the nitrogen holding the alveolus open, then is absorbed, and the alveolus collapses
She gives the mechanism of oxygen toxicity beyond the slide: it is due to oxygen free radicals that damage the alveolar-capillary membrane, which causes pulmonary edema and hypoxemia. Her symptom list is reproduced almost word-for-word on her posted study guide — when an instructor’s study guide and her slide carry the same five words, learn those words.
7.4 ABG Normal Values
Value
Normal range
What it tells you
pH
7.35 — 7.45
Acidotic or alkalotic. Always the first thing you look at
PaCO2
35 — 45 mm Hg
The respiratory value. Her memory hook: CO2 is what we breathe out through the lungs, so CO2 is lungs
HCO3
22 — 26 mEq/L
The metabolic value. Bicarbonate is a base, retained or excreted by the kidneys
PaO2
80 — 100 mm Hg
Oxygenation. Not part of the acid-base determination, but read it
7.5 The Method — Four Steps
Her interpretation procedure, in her order. Work every gas the same way and the hard ones stop being hard.
Steps 2 and 3 are really one question: which value matches the direction of the pH? Whichever one agrees with the pH is the cause; the other one, if it has moved, is the compensation.
7.6 ROME
How pH and the value relate
Example
Respiratory is Opposite
pH and PaCO2 move in opposite directions
pH low + PaCO2 high = respiratory acidosis
Metabolic is Equal
pH and HCO3 move in the same direction
pH low + HCO3 low = metabolic acidosis
7.7 Compensation
Her decision rule, stated as a procedure and present on no slide:
State
How you recognize it
Uncompensated
The other value — the one not causing the problem — is normal. The body has not started compensating
Partially compensated
Nothing is normal. The pH is still abnormal, and the other value has moved abnormal in the opposite direction, trying to correct it
Fully compensated
The pH is back within range, while both the PaCO2 and the HCO3 are abnormal
7.8 Worked Example 1
Her first example, solved aloud in full. The slide shows the three numbers and no answer — the whole solution is hers.
Step 1 — pH. 7.29 is below 7.35 → acidotic.
Step 2 — PaCO2. 47 is above 45, and a high CO2 is acidotic. pH low, CO2 high — opposite, so by ROME this is respiratory.
Step 3 — HCO3. 24 is inside 22-26. The bicarbonate has not moved.
Step 4 — compensation. Because the bicarbonate is normal, the body has not begun compensating.
7.9 Worked Example 2
Step 1 — pH. 7.31 is below 7.35 → acidotic.
Step 2 — PaCO2. 49 is above 45 → also acidotic. pH and CO2 opposite → respiratory acidosis.
Step 3 — HCO3. 30 is above 26 — more alkaline than normal. Her interpretation: the base is rising to offset the acid, so the body is trying to compensate.
Step 4 — compensation. The pH is still abnormal and the bicarbonate has moved abnormal in the opposite direction. Nothing here is normal.
Her ABG reference slide, carrying both worked examples on the left and the ROME chart on the right, with the three normal ranges boxed at the top. She calls this chart a good cheat sheet and tells students to use it. Cover the numbers and re-derive both answers before the exam.
7.10 The Four Patterns, Assembled
Everything above collapses into one table. Build it once from her method and it covers any uncompensated gas.
Hyperventilation — anxiety, pain, early ARDS, overbreathing on AC mode
Metabolic acidosis
↓
normal
↓
Lactic acid from severe hypoxia; DKA; renal failure
Metabolic alkalosis
↑
normal
↑
Vomiting, gastric suction, excess bicarbonate
7.11 Oxygen Therapy — Patient Education
Her topic 20 asks for patient education under oxygen therapy. She never taught a home-oxygen block, so this is the in-hospital teaching that follows from what she did teach — the safety and comfort points that attach to the complications in 7.3.
Teach
Because
No smoking, no open flame in the room, and tell visitors
Oxygen supports combustion. This is the one item on her own complications slide that is purely patient teaching
Do not change your own flow rate
The FiO2 is a provider order titrated to ABGs and saturation — and in a COPD retainer, turning it up is the specific harm (3.10)
Report a dry or sore nose, or a dry mouth
Humidification can be added; drying is the most common comfort complaint and the reason patients remove the cannula
Keep the cannula in place even when breathing feels fine
Saturation falls before symptoms return. Her general framing — watch the trend, not the moment
Report new confusion, headache, or drowsiness — to the patient’s family too
These are the CO2 retention signs from 3.3, and the family often notices them first. Her own example is a patient brought in altered because of it
Skin checks where the device sits
Behind the ears and at the nares for a cannula; at the nasal bridge for a mask (5.5)
UNIT 8
Artificial Airways & Rapid Sequence Intubation
Covers: Ventilators, Chest Tubes & ABG deck slides 13-19; Lewis’s Ch. 28 pp. 546-549, 558-561 for gap-fill.
8.1 Nasopharyngeal Airway (NPA)
Can be placed in a conscious or unconscious patient.
Measuring length: hold the NPA to the side of the patient’s face and choose the one that measures correctly from the tip of the nose to the tip of the ear.
Diameter: choose a tube slightly smaller than the patient’s nostril.
Choose the nostril with the best airflow.
Lubricate and insert gently while rotating the tube toward the patient’s ear. Stop if you encounter obstruction or difficulty.
Her nasopharyngeal airway slide. Above, the parts — flange, cannula, bevel. Below, the tube in place: it follows the floor of the nose and its tip sits in the pharynx behind the tongue, which is why the nose-to-ear measurement gets the length right.
8.2 Oropharyngeal Airway (OPA)
A smaller, shorter tube of firm, hard plastic.
Do not insert in a conscious patient — it induces vomiting.
Measuring length: hold it against the side of the face and measure from the corner of the mouth to the angle of the jaw or the earlobe.
Insertion: lubricate, insert with the bevel pointed toward the roof of the mouth, and as the flange reaches the lips, rotate the OPA 90 degrees so its curve fits the natural curve of the upper airway. The flange should sit comfortably against the lips.
Purpose: keep the tongue from occluding the airway.
Her oropharyngeal airway slide. A and B show the flange, body, channel and tip; C shows the tube seated over the tongue with the flange at the lips. The 90-degree rotation on insertion is the step most often asked about.
8.3 NPA versus OPA
NPA
OPA
Material
Soft, flexible, rubbery
Firm, hard plastic; smaller and shorter
Level of consciousness
Conscious or unconscious
Unconscious only — induces vomiting in a conscious patient
Measured
Tip of the nose to tip of the ear
Corner of the mouth to the angle of the jaw or earlobe
Insertion
Lubricate, rotate toward the ear; stop at resistance
Lubricate, bevel to the roof of the mouth, rotate 90 degrees at the lips
Extra use
Route for frequent suctioning
Keeps the tongue from occluding the airway
8.4 The Endotracheal (ET) Tube
A long, flexible plastic tube that secures the airway when a patient needs mechanical ventilation. Intubation is the process of securing the airway with an oral or nasal ET tube, and the tube passes through the mouth and through the vocal cords. The most common sizes are 7F and 8F, referring to the internal diameter — typically 7F for females and 8F for males (chapter).
Part
Function
Adaptor / connector
Attaches the tube to a bag-valve mask or the ventilator — a 15-mm connector
Cuff
Inflated after placement. Holds the tube in place and prevents secretions from dripping down past it
Pilot balloon
Tells you whether the cuff is inflated; the inflation valve is here
Markings along the tube
Used to gauge and record how far the tube is inserted — this is what you chart at the lip or teeth
Her labelled endotracheal tube: 15-mm connector, cuff inflation line, pilot balloon, spring-loaded inflation valve, and the cuff itself at the distal end. The depth markings along the shaft are what you record at the lip or teeth every shift.
8.5 The Nasotracheal (NT) Tube and the GlideScope
Used when oral intubation is not possible — her slide’s examples are unstable cervical spine injury, dental abscess and epiglottitis, and she adds limited neck mobility.
Slightly longer than an ET tube.
Inserted through the nostril and placed blindly, without seeing the larynx.
Attaches to the ventilator via an adaptor at the end of the tube.
Her nasotracheal tube photograph. Compare its length and curve with the ET tube above — the extra length is what lets it reach the trachea from the nostril.
8.6 Tracheostomy — Introduction
She introduces the tracheostomy briefly here and defers the detail to the end of the lecture (Unit 10). At this point: a small plastic tube consisting of a flange, pilot balloon, balloon inflation port and a cuff, placed into the trachea through a surgical incision on the anterior surface of the neck, and able to be inserted urgently when other methods are not possible.
Her labelled tracheostomy tube: tie strings, flange, outer cannula, cuff, inflation tube and pilot balloon with its one-way valve, the hollow inner cannula, the obturator with its rounded tip, and the 15-mm adapter. The inner cannula is the part you remove and clean; the obturator is the guide used to insert the tube and is removed once it is in.
She explains the two cannulas, which the slide assumes you know: there is one cannula sitting in the tracheostomy site and another cannula on the inside that you can remove, clean and put back. That inner cannula is the object of most trach care (10.14).
8.7 Rapid Sequence Intubation
Her topic 15. RSI is the rapid, concurrent administration of both a sedative and a paralytic during emergency airway management, to induce unconsciousness for intubation. Its purpose is to decrease injury and aspiration risk.
Drug class
Her examples
Purpose
Sedative
propofol, etomidate
Induces unconsciousness
Rapid-onset opioid
fentanyl
Blunts the pain of the procedure
Paralytic
rocuronium
Produces skeletal muscle paralysis so the cords can be passed
Her airway anatomy slide from the RSI section. Trace the path the tube takes — past the larynx and vocal cords, down the trachea — and find the carina where the primary bronchi branch. The tube tip must sit 2 to 3 cm above that point.
Immediately after the tube is placed: inflate the cuff, and continue to manually ventilate the patient with a bag-valve mask and 100% oxygen while placement is being confirmed.
Timing rules from the chapter, which her slides omit: preoxygenate with a BVM and 100% oxygen for at least 2 minutes before starting, and limit each intubation attempt to under 30 seconds, ventilating between attempts. RSI is not indicated in cardiac arrest or with a known difficult airway.
8.8 Confirming Placement
Her topics 16a and 16b, given as a confirmation sequence in her order. The list is short enough to memorize whole — and the exam version of this question usually asks which finding confirms placement versus which merely suggests it.
8.9 Immediately After Intubation
Action
Detail
Monitor during the procedure
Vital signs, mean arterial pressure (MAP), visible chest movement. Inform the team if the SpO2 falls below 92%
Connect
ET tube to the ventilator and to a closed suctioning system
Assess
The need to suction the ET tube and the pharynx
Bite block
Prevents the patient biting the tube and blocking oxygen delivery
Mark and record
The position of the tube at the lip or teeth. For an NT tube, mark where it exits the nare. The chapter’s example of the record: 21 cm at the teeth, 23 cm at the lips
ABG
Obtain one — it guides changes to the ventilator settings
Continuous pulse oximetry
Information about oxygenation
EtCO2 monitoring
Information about ventilation
UNIT 9
Ventilator Settings & Modes
Covers: Ventilators, Chest Tubes & ABG deck slides 20-29; Lewis’s Ch. 28 pp. 561-567. Section 9.3, ventilator alarms, is deliberately omitted — see the front matter.
9.1 The Ventilator Settings
Her two settings slides, combined. Learn the definition and the typical value together — a question can give you either one and ask for the other. One notation point she makes: tidal volume is usually written with a capital V and a lowercase subscript t, and she notes she could not format it that way on the slide, so expect to see it as VT.
Setting
What it is
Typical value
Respiratory rate
Breaths the ventilator delivers per minute
12-20 /min
Tidal volume (VT)
Volume of gas delivered during each ventilator breath
4-8 mL/kg
FiO2
Fraction of inspired oxygen. Adjusted to keep PaO2 >60 or SpO2 >92%
30% — 100%
PEEP
Positive pressure applied at the end of expiration
5 cm H2O
Pressure support
Positive pressure augmenting the patient’s own inspiratory effort
5-10 cm H2O
Sensitivity
The effort the patient must generate to trigger a breath
Set by provider or RT
Peak inspiratory pressure (PIP)
The maximum pressure the ventilator may generate to deliver the tidal volume
30 cm H2O
Inspiratory flow rate and time
The speed at which the tidal volume is delivered
40-80 L/min; 0.8-1.2 sec
I:E ratio
Duration of inspiration to duration of expiration
1:2 — exhalation twice as long
9.2 Peak Inspiratory Pressure and the Overflow Mechanism
PIP is a ceiling, not a target. The ventilator will build pressure to deliver the breath, but it is not permitted to exceed the PIP you set. Her reason for setting one at all: so the ventilator cannot over-pressurize the patient, which would cause volutrauma — damage to the alveoli.
9.4 The Mode Framework
A ventilator mode is the way the ventilator delivers effective ventilation, and it is chosen based on how much work of breathing the patient can perform. Her definition of work of breathing in this context: the inspiratory effort needed to overcome the elasticity and viscosity of the lungs, plus airway resistance. She translates that into plain language — if the lungs are stiffer, the work of breathing is harder, because the patient has to push against a harder pressure.
Level of support
Who does the work
Settings
Full
The ventilator does most of the work of breathing
A set rate, set VT, and a PIP limit
Partial
Shared — the patient takes on more responsibility
A set rate or VT, but the patient adds their own breaths
Spontaneous
The intubated or tracheostomy patient assumes responsibility for almost all breathing
Usually used before extubation
9.5 Which Modes Matter
9.6 Assist-Control (AC)
Also called volume control. A full support mode.
A preset tidal volume is delivered at a preset respiratory rate — the patient will always get that preset rate no matter what.
When the patient takes a spontaneous breath, the ventilator senses the change in airflow in the circuit and delivers the full preset tidal volume for that breath too.
Used in postoperative patients, patients with neuromuscular disorders, and acute respiratory failure — and, her addition, just after CPR, or for someone in bad respiratory failure who cannot do any of the breathing on their own.
Both the patient and the ventilator do the work of breathing — a partial support mode.
Delivers a preset tidal volume at a preset respiratory rate, in synchrony with the patient’s own spontaneous breathing.
In between the ventilator-delivered breaths, the patient breathes spontaneously and achieves whatever tidal volume they can achieve.
Used when the patient’s condition is too good for a full support mode, but they are not ready for a spontaneous mode.
Benefits: improved patient-ventilator synchrony, lower mean airway pressures, and prevention of respiratory muscle atrophy as the patient takes on more of the work.
9.8 AC versus SIMV — the Discriminator
Assist-Control (AC)
SIMV
Level of support
Full
Partial
Set rate delivered?
Yes — always, no matter what
Yes — synchronized with the patient’s own efforts
Patient’s own extra breaths
Receive the full preset tidal volume
Receive whatever volume the patient can generate
Main risk
Hyperventilation → respiratory alkalosis
Muscle fatigue from increased work of breathing
Typical patient
Just intubated, post-CPR, post-op, severe ARF — cannot do the work
Improving, doing some of the work; a weaning mode
9.9 Pressure-Control (PC) Ventilation
A full support mode that provides a pressure-limited breath.
There is a set respiratory rate and a set peak inspiratory pressure.
When the patient breathes, the ventilator delivers a volume of gas up to the PIP limit. The limit is never exceeded, and there is NO set tidal volume.
Useful for patients with decreased lung compliance and increased resistance — stiff lungs, which is the ARDS patient.
Gives control over the amount of pressure going into the lungs, which decreases the risk of volutrauma and barotrauma.
Usually used for a trial before extubation.
9.10 Pressure-Regulated Volume Control (PRVC)
A full support mode that combines features of both volume and pressure delivery.
The ventilator attempts to deliver the targeted tidal volume with the least amount of pressure.
It constantly analyzes each breath — resistance and compliance of the lungs, the exhaled tidal volume, and the PIP — and adjusts the delivery of each breath based on that feedback.
9.11 Pressure Support Ventilation (PSV)
A spontaneous mode. Positive pressure is applied to the airway on inspiration only.
The patient must be able to initiate their own breath, and determines their own inspiratory length, tidal volume and respiratory rate.
The preset positive airway pressure is set so the inspiratory flow rate of gas exceeds the patient’s own; the ventilator supplies a rapid flow at the start of the breath and then tapers it toward the end of inhalation.
Purpose: to facilitate weaning. Benefits: patient comfort, decreased work of breathing, decreased oxygen consumption.
9.12 CPAP as a Ventilator Mode
A spontaneous mode in which the ventilated patient controls almost all aspects of the breath.
Not the same as the noninvasive CPAP of Unit 5 — this is a mode on a ventilator, delivered through an artificial airway.
Only FiO2 and PEEP are set. One level of pressure during both inspiration and expiration; the patient determines their own respiratory rate and tidal volume.
Used to assess the patient’s rate and rhythm, work of breathing, and hemodynamic status after a period of intubation.
Usually used for only about 30 to 120 minutes — the patient may be extubated after it.
9.13 All Six Modes at Once
Mode
Support
What is set
What varies
AC (volume control)
Full
Rate, VT, PEEP
Pressure. Every breath — set or patient-initiated — gets the full VT
PC
Full
Rate, PIP, PEEP
Volume. PIP is never exceeded; no set VT
PRVC
Full
Rate, VT target, PIP limit, PEEP
Adjusts breath by breath to hit the VT at the lowest pressure
SIMV
Partial
Rate, VT, PEEP
Mandatory breaths get the set VT; the patient’s own breaths get whatever they can generate
PSV
Spontaneous
Inspiratory pressure, PEEP, sensitivity
Patient sets rate, VT and inspiratory time. No backup rate
CPAP
Spontaneous
FiO2 and PEEP only
Everything else. No set rate, VT or PIP
9.14 Positive End-Expiratory Pressure (PEEP)
Positive pressure applied to the airway during exhalation.
PEEP increases oxygenation by splinting open previously collapsed alveoli and preventing alveolar collapse throughout the respiratory cycle, which increases the opportunity for O2 and CO2 to diffuse across the alveolar-capillary membrane.
Used in all patients who are mechanically ventilated.
Optimal PEEP is PEEP titrated so oxygenation improves without compromising hemodynamics. FiO2 can usually be reduced when PEEP is used.
Classic indication: ARDS. It is also the treatment for a shunt (2.5).
Use with caution in: traumatic brain injury, increased ICP, low cardiac output, and hypovolemia.
UNIT 10
The Ventilated Patient — Nursing Management, Weaning & Tracheostomy
Covers: Ventilators, Chest Tubes & ABG deck slides 30-40; Lewis’s Ch. 28 pp. 567-575 for gap-fill.
10.1 Maintaining Correct Tube Placement
Her four nursing responsibilities for the artificial airway: maintain correct tube placement, maintain proper cuff inflation, maintain tube patency, and maintain alarm systems. The first one is where the emergencies live. How you confirm placement is still correct: observe for symmetric chest wall movement, auscultate and confirm bilateral breath sounds, and compare the recorded position at the lip or teeth against the last shift’s.
10.2 Maintaining Proper Cuff Inflation
Maintain cuff pressure at 20 to 30 cm H2O.
Measure and record cuff pressure routinely — she says usually every shift, or according to hospital policy.
Her deflated (A) versus inflated (B) cuff, shown against the tracheal wall. Deflated, secretions pass freely down past the tube. Over-inflated, the cuff presses on the tracheal wall and shuts off capillary blood flow. The 20-30 cm H2O window is the space between those two failures.
10.3 Maintaining Tube Patency — Suctioning
Step
Detail and rationale
Hand hygiene and sterile gloves
She adds this before the slide’s first step
Connect suction tubing
To the end of the in-line suction catheter
Hyperoxygenate
100% FiO2 before starting, via the 100% button on the ventilator. If you raise the FiO2 manually, remember to return it to baseline afterward
Insert the catheter
Gently but quickly, pausing to pull back on the plastic sleeve containing the catheter
Stop when the patient coughs more forcefully
A cough means the catheter is deep enough
Do NOT insert until you meet resistance
Resistance means you are hitting the carina — fragile, vascular tissue (8.8)
Apply suction on withdrawal only
Continuous suction while withdrawing, over 10 seconds. Never on the way in. The chapter adds a pressure limit of no greater than 120 mm Hg
Observe tolerance
Her definition: make sure they are not turning blue and not coughing excessively
Oral cavity last
Disconnect the suction tubing, connect the Yankauer, and gently suction the mouth
Her suctioning equipment slide. Left: the closed, in-line suction catheter inside its protective sleeve — the sleeve is what you pull back on as the catheter advances, and the reason the circuit is never opened. Right: the connecting tubing and the rigid Yankauer used last, for the mouth.
10.4 Oral Care, Skin Integrity, and Nutrition
Area
Content
Oral care
Moisten lips, tongue and gums with saline or water swabs to prevent mucosal drying. At least 3 times a day. Helps prevent VAP
Skin integrity
Her concrete version: ventilated patients have straps on the cheeks holding the tube in place — check for breakdown around those, and anywhere the tube sits on the lip
Nutrition
Her topic 9f. Nutrition problems cause poor oxygen transport from anemia, delay weaning, decrease resistance to infection, and slow extubation and recovery
Her nutrition slide, with an enteral feeding pump and bag. The oral care numbers are on the left — saline or water swabs, at least three times a day — and the whole right-hand argument is that early enteral feeding is what keeps the respiratory muscles and the gut mucosa intact.
10.6 Complications of Mechanical Ventilation
Her topic 9e. Several of these have already appeared in other units, which is the point — this slide is a synthesis, and it is worth reading as one.
Complication
Mechanism
VAP
See 10.7
Aspiration
The tube holds the epiglottis open and secretions collect above the cuff. Head-of-bed elevation and cuff pressure are the defenses
Barotrauma
Increased airway pressure distends and ruptures fragile alveoli. Greatest risk in stiff, noncompliant lungs — ARDS
Volutrauma
Too large a volume delivered into noncompliant lungs; alveolar rupture and movement of fluid and protein into the alveoli
Adverse hemodynamic effects
Increased intrathoracic pressure compresses the thoracic vessels, decreasing venous return, preload and cardiac output — the same mechanism as the PEEP cautions in 9.14
Sodium and water imbalance
Decreased cardiac output → decreased renal perfusion → renin, angiotensin, aldosterone → sodium and water retention, appearing 48 to 72 hours after starting positive pressure ventilation (chapter)
Blood diverted from the gut; prophylaxis with a PPI, plus early enteral feeding
VTE
Immobility. SCDs plus subcutaneous heparin or enoxaparin if not contraindicated; early mobility with physical and occupational therapy
Constipation
Her reason, which the slide omits: they are not going to be very mobile
Pressure injuries
Turn every 2 hours, position pillows, and elevate the heels. Hospitals track these closely because they are preventable
Ventilator disconnection
Most disconnections are caught by the low-pressure alarm
Unplanned extubation
See 10.8
10.7 Ventilator-Associated Pneumonia
Her topic 18. The prevention list doubles as the ventilator bundle, and every item on it is a nursing action.
10.8 Unplanned Extubation
10.9 Weaning Readiness
Her topic 9d. Weaning is the process of gradually reducing ventilator support so the patient assumes greater responsibility for breathing. A formal readiness assessment is done first.
10.10 The Spontaneous Breathing Trial
There is no SBT slide anywhere in the deck. She teaches the whole topic off-deck, immediately after the weaning slide — the second complete topic she stops to add in one lecture, which is worth noticing on its own.
Element
Her detail
How often
Daily, for patients on ventilators, if they can tolerate it
What you stop
All sedatives and opioids — but only in patients who are not in pain. If they are in pain, do not stop it
Get them ready for weaning, and do not restart the sedatives if they are doing well without them
10.11 Tracheostomy — Indications and Advantages
Advantages over an ET tube: more comfortable for the patient, easier to keep the tube clean, and less long-term risk to the vocal cords.
Cuffed — especially for patients on mechanical ventilation. The cuff seals the airway so the delivered volume reaches the lungs and secretions do not descend.
Uncuffed — for patients who need a better airway but are not going to be mechanically ventilated.
Post-procedure care: inflate the cuff immediately, confirm correct placement, and monitor vital signs. Her complications list: airway obstruction, bleeding, infection, and potential tube dislodgement.
10.12 Nursing Management of the Tracheostomy
Her topic 19a. Where her spoken version is looser than the slide, use the slide’s number — the three timing rules below are the ones to carry.
Action
Frequency / detail
Assess and confirm patency
Every shift, or more often as needed
Observe the site
For redness, inflammation, edema, ulceration — she adds that these may indicate infection
Sterile dressing changes
Every 12 to 24 hours
Measure cuff inflation pressure
With a cuff manometer at least every 8 hours. Not above 20-30 cm H2O
Suction
As needed. Avoid suctioning a newly created tracheostomy for the first few hours
Humidification
Keeps secretions thin and prevents mucus plugs — and she explains why plugs matter, which the slide does not: a plug blocks the airway, causing coughing and difficulty breathing
Inner cannula
Change or clean it (10.14)
Turning and repositioning
Be careful — accidental decannulation can occur
Her tracheostomy care slide. A and B: securing the ties at the flange. C: the split gauze dressing under the flange with the ties around the neck. D: the finished dressing on a patient. Two fingers should fit between the ties and the skin.
10.13 Accidental Decannulation
10.14 Stoma and Inner Cannula Care
Her procedure, which is the last content slide of the module:
Open sterile equipment. Pour sterile water or normal saline into 2 compartments of a sterile container or 2 basins, then apply sterile gloves.
If present, unlock and remove the inner cannula. Many tracheostomy tubes have none — care for those is every step except this one.
Disposable inner cannula: replace it with a new one.
Non-disposable: immerse in sterile solution and clean inside and outside with a tube brush or pipe cleaners; rinse in sterile solution; remove and shake to dry; insert into the outer cannula with the curved part downward and lock in place. Her addition, not on the slide: dry it really well before reinserting it.
Stoma care: remove dried secretions with a 4 x 4-inch gauze pad soaked in sterile water or saline, gently pat dry, and clean under the tracheostomy flange using cotton swabs.
Cram Sheet
The highest-yield facts in the module, one line each, in unit order. Use it the night before as a self-test: cover the right column.